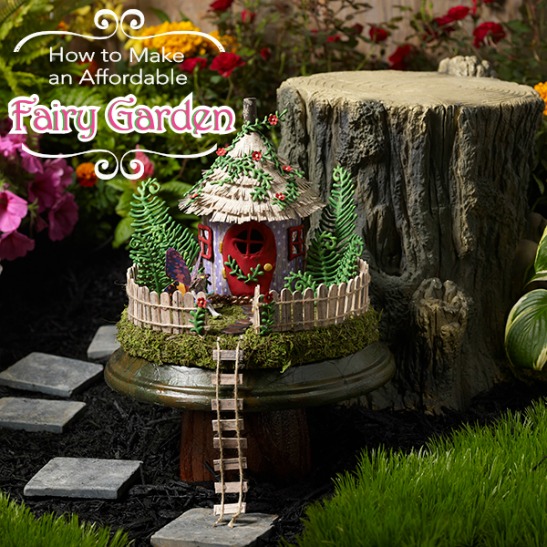
Finally, a good reason to go outdoors. Fun and fanciful, these scaled-down domiciles are perfect for adding a wee dash of whimsy to your garden landscapes. But while these diminutive digs might be small in stature, they can make a huge impact on your wallet. Thankfully, with a little, time, ingenuity, and the blessings of your fairy tenants, you can craft your way to an exquisite and affordable fairy garden masterpiece.
What we love most about fairy gardens, other than their adorably small size, is that imagination is the name of the game when it comes to their construction. Whether you're buying a fairy garden pre-fab, or making one from scratch, it can be easy to become overwhelmed by the massive amount of fairy garden options and accessories. And sometimes, those massive options can mean massive cost.
So, what better way to put that Mod Melter to use than with this super-cute, super-affordable fairy house pedestal? If you can believe it, the door, windows, greenery and more are made out of a Mod Melts and painted with FolkArt! We even provide a free template to help jumpstart that house! Skip those often expensive fairy garden accessories, and make your own.
Assemble those craft goodies and let's get started.
Supplies:- FolkArt®
Multi-Surface Acrylic Paint: 2901 Apple Red, 2907 Bark Brown, 2910 Yellow Ochre, 2917 Classic Green, 2929 Lavender, 2942 Fresh Foliage, 2957 Pure Black
- FolkArt® Metallics: 664 Copper
- Mod Podge Gloss, 8 oz.
- Mod Podge Ultra Matte Chalk Finish, 8 oz.
- Mod Podge 7 Piece Tool Kit
- Mod Podge Mod Melter
- Mod Podge Silicone Craft Mat
- Mod Podge Melts - Clear Sea Glass
- Mod Podge Melts - White Milk Glass
- Paper towels, Foam plates, Water basin
Other Supplies- Downloadable art "Mod Melt Fairy House Tracing"
- Wooden birdhouse (perch removed)
- 30 small craft sticks
- Pack of 6 wooden spokes (1 ¼" length)
- 2" wood dowels
- 2.5 yards of jute
- Decorative paper in designs of (2) burlap; (3) barn wood; floral; solid black
- 1 Sheet of brown and green tissue papers
- Tiny paper flower blossoms
- Small tree stick for chimney
- Moss sheet 12" round
- Styrofoam 9" round
- Floral wire
- 11" diameter terracotta pot dish
- 8" diameter terracotta pot
- Decorative resin fairy
- Craft knife
- Scissors
- Ruler
- Water basin
- Paper towels
Instructions
Mod Melt Decorative Pieces
-
Print the downloadable art Fairy House Icons.
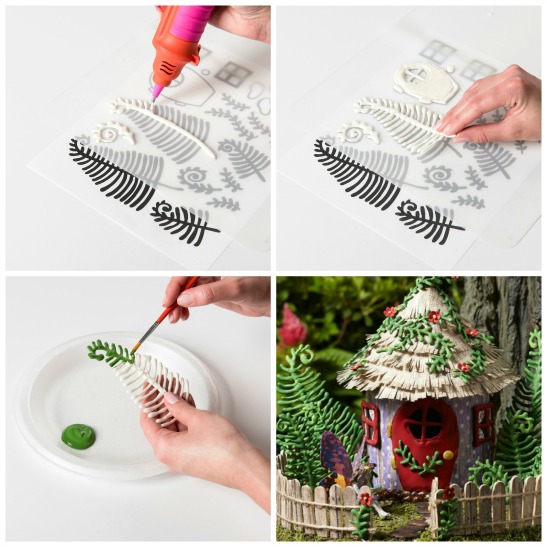
Place the art underneath the Silicone Craft Mat. Using the Mod Melter
with Milk Glass White, trace the designs with glue. Let dry and peel off
the mat. For the door, fill in the entire shape with the Mod Melt.
Repeat the designs if you desire.
-
Mod Melt a thin dowel on the backs of the Ferns with 1" hanging off
the bottom. You will use these to stick into your Styrofoam base.
-
Paint all of the items with several coats of acrylic paint. Let dry.
Fairy House
-
For the thatch roof, cut the burlap patterned decorative paper in
slightly curved strips 1 ½"W x 3 ½"L. Fringe one side of each piece with
scissors. Ultra Matte glue each strip to the roof - one row of strips
slightly overlapping the next. Mod Melt a small tree stick to the roof
for a chimney.
-
Paint the bottom edge of the house in Bark Brown. Let dry. Create
"stones" by Mod Melting a Milk Glass White pattern directly on the
painted base. Let dry. Paint stones in Copper.
-
Cut a piece of barn wood decorative paper to fit the house body. Cut
out the circle opening. Ultra Matte, glue the paper in place.
-
Cut black paper and paper floral curtains for each window. Ultra Matte
glue the papers together. Mod Melt the papers to the back of the
windows in Sea Glass Clear.
-
Mod Melt the door, knob, windows, vines and flowers in place in Sea Glass Clear.
Mushrooms
-
Paint the wooden spokes Titanium White with Apple Red tops. Let dry. Paint small red dots in white. Let dry.
Barn Wood Fence and Ladder
-
Cover the craft sticks with a barn wood pattern paper on both sides with Ultra Matte. Let dry then trim.
-
Cut the sticks 1 ½" long from each end using scissors. These will make
up the fence planks. The left over straight pieces will be used for the
ladder.
-
Align the fence planks along a ruler. Space each plank slightly apart.
Lay a long piece of jute across the top of the planks ¼" from the curve
edge. Repeat along the bottom of the planks. Mod Melt in place with Sea
Glass Clear. Let dry. Flip the fence over and repeat.
-
Mod Melt thin dowels every 4" of fencing with 1" hanging off bottom of the fence to stick into the Styrofoam base.
-
To create an 8" L ladder, Mod Melt the straight barnwood planks every ½" down two pieces of jute.
Pedestal
-
Flip the terra cotta pot over and cover with brown tissue paper using
Mod Podge Gloss. Wrinkles help with achieving a tree trunk effect. Let
dry.
-
Flip the terra cotta dish over on the pot. Cover with torn green
tissue paper pieces using Mod Podge Gloss. Let dry then Mod Melt the
dish to the pot.
-
Cover the round Styrofoam circle with moss sheeting by pinning with cut floral wire bent into "u" shapes.
-
Mod Melt the moss covered circle to the top of the dish.
Assembly
-
Mod Melt your Fairy House and stepping stones in place.
-
Attach the fence by sticking the dowels into the moss base. Cut an
opening in the fence where the stepping stones meet the fence. Mod Melt
the base of the fence in places to help stabilize.
-
Mod Melt two pieces of vines with flowers to the outside of the fence entrance.
-
Attach the ferns by sticking the dowels into the moss base. Stick the mushrooms into the base.
-
Mod Melt the fairy in place and the rest of your paper flowers.
-
Hang the ladder by pinning into the moss base at the fence opening.
While there may be more than a few steps involved in crafting this quaint little fairy house, we think they're well worth it. The best part of crafting this tiny tableau is that it comes with all the charm of an elaborate fairy garden vignette, but at a fraction of the cost. And we're sure our fairy friends can see the benefit in frugal crafting. Both your purse, and potential pint-sized residents, will thank you.
Follow us on Pinterest for more magical inspiration and tag your creations #plaidcrafts to share with us!