Email Signup

Subscribe to the Plaid Crafts Newsletter for craft project ideas, product news, our live events, and more!

Upcycle Your Glassware! Save 25%

Save 25% on orders $60+ and get free U.S. ground shipping! Explore the NEW! FolkArt Murano Glass Paint! This promotion cannot be combined with other promos. See shipping details.

Use Code

Sale Ends 3/23/24

Apple Barrel Painted Storage Cube and Decor

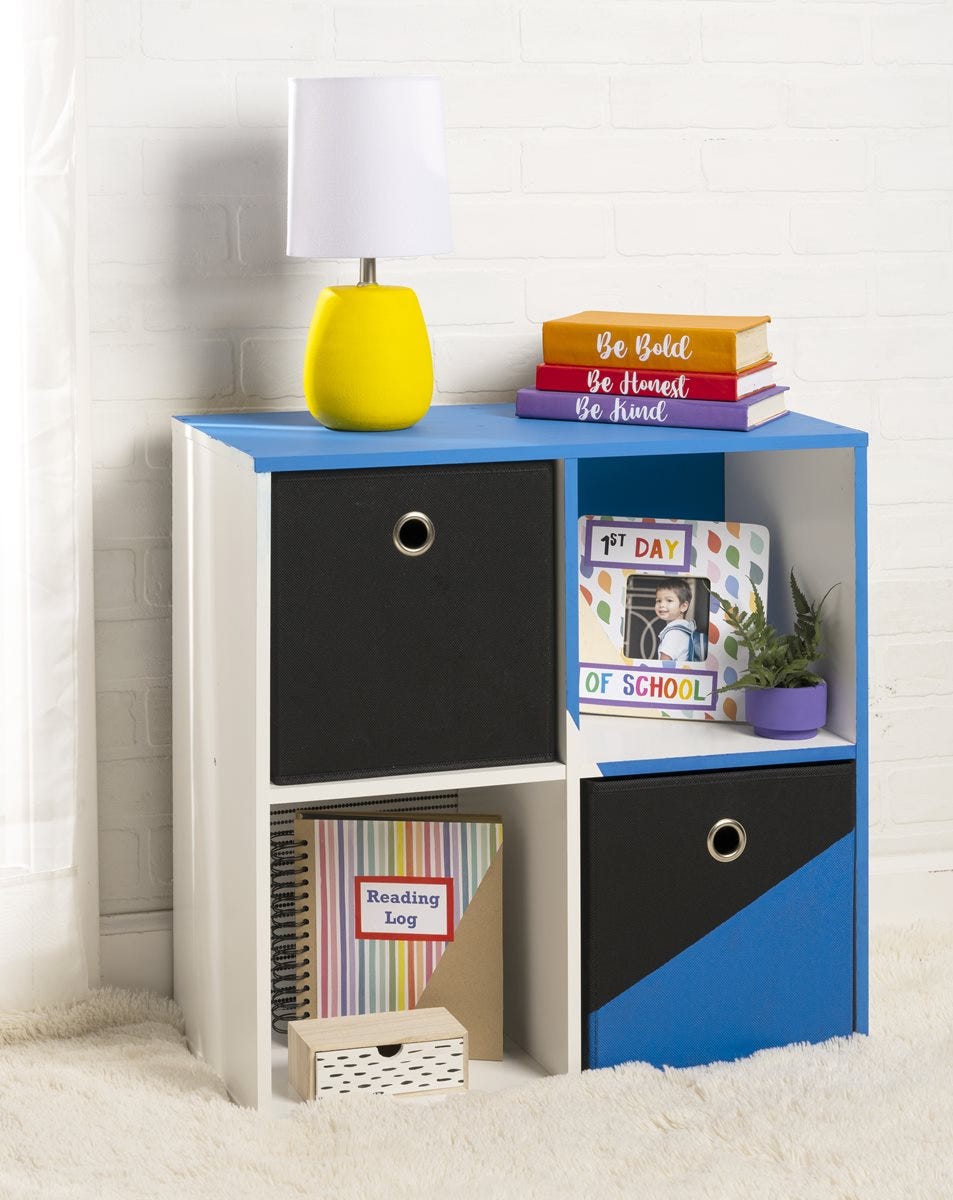
Easy and fun to create, these colorful cubes will organize your student supplies and brighten any corner of the room with colorful notebooks and framed photos!

This project features these great brands:

  • Apple Barrel Logo
  • Mod Podge Logo

At a Glance:

Project #16453 Skill Level: Intermediate
supplies

Plaid Supplies

Apple Barrel ® Colors - White, 16 oz. - 21119

Number Needed: 1 $6.99
Item not for sale on Plaid Online.

Apple Barrel ® Colors - Cobalt Hue, 16 oz. - 21142

Number Needed: 1 $6.99
Item not for sale on Plaid Online.

Mod Podge ® Gloss, 16 oz. - CS11202

Number Needed: 1 $10.99
Item not for sale on Plaid Online.

Mod Podge ® Matte, 16 oz. - CS11302

Number Needed: 1 $10.99
Item not for sale on Plaid Online.

Plaid ® Wood Surfaces - Frames - Square - 97540

Number Needed: 1 $1.99
Item not for sale on Plaid Online.

Other Supplies

Storage Cube, Notebook, Pencil Box, Brush Basin or container for water, Paper Towels, Medium grit sandpaper, Assorted scrapbook papers, Scissors, 1” Foam brushes
 

instructions

Cube Instructions

  1. Using a 1” Foam brush, neatly base coat the entire cube organizing unit with White.  Allow to dry.  Next, sand smooth and then reapply White for opaque coverage.  Allow to dry.
  2. Select accent color, ours is Cobalt Hue.  Brush accent color onto desired areas of the cube organizer, refer to photograph.  Allow to dry, then reapply for opaque coverage. 
  3. Accent a black fabric storage bin with a diagonal strip of Cobalt Hue.  Allow to dry and then reapply.  Let dry.
 
Frame Instructions
  1. Using a 1” Foam brush, brush a coat of White onto the entire frame.  Let dry.  Sand smooth and reapply White.  Allow to dry.
  2. Cut desired scrapbook paper the size of the frame using scissors.
  3. Adhere paper to the prepared wood frame using Mod Podge in the sheen of your choice, Matte or Gloss.  Using a clean 1” foam brush, brush a liberal amount of Mod Podge onto the frame surface as well as the backside of the scrapbook paper piece.  Next position the paper onto the surface and smooth in place.  Press firmly to remove any possible air bubbles or paper wrinkles.  If desired, add layers of paper designs, such as “1st Day of School.”  Allow to dry a minimum of 15 minutes and then brush a coat of Mod Podge over the paper strips to seal and protect.  Allow to dry.
 
Notebook Instructions
  1. Select desired scrapbook paper large enough to fit the cover of a notebook.  Trim with scissors if needed.
  2. Adhere paper to the notebook using Mod Podge in the sheen of your choice, Matte or Gloss.  Using a clean 1” foam brush, brush a liberal amount of Mod Podge onto the surface as well as the backside of the scrapbook paper piece.  Next position the paper onto the surface and smooth in place.  Press firmly to remove any possible air bubbles or paper wrinkles.  Allow to dry a minimum of 15 minutes and then brush a coat of Mod Podge over the paper strips to seal and protect.  Allow to dry.
 
Pencil Box Instructions
  1. Allow the base of the pencil box to stay unpainted allowing the natural wood to be displayed.
  2. Select desired scrapbook paper to fit the front drawer of the pencil box.  Trim with scissors to fit.
  3. Adhere paper to surface using Mod Podge in the sheen of your choice, Matte or Gloss.  Using a clean 1” foam brush, brush a liberal amount of Mod Podge onto the surface as well as the backside of the scrapbook paper piece.  Next position the paper onto the surface and smooth in place.  Press firmly to remove any possible air bubbles or paper wrinkles.  Allow to dry a minimum of 15 minutes and then brush a coat of Mod Podge over the paper strips to seal and protect.  Allow to dry.

resources

Related Videos

Mod Podge Tips and Tricks for No Wrinkles

Learn how to get perfect Mod Podge projects everytime!

Watch this Video

Learn how to get perfect Mod Podge projects everytime!

How Mod Podge is Made

Get a behind-the-scenes look at how Mod Podge is made, bottled and shipped to you!

Watch this Video

Get a behind-the-scenes look at how Mod Podge is made, bottled and shipped to you!

Applying Paper to Wood Using Mod Podge

Learn basic steps of applying paper to wood using Mod Podge.

Watch this Video

Learn basic steps of applying paper to wood using Mod Podge.

Related Resources

Free Lesson Plans featuring Mod Podge

Free Lesson Plans featuring Mod Podge

Use these free lesson plans to craft an unforgettable experience in the classroom with one of these

View PDF
Mod Podge Clear Image Transfer FAQs

Mod Podge Clear Image Transfer FAQs

Learn more about Mod Podge Clear Image Transfer Medium by reading the FAQ. 

View PDF
Mod Podge Ultra Frequently Asked Questions

Mod Podge Ultra Frequently Asked Questions

Learn more about Mod Podge Ultra by reading the frequently asked questions. 

View PDF

Related FAQs

Decorated candles using Mod Podge ® or Royal Coat ® Decoupage Finish are meant for decorative purposes and not for illumination. Many of the decorations would catch fire and be hazardous if the candle were burned. However, if you are using a wide pillar candle and the decorations do not go to the top of the candle, it can be burned down slightly to create a well, then a votive candle inserted into the well. A new votive candle can be inserted when the old one is finished. Use extreme caution and good judgment when burning candles that have been decorated.
First check to see if the napkin is 2 ply. If so, separate and lay aside. Brush Mod Podge directly on the your surface. Carefully place the printed napkin on the surface and lightly blot down with a dampened sponge. Start blotting in the center and work to the edge. Once it is in place, let dry. After about 30 minutes lightly apply a top coat of Mod Podge.
  1. Apply a coat of Mod Podge® to the inside of the form and allow to dry slightly. Place the Napkin design where desired and gently rub it flat with your thumb.
  2. Cover the image with a second very thin coat of Mod Podge®, beginning in the center and brushing out. Allow to dry thoroughly.
  3. Add special sponging or spouncing effects, as desired, around the design and let dry.
  4. Paint the whole inside with a light color of FolkArt® Acrylic Colors. If you want to use a darker color inside, first paint around the Napkin design with a light color, let dry and then add the darker color.
DIY Dorm Decor - Personalized Trolley Cart
New!
DIY Dorm Decor - Personalized Trolley Cart
Funky Birds Magazine Holders
New!
Funky Birds Magazine Holders
Busy Bee Bulletin Board
New!
Busy Bee Bulletin Board
FolkArt Chalkboard Paint Wood Crate
New!
FolkArt Chalkboard Paint Wood Crate

Disclaimer: The information found in each project is presented in good faith, but no warranty is given, nor results guaranteed, nor is freedom from any patent to be inferred. Since we have no control over physical conditions surrounding the application of information herein contained, Plaid Enterprises, Inc. disclaims any liability for untoward results.

Important: Please be sure to thoroughly read the instructions for all products, paying particular attention to all cautions and warnings shown to ensure the proper and safe use of the product.

Copyright: All Rights Reserved. No part of this Project may be reproduced in any form without permission in writing, except for your personal use, except by reviewer, who may in reviewing this project, quote brief passages in a magazine or newspaper.