We are excited to announce that Arteza has joined Plaid Enterprises, expanding our portfolio of trusted creative brands alongside Bucilla, Delta, Apple Barrel, and more.
We are excited to announce that Arteza has joined Plaid Enterprises, expanding our portfolio of trusted creative brands alongside Bucilla, Delta, Apple Barrel, and more.
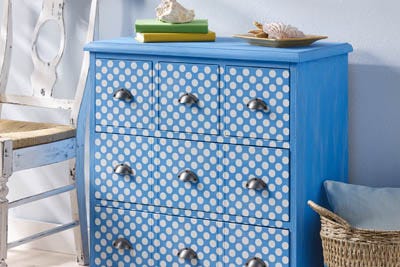
Create a smooth painting surface by removing all drawer-pull hardware using a screwdriver and set aside.
Next, lightly sand smooth any rough areas of the unfinished wood side table. Wipe with a tack cloth to remove sanding dust.
Pour a small amount of Bermuda into a foam bowl as a palette or load the basecoating brush directly from the paint bottle.
Brush on a coat of Bermuda to the entire surface of the side table including all drawer fronts. Allow to dry one hour.
If necessary, lightly sand smooth any rough areas where the wood grain may have been raised by the application of paint. Apply a second coat of Bermuda for opaque coverage. Clean the basecoating brush with soap and water, then allow both the brush and the painted side table time to dry thoroughly.
Working with all drawers inserted, find the center and lightly mark with a pencil. Next, position the center of the stencil over the furniture center and secure in place with stencil tape.
Pour a small amount of White onto a foam plate. Load a stencil brush with paint then offload excess paint onto a paper towel. Begin stenciling using a circular clockwise/counter-clockwise motion over the stencil design. Lift the stencil then reposition it to complete stenciling the entire drawer fronts and support dividers. Allow to dry.
Replace all drawer-pull hardware.
TIPS
When repeating a stencil design, always check the backside of the stencil for paint residue before realigning it to the next area. If necessary, wipe the backside of the stencil with a baby wipe or moist paper towel.
Keep stencils clean between uses by cleaning immediately with soap and water after each use or wiping down well with rubbing alcohol or hand sanitizer.