Email Signup

Subscribe to the Plaid Crafts Newsletter for craft project ideas, product news, our live events, and more!

25% Bucilla Spring Sale

Save 25% on orders of $60 or more and get free U.S. shipping! Shop new arrivals from Bucilla - Seasonal Felt Stockings & Ornaments! This promotion cannot be combined with other promos. See shipping details. for inspirational ideas. Get free U.S. ground shipping on orders $60+! This promotion cannot be combined with other promos. See shipping details.

Use Code

Sale Ends 4/20/24

Gallery Wall Frames and Signs

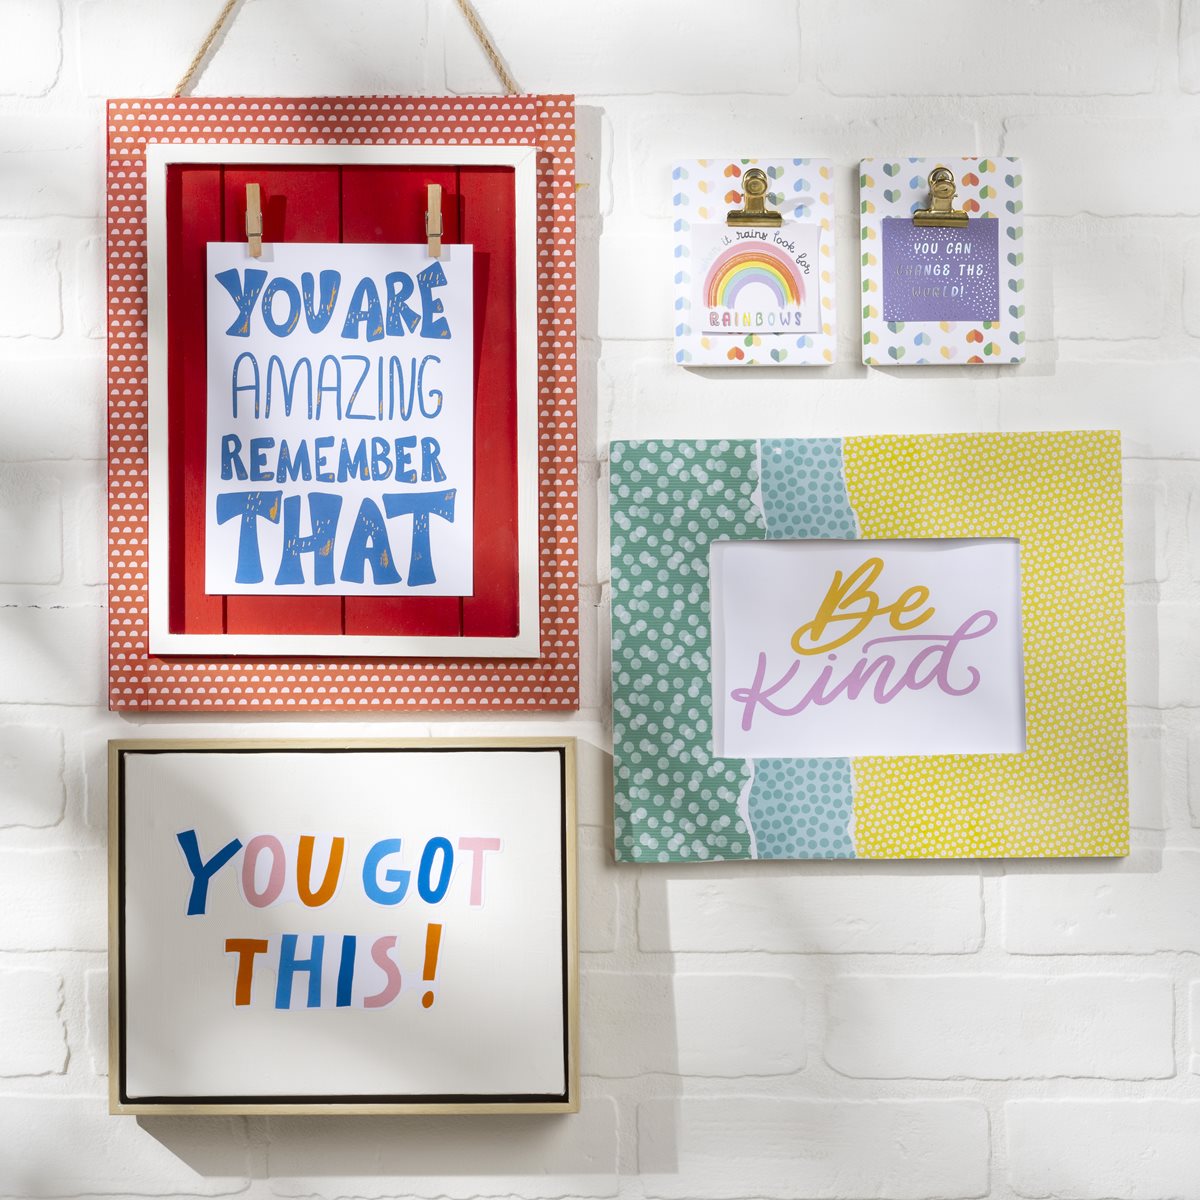
Create a simple and fun gallery wall using Apple Barrel Acrylic paints, bright cheerful scrapbooks papers and Mod Podge!

This project features these great brands:

  • Mod Podge Decoupage Finishes and Formulas Logo

At a Glance:

Project #16451 Skill Level: Intermediate
supplies

Plaid Supplies

Apple Barrel ® Colors - White, 16 oz. - 21119

Number Needed: 1 $6.99
Item not for sale on Plaid Online.

Apple Barrel ® Colors - Bright Red, 16 oz. - 21123

Number Needed: 1 $6.99
Item not for sale on Plaid Online.

Apple Barrel ® Colors - Pumpkin Orange, 16 oz. - 21126E

Number Needed: 1 $6.99
Item not for sale on Plaid Online.

Apple Barrel ® Colors - Bright Yellow, 16 oz. - 21131

Number Needed: 1 $6.99
Item not for sale on Plaid Online.

Apple Barrel ® Colors - Cobalt Hue, 16 oz. - 21142

Number Needed: 1 $6.99
Item not for sale on Plaid Online.

Apple Barrel ® Colors - Purple Iris, 16 oz. - 22488E

Number Needed: 1 $6.99
Item not for sale on Plaid Online.

Mod Podge ® Gloss, 16 oz. - CS11202

Number Needed: 1 $10.99
Item not for sale on Plaid Online.

Mod Podge ® Matte, 16 oz. - CS11302

Number Needed: 1 $10.99
Item not for sale on Plaid Online.

Plaid ® Wood Surfaces - Pallet Sign, 10.25" x 13.37" - 44939

Number Needed: 1 $9.09
Item not for sale on Plaid Online.

Plaid ® Wood Surfaces - Frames - Medium Memory Frame with Easel Back - 96286

Number Needed: 1 $4.49
Item not for sale on Plaid Online.

Plaid ® Surfaces - Mini Clipboard Frame - Unfinished - 44941

Number Needed: 1 $2.79
Item not for sale on Plaid Online.

Other Supplies

8” x 10” Frame, Matboard or Poster Board, Brush Basin or container for water, Paper Towels, Medium grit sandpaper, Assorted scrapbook papers, Scissors, 1” Foam brushes, No. 8 Flat brush
 

instructions

“You are AMAZING” Sign Instructions

  1. Paint the interior section of the sign opaquely Bright Red. Paint the frame White.  Allow both areas to dry.  Once dry, sand smooth and reapply a second coat of paint for opaque coverage.  Allow to dry.
  2. Using scissors, cut strips of scrapbook paper to fit the exterior border of the sign. 
  3. Adhere paper strips to the wood sign using Mod Podge in the sheen of your choice, Matte or Gloss.  Using a clean 1” foam brush, brush a liberal amount of Mod Podge onto the surface as well as the backside of the scrapbook paper piece.  Next position the paper strip onto the surface and smooth in place.  Press firmly to remove any possible air bubbles or paper wrinkles.  Allow to dry a minimum of 15 minutes and then brush a coat of Mod Podge over the paper strips to seal and protect.  Allow to dry.
  4. Clip a favorite sign in the center using the provided clothespins.
 
“Be Kind” Sign Instructions
  1. Paint the entire wood frame White.  Allow the paint to dry.  Once dry, sand smooth and reapply a second coat of paint for opaque coverage.  Allow to dry.
  2. In place of using scissors to cut scrapbook paper, tear the edges of assorted scrapbook papers to create a layered organic look.
  3. Adhere paper layers to the wood frame using Mod Podge in the sheen of your choice, Matte or Gloss.  Using a clean 1” foam brush, brush a liberal amount of Mod Podge onto the surface as well as the backside of the scrapbook paper piece.  Next position the paper onto the surface and smooth in place.  Press firmly to remove any possible air bubbles or paper wrinkles.  Continue layering until the frame is covered.  Allow to dry a minimum of 15 minutes and then brush a coat of Mod Podge over the paper strips to seal and protect.  Allow to dry.
  4. Insert a favorite saying in the center of the frame, or personalize with your own painted saying using Apple Barrel paints.
 
“You Got This!” Sign Instructions
  1. Select Apple Barrel colors of choice.  We used White and Bright Red to make a pink, Pumpkin Orange, Cobalt Hue, and Purple Iris.  Using a No. 8 Flat brush, paint “squared” block style letters to complete your favorite saying onto matboard or poster board.  Allow to dry and assemble in a frame.  
 
Note Clips Signs
  1. Remove metal clips from Mini Clipboards and put to the side.
  2. Cut scrapbook papers large enough to cover both the top and edges of the Mini Clipboards.
  3. Adhere paper layers to each board using Mod Podge in the sheen of your choice, Matte or Gloss.  Using a clean 1” foam brush, brush a liberal amount of Mod Podge onto the surface as well as the backside of the scrapbook paper piece.  Next position the paper onto the surface and smooth in place.  Press firmly to remove any possible air bubbles or paper wrinkles.  Continue layering until the surface is covered.  Allow to dry a minimum of 15 minutes and then brush a coat of Mod Podge over the paper strips to seal and protect.  Allow to dry.
  4. Affix metal clips back onto each board.  Clip your favorite photo or special note or words of encouragement.

resources

Related Videos

Mod Podge Tips and Tricks for No Wrinkles

Learn how to get perfect Mod Podge projects everytime!

Watch this Video

Learn how to get perfect Mod Podge projects everytime!

How Mod Podge is Made

Get a behind-the-scenes look at how Mod Podge is made, bottled and shipped to you!

Watch this Video

Get a behind-the-scenes look at how Mod Podge is made, bottled and shipped to you!

Applying Paper to Wood Using Mod Podge

Learn basic steps of applying paper to wood using Mod Podge.

Watch this Video

Learn basic steps of applying paper to wood using Mod Podge.

Related Resources

Free Lesson Plans featuring Mod Podge

Free Lesson Plans featuring Mod Podge

Use these free lesson plans to craft an unforgettable experience in the classroom with one of these

View PDF
Mod Podge Clear Image Transfer FAQs

Mod Podge Clear Image Transfer FAQs

Learn more about Mod Podge Clear Image Transfer Medium by reading the FAQ. 

View PDF
Mod Podge Ultra Frequently Asked Questions

Mod Podge Ultra Frequently Asked Questions

Learn more about Mod Podge Ultra by reading the frequently asked questions. 

View PDF

Related FAQs

Decorated candles using Mod Podge ® or Royal Coat ® Decoupage Finish are meant for decorative purposes and not for illumination. Many of the decorations would catch fire and be hazardous if the candle were burned. However, if you are using a wide pillar candle and the decorations do not go to the top of the candle, it can be burned down slightly to create a well, then a votive candle inserted into the well. A new votive candle can be inserted when the old one is finished. Use extreme caution and good judgment when burning candles that have been decorated.
First check to see if the napkin is 2 ply. If so, separate and lay aside. Brush Mod Podge directly on the your surface. Carefully place the printed napkin on the surface and lightly blot down with a dampened sponge. Start blotting in the center and work to the edge. Once it is in place, let dry. After about 30 minutes lightly apply a top coat of Mod Podge.
  1. Apply a coat of Mod Podge® to the inside of the form and allow to dry slightly. Place the Napkin design where desired and gently rub it flat with your thumb.
  2. Cover the image with a second very thin coat of Mod Podge®, beginning in the center and brushing out. Allow to dry thoroughly.
  3. Add special sponging or spouncing effects, as desired, around the design and let dry.
  4. Paint the whole inside with a light color of FolkArt® Acrylic Colors. If you want to use a darker color inside, first paint around the Napkin design with a light color, let dry and then add the darker color.
Make It Cozy Fall Upcycled Rake Wreath
New!
Make It Cozy Fall Upcycled Rake Wreath
Photo Transfer and Stitching Wall Art
New!
Photo Transfer and Stitching Wall Art
Radiant Orchid Pebble Frame
New!
Radiant Orchid Pebble Frame
Upcycled Jars Outdoor Center Piece
New!
Upcycled Jars Outdoor Center Piece

Disclaimer: The information found in each project is presented in good faith, but no warranty is given, nor results guaranteed, nor is freedom from any patent to be inferred. Since we have no control over physical conditions surrounding the application of information herein contained, Plaid Enterprises, Inc. disclaims any liability for untoward results.

Important: Please be sure to thoroughly read the instructions for all products, paying particular attention to all cautions and warnings shown to ensure the proper and safe use of the product.

Copyright: All Rights Reserved. No part of this Project may be reproduced in any form without permission in writing, except for your personal use, except by reviewer, who may in reviewing this project, quote brief passages in a magazine or newspaper.