Email Signup

Subscribe to the Plaid Crafts Newsletter for craft project ideas, product news, our live events, and more!

Upcycle Your Glassware! Save 25%

Save 25% on orders $60+ and get free U.S. ground shipping! Explore the NEW! FolkArt Murano Glass Paint! This promotion cannot be combined with other promos. See shipping details.

Use Code

Sale Ends 3/23/24

Lovely Floral Dog Tote

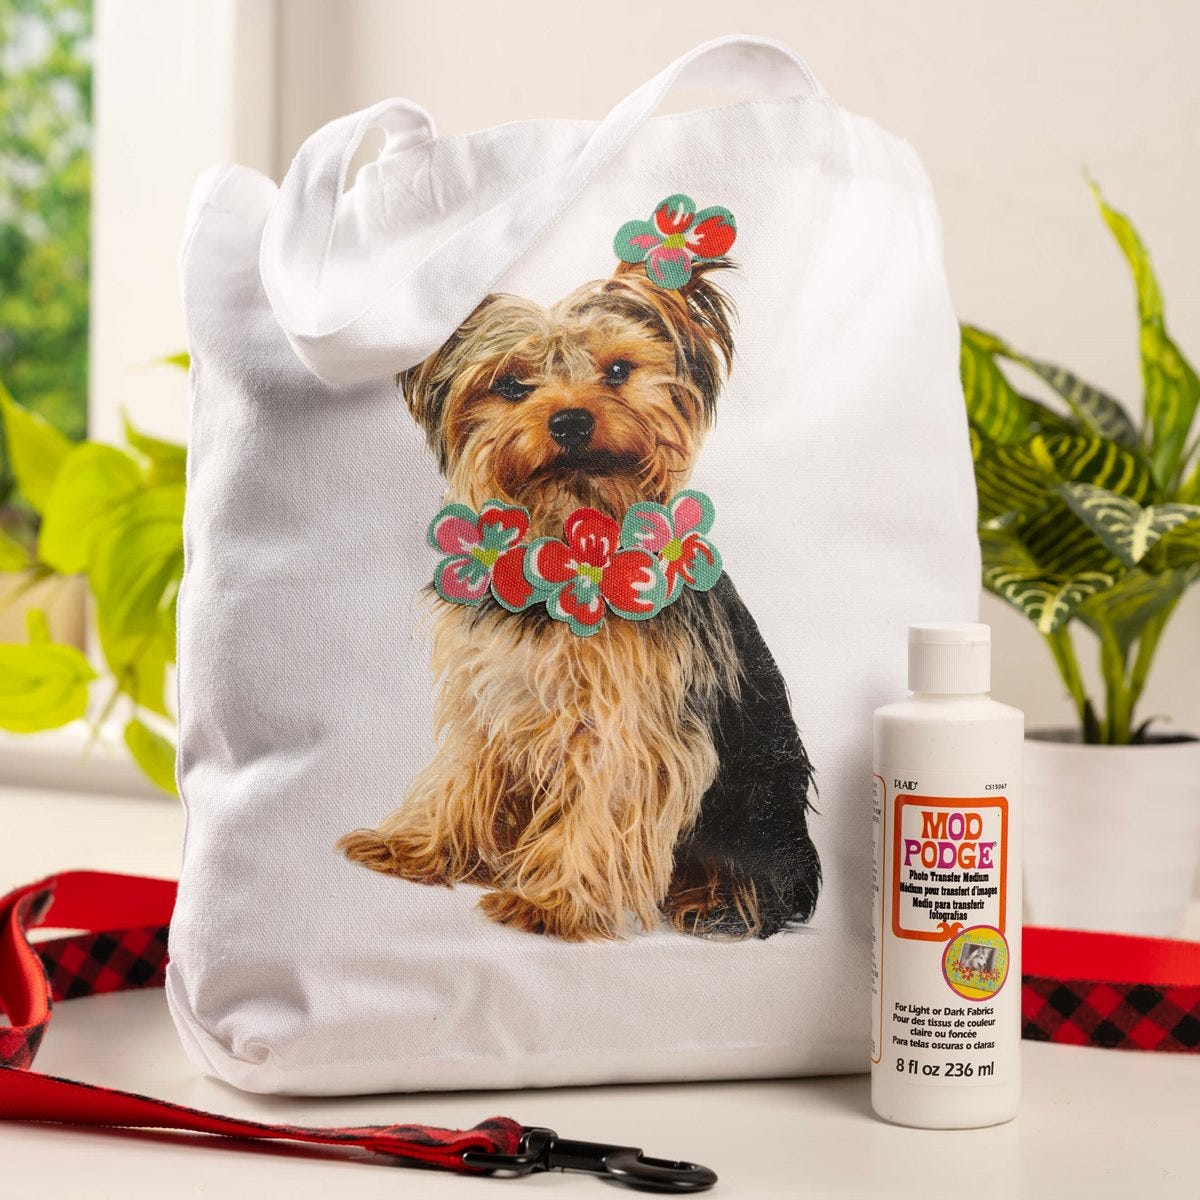
Take your dog everywhere you go with Mod Podge Image Transfer!

This project features these great brands:

  • Mod Podge Decoupage Finishes and Formulas Logo
  • Mod Podge Tools and Accessories  Logo

At a Glance:

Project #16910 Skill Level: Beginner
supplies

Plaid Supplies

Mod Podge ® Photo Transfer Medium, 8 oz. - CS15067

Number Needed: 1 $9.99
Item not for sale on Plaid Online.

Mod Podge ® Foam Brush Set, 4 pc. - 24959

Number Needed: 1 $4.49
Item not for sale on Plaid Online.

Other Supplies

  • Printed out image
  • Scissors

instructions

Preparation:

  1.  Print desired art that can be found by searching images on the internet.  Be use to use a laser printer not an inkjet printer. Using scissors, cut close to the design lines of the image.
 
Instructions:
  1. Apply a liberal amount of Mod Podge Photo Transfer Medium to the front side of the laser printed image. White still wet, flip the image over and carefully position the image onto the canvas tote bag where desired, keeping the Transfer Medium side of the image next to the canvas bag.  Press in place, smoothing any air pockets or wrinkles to the edges. Remove any excess Transfer Medium that may be squeezed to the edges. Allow to thoroughly dry.
  2. Once dry, wet the paper back of the image and carefully rub to remove paper fibers. Continue carefully working the wet paper, removing it until the entire image has been revealed. NOTE: This may be accomplished in a couple wet and then dry sessions rather than all in once session.

resources

Related Videos

Mod Podge Tips and Tricks for No Wrinkles

Learn how to get perfect Mod Podge projects everytime!

Watch this Video

Learn how to get perfect Mod Podge projects everytime!

How Mod Podge is Made

Get a behind-the-scenes look at how Mod Podge is made, bottled and shipped to you!

Watch this Video

Get a behind-the-scenes look at how Mod Podge is made, bottled and shipped to you!

Applying Paper to Wood Using Mod Podge

Learn basic steps of applying paper to wood using Mod Podge.

Watch this Video

Learn basic steps of applying paper to wood using Mod Podge.

Related Resources

Free Lesson Plans featuring Mod Podge

Free Lesson Plans featuring Mod Podge

Use these free lesson plans to craft an unforgettable experience in the classroom with one of these

View PDF
Mod Podge Clear Image Transfer FAQs

Mod Podge Clear Image Transfer FAQs

Learn more about Mod Podge Clear Image Transfer Medium by reading the FAQ. 

View PDF
Mod Podge Ultra Frequently Asked Questions

Mod Podge Ultra Frequently Asked Questions

Learn more about Mod Podge Ultra by reading the frequently asked questions. 

View PDF

Related FAQs

Decorated candles using Mod Podge ® or Royal Coat ® Decoupage Finish are meant for decorative purposes and not for illumination. Many of the decorations would catch fire and be hazardous if the candle were burned. However, if you are using a wide pillar candle and the decorations do not go to the top of the candle, it can be burned down slightly to create a well, then a votive candle inserted into the well. A new votive candle can be inserted when the old one is finished. Use extreme caution and good judgment when burning candles that have been decorated.
First check to see if the napkin is 2 ply. If so, separate and lay aside. Brush Mod Podge directly on the your surface. Carefully place the printed napkin on the surface and lightly blot down with a dampened sponge. Start blotting in the center and work to the edge. Once it is in place, let dry. After about 30 minutes lightly apply a top coat of Mod Podge.
  1. Apply a coat of Mod Podge® to the inside of the form and allow to dry slightly. Place the Napkin design where desired and gently rub it flat with your thumb.
  2. Cover the image with a second very thin coat of Mod Podge®, beginning in the center and brushing out. Allow to dry thoroughly.
  3. Add special sponging or spouncing effects, as desired, around the design and let dry.
  4. Paint the whole inside with a light color of FolkArt® Acrylic Colors. If you want to use a darker color inside, first paint around the Napkin design with a light color, let dry and then add the darker color.
Green Waverly Bathroom Storage Decor
New!
Green Waverly Bathroom Storage Decor
Treasure Gold Vases
New!
Treasure Gold Vases
Floral T Shirt
New!
Floral T Shirt
FolkArt Enamel Tumblers
New!
FolkArt Enamel Tumblers

Disclaimer: The information found in each project is presented in good faith, but no warranty is given, nor results guaranteed, nor is freedom from any patent to be inferred. Since we have no control over physical conditions surrounding the application of information herein contained, Plaid Enterprises, Inc. disclaims any liability for untoward results.

Important: Please be sure to thoroughly read the instructions for all products, paying particular attention to all cautions and warnings shown to ensure the proper and safe use of the product.

Copyright: All Rights Reserved. No part of this Project may be reproduced in any form without permission in writing, except for your personal use, except by reviewer, who may in reviewing this project, quote brief passages in a magazine or newspaper.