By: Sherrie Ragsdale

Apple Barrel ® Multi-Surface Satin Acrylic Paints - Outrageous Orange, 2 oz. - 21961E
Apple Barrel
2 oz
+ 30 colors
$1.39
Apple Barrel ® Multi-Surface Satin Acrylic Paints - Princess Purple, 2 oz. - 21978E
Apple Barrel
2 oz
+ 30 colors
$1.39
Apple Barrel ® Multi-Surface Satin Acrylic Paints - Black, 2 oz. - 21985E
Apple Barrel
2 oz
+ 30 colors
$1.39
Apple Barrel ® Multi-Surface Satin Acrylic Paints - True Green, 2 oz. - 21968E
Apple Barrel
2 oz
+ 30 colors
$1.39
Apple Barrel ® Multi-Surface Satin Acrylic Paints - Lemon, 2 oz. - 21964E
Apple Barrel
2 oz
+ 30 colors
$1.39
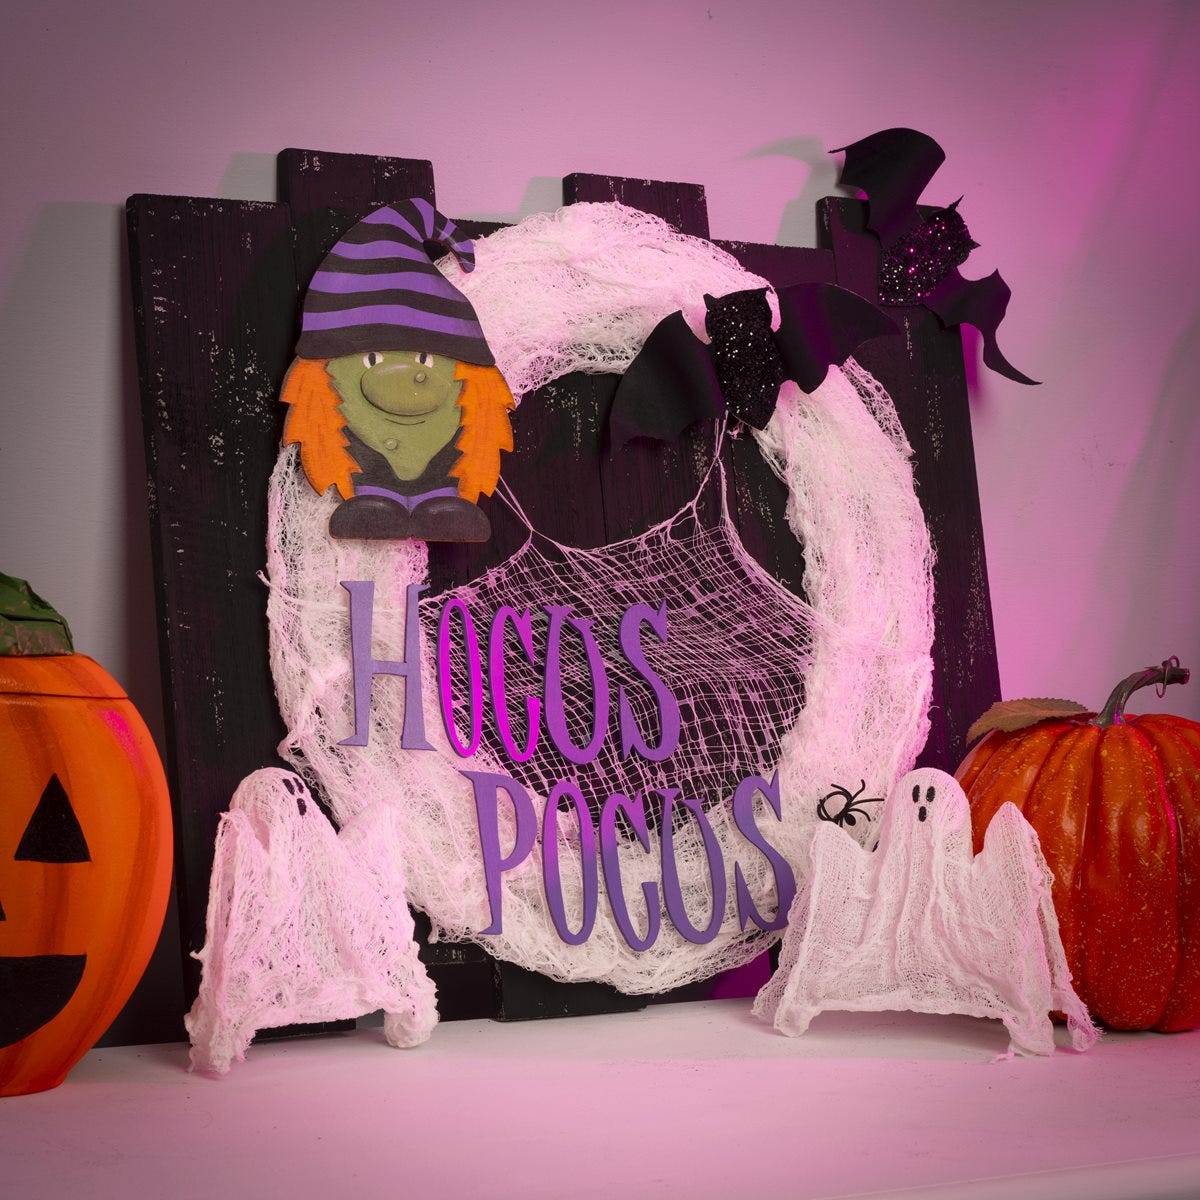
Instructions
- In the center of the posterboard, draw a circle using the paper plate as a template.
- Cover a large area that extends pass the circle with clingwrap.
- Cut off about a yard of the cheesecloth and place it on paper plate. Pour Mod Podge Stiffy over the cheesecloth until it is completely saturated. Squeeze the cheesecloth together to make sure you have total saturation.
- Spread out cheesecloth and form it around the previously drawn circle. Continue this process until the wreath is full and thick. Refer to the photo for fullness. Allow the Stiffy to dry overnight. To speed up drying time you could place a fan on wreath.
- Once the wreath is dry, remove from clingwrap. Cut off a piece of cheesecloth, place it on paper plate. Pour Mod Podge Stiffy over the cheesecloth until it is completely saturated. Stretch cheesecloth across the bottom portion of the wreath to form a spiderweb. Attach the cheesecloth with the white string. Allow the Stiffy to dry.
- Paint the letters with Princess Purple. Allow to dry.
- Paint the witch as follows: Hair – Outrageous Orange Hat – Black and Princess Purple Face – Mix Lemon and True Green together to get a yellow green color Dress – Black Legs – Princess Purple Shoes – Black Eyes – Black and Snow White
- Water down the black and shade around warts, face and hair, legs and hat.
- Highlight shoes, warts, hat and nose with Snow White.
- To make the bat cut out the bat shape from black fabric.
- Cover the two dowels in clingwrap. Place the dowel onto clingwrap.
- Place the cutout bat onto paper plate and saturate with Stiffy. Make sure both sides of bat are covered.
- Place the bat on top of the dowel so that the wings are going across the dowels and the bats body is flat on surface. Allow the bats to dry.
- Remove bats from clingwrap. Brush Mod Podge Gloss onto the body of the bat and add black glitter.
- Use Tacky glue to attach bat, witch and letters to the wreath. Refer to photo for placement
