Email Signup

Subscribe to the Plaid Crafts Newsletter for craft project ideas, product news, our live events, and more!

25% Bucilla Spring Sale

Save 25% on orders of $60 or more and get free U.S. shipping! Shop new arrivals from Bucilla - Seasonal Felt Stockings & Ornaments! This promotion cannot be combined with other promos. See shipping details. for inspirational ideas. Get free U.S. ground shipping on orders $60+! This promotion cannot be combined with other promos. See shipping details.

Use Code

Sale Ends 4/20/24

Storage Crates and Coordinating Decor

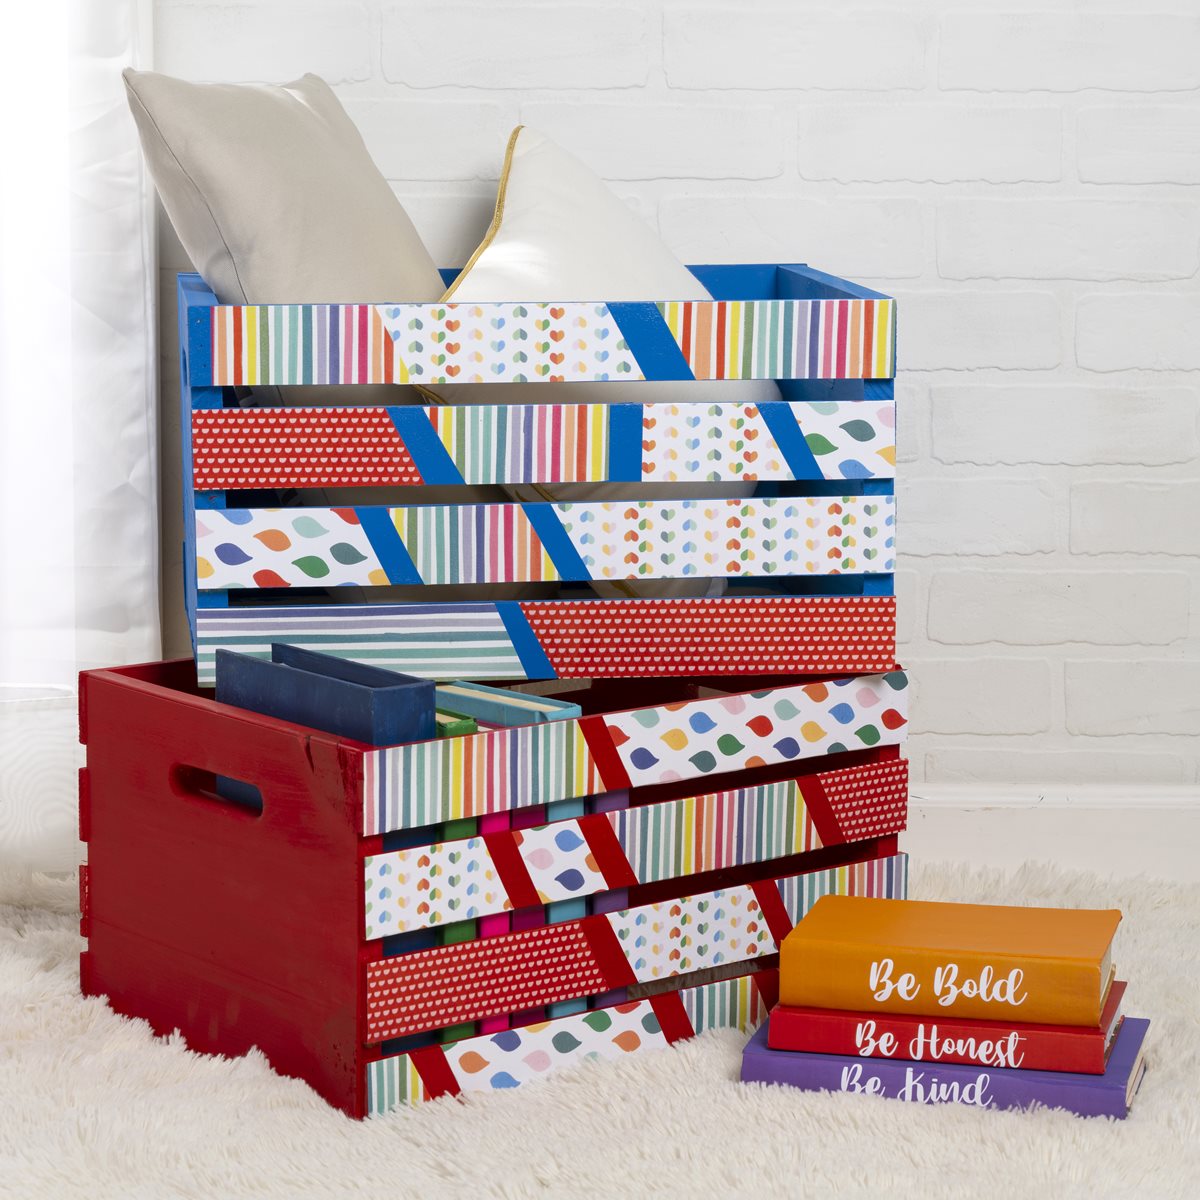
Easy and fun to create, these colorful crates will help your student stay organized while keeping all school supplies neat and in their place!

This project features these great brands:

  • Mod Podge Decoupage Finishes and Formulas Logo

At a Glance:

Project #16450 Skill Level: Intermediate
supplies

Plaid Supplies

Apple Barrel ® Colors - White, 16 oz. - 21119

Number Needed: 1 $6.99
Item not for sale on Plaid Online.

Apple Barrel ® Colors - Bright Red, 16 oz. - 21123

Number Needed: 1 $6.99
Item not for sale on Plaid Online.

Apple Barrel ® Colors - Pumpkin Orange, 16 oz. - 21126E

Number Needed: 1 $6.99
Item not for sale on Plaid Online.

Apple Barrel ® Colors - Cobalt Hue, 16 oz. - 21142

Number Needed: 1 $6.99
Item not for sale on Plaid Online.

Mod Podge ® Gloss, 16 oz. - CS11202

Number Needed: 1 $10.99
Item not for sale on Plaid Online.

Mod Podge ® Matte, 16 oz. - CS11302

Number Needed: 1 $10.99
Item not for sale on Plaid Online.

Other Supplies

Unfinished Wood Crates (2), Old Books (3), Brush Basin or container for water, Paper Towels, Medium grit sandpaper, Assorted scrapbook papers, Scissors, 1” Foam brushes, No. 1 Liner brush
 

instructions

  1. Paint the crate in the color of your choice that coordinates with colors in the scrapbook paper designs.  We chose Bright Red and Cobalt Hue.  Using a 1” Foam brush, paint the entire crate with one coat of paint.  Allow to dry.  When dry, sand smooth and reapply a second coat for opaque coverage.  Allow to dry.
  2. Determine the scrapbook paper patterns desired for the crate side slats.  Using scissors, cut rectangular strips of paper with either straight or angled edges.  Be creative; and mix and match coordinating patterns such as polka dots, stripes, and small overall patterns.
  3. Apply cut papers to each wood slat using Mod Podge (Matte or Gloss).  Using a clean 1” foam brush, brush a liberal amount of Mod Podge onto the basecoated wood slat as well as the backside of the scrapbook paper piece.  Next position the paper strip onto the surface and smooth in place.  Press firmly to remove any possible air bubbles or paper wrinkles.  Allow to dry a minimum of 15 minutes and then brush a coat of Mod Podge over the paper strips to seal and protect.  Allow to dry.
 
Book Instructions
  1. Using a 1” Foam brush, base coat each book a different color.  We used Pumpkin Orange, Bright Red, and Cobalt Hue.  Allow to dry and if needed, reapply a second coat for opaque coverage.
  2. Using a No. 1 liner brush and brush lettering techniques, paint words or phrases of your choice onto the spine of the book.  We painted, “Be Bold,” “Be Honest,” and “Be Kind.”

resources

Related Videos

Mod Podge Tips and Tricks for No Wrinkles

Learn how to get perfect Mod Podge projects everytime!

Watch this Video

Learn how to get perfect Mod Podge projects everytime!

How Mod Podge is Made

Get a behind-the-scenes look at how Mod Podge is made, bottled and shipped to you!

Watch this Video

Get a behind-the-scenes look at how Mod Podge is made, bottled and shipped to you!

Applying Paper to Wood Using Mod Podge

Learn basic steps of applying paper to wood using Mod Podge.

Watch this Video

Learn basic steps of applying paper to wood using Mod Podge.

Related Resources

Free Lesson Plans featuring Mod Podge

Free Lesson Plans featuring Mod Podge

Use these free lesson plans to craft an unforgettable experience in the classroom with one of these

View PDF
Mod Podge Clear Image Transfer FAQs

Mod Podge Clear Image Transfer FAQs

Learn more about Mod Podge Clear Image Transfer Medium by reading the FAQ. 

View PDF
Mod Podge Ultra Frequently Asked Questions

Mod Podge Ultra Frequently Asked Questions

Learn more about Mod Podge Ultra by reading the frequently asked questions. 

View PDF

Related FAQs

Decorated candles using Mod Podge ® or Royal Coat ® Decoupage Finish are meant for decorative purposes and not for illumination. Many of the decorations would catch fire and be hazardous if the candle were burned. However, if you are using a wide pillar candle and the decorations do not go to the top of the candle, it can be burned down slightly to create a well, then a votive candle inserted into the well. A new votive candle can be inserted when the old one is finished. Use extreme caution and good judgment when burning candles that have been decorated.
First check to see if the napkin is 2 ply. If so, separate and lay aside. Brush Mod Podge directly on the your surface. Carefully place the printed napkin on the surface and lightly blot down with a dampened sponge. Start blotting in the center and work to the edge. Once it is in place, let dry. After about 30 minutes lightly apply a top coat of Mod Podge.
  1. Apply a coat of Mod Podge® to the inside of the form and allow to dry slightly. Place the Napkin design where desired and gently rub it flat with your thumb.
  2. Cover the image with a second very thin coat of Mod Podge®, beginning in the center and brushing out. Allow to dry thoroughly.
  3. Add special sponging or spouncing effects, as desired, around the design and let dry.
  4. Paint the whole inside with a light color of FolkArt® Acrylic Colors. If you want to use a darker color inside, first paint around the Napkin design with a light color, let dry and then add the darker color.
Mod Podge Photo Tumblers
New!
Mod Podge Photo Tumblers
Easter Paper Plate Masks
New!
Easter Paper Plate Masks
Classroom Birthdays Sign
New!
Classroom Birthdays Sign
Ocean Vibe Pouring Theme
New!
Ocean Vibe Pouring Theme

Disclaimer: The information found in each project is presented in good faith, but no warranty is given, nor results guaranteed, nor is freedom from any patent to be inferred. Since we have no control over physical conditions surrounding the application of information herein contained, Plaid Enterprises, Inc. disclaims any liability for untoward results.

Important: Please be sure to thoroughly read the instructions for all products, paying particular attention to all cautions and warnings shown to ensure the proper and safe use of the product.

Copyright: All Rights Reserved. No part of this Project may be reproduced in any form without permission in writing, except for your personal use, except by reviewer, who may in reviewing this project, quote brief passages in a magazine or newspaper.