We are excited to announce that Arteza has joined Plaid Enterprises, expanding our portfolio of trusted creative brands alongside Bucilla, Delta, Apple Barrel, and more.
We are excited to announce that Arteza has joined Plaid Enterprises, expanding our portfolio of trusted creative brands alongside Bucilla, Delta, Apple Barrel, and more.
10 yds. colored jute (in light green; dark green; brown)
Green-colored glass beads (with holes large enough to fit jute)
Brown-stained wooden Beads (with holes large enough to fit jute)
Large eye needle
Strong tape (masking or duct)
8" x10" Sheet of brown felt
Clear-drying glue or hot glue
Scissors
Instructions
Cut both colors of green jute into 14" pieces.
Thread the needle with three pieces of jute, mixing the colors. Insert the needle in one of the holes. Pull the jute through the hole leaving a 1" tail on the back. Tape the tail down. Continue to do this until you have 15 holes threaded in a row.
Tie a knot close to the wood edge with the three pieces of jute, continue with the rest of the jute.
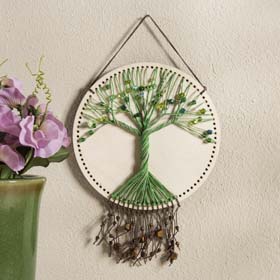
Gather all the jute together in the center and twist to form the trunk of the tree.
Tip: Use a large piece of tape to help hold the twist in the jute until the branches are completed.
Take smaller groups of jute and twist to form the branches. Before inserting into the top holes make sure to slide the beads on in a random pattern. Insert the jute into the holes at the top and secure to the back with tape. After all the jute has been made into branches, remove the tape holding the trunk.
Cut the brown jute into 15 pieces at 10" long. Thread one end in the needle with the jute and insert in the hole with a knot. Pull the jute through the hole and even up the ends. Tie a knot with the jute at the base of the circle. Continue until all 15 holes are complete. These become the roots of the tree. Thread the wooden beads on in random manner. Tie a knot in the jute after you add a bead. Trim jute to a desired length.
Fold one yard of the brown jute in half. Thread it through a hole at the top on the side. Tie a knot, trim ends. Thread the other end into the corresponding hole on the other side. Adjust the length of the jute to desired hanging length. Tie a knot, trim ends. Add a small dot of glue to the knot to help it from coming loose.
Glue the felt to the back side of the circle. Allow glue to dry then trim the felt to the edge.