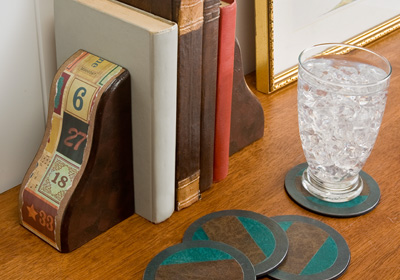
Awesome gifts for dad.
Instructions
Shelf Bracket Alphabet Bookends1. Squirt out a small puddle of the Burnt Umber paint, and then do the same with Raw Umber. You will want the two paints touching.
2. Dip your brush into both paints at the same time – one color on ½ of the brush, the other color on the other half.
3. Use the slip-slap technique to paint both shelf brackets. Do this by painting with one side of the brush and then the other, in a diagonal motion. Do it a few times and then reload the brush.
4. Paint both shelf brackets in this manner. I left the paint a little thicker in some areas for a little texture. (Tip: add touches of contrasting color here and there if necessary to complete the look). Let dry.
5. While the shelf brackets are drying, cut the paper. Measure for both the front and the back, leaving ¼” of room on both sides. You’ll have two pieces for each bracket.
6. Cut the second sheet of paper (in my case, the alphabet paper) into four pieces, the same size as in step five.
7. Tear the pieces you cut in step six. Tear down each side of the four pieces.
8. Mod Podge the base paper to the shelf bracket on the back and top (smooth thoroughly). Let dry for 15 – 20 minutes, then apply a top coat. Let dry.
9. Mod Podge the second layer of paper (the torn paper) on top of the base paper. Let dry for 15 – 20 minutes, then apply a top coat. Let dry.
10. Add a final coat to both brackets and let dry.
11. Cut cork to fit the bottom of each shelf bracket. Adhere with craft glue. Let dry for 24 hours before using.
Lighting Cover Coasters
1. Open each light cover package. You will use the metal and foam circles – save the screws for another project!
2. Place the metal circle onto paper #1 and trace four circles onto the back of the sheet. Cut out and trim to fit the metal circles exactly.
3. Use a circle template or a household item as your second circle. I chose an item about ½” smaller than the metal circle. Trace four circles onto the back of paper #2.
4. Repeat using this same template or item with paper #3.
5. Cut out the middle of the four circles made with paper #3. You will do this by finding the center of the circle and measuring out ½” on either side. Cut a straight line down on each side of the circle.
6. Mod Podge paper #1 down onto the metal circles. Smooth thoroughly and let dry for 15 – 20 minutes. Give a top coat and let dry.
7. Repeat with papers #2 and #3 (refer to the photo for placement). Follow the same process as step six.
8. Give one final coat of Mod Podge and let dry.
9. Spray several coats of Mod Podge gloss sealer on top and let dry.
10. Glue the foam circles on the bottom of the metal circles to make them coasters – and now they won’t damage your table. Let dry 24 hours before using.


