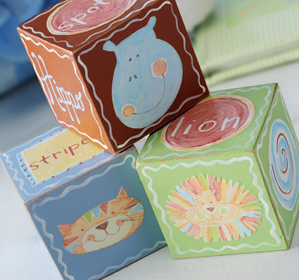
A perfect, playful touch to any nursery.


Instructions
- Using the 1” foam brush or the ¾” flat brush, basecoat each wood block individually Nutmeg, Baby Blue, and Soft Apple. Allow to dry. Sand smooth using fine grit sandpaper and reapply basecoat colors.
- Using the No. 1 liner brush loaded with thinned Wicker White, paint a wiggle line bordering each side of the wood blocks.
- Still using the liner brush loaded with thinned paint, paint “Hippo”, “Tiger”, and “Lion” on one side of each block (if those are the baby animals of your choice).
- Cut out the heads of each of the baby animals, a hippo, tiger, and lion. Also cut out extra circles and squares of coordinating print papers.
- Apply a coat of Matte Mod Podge to the backside of the paper. Place the paper cutout directly on the wood block centering the design on each side. Smooth any air bubbles or wrinkles using the Mod Podge squeegee.
- Once all three blocks are designed and papers are glued in place, brush a coat or two of Matte Mod Podge on each block. Allow to dry.

