Lay the magazine holder flat. Measure 9” from the bottom and mark with a pencil. Mark the front of the magazine holder 10” from the bottom. Cut the top part of the box off.
Cut the multi-color polka dot paper into two 3.75” x 9.5” pieces. Glue the paper to the sides of the box using Mod Podge. Cut a 4.5” x 3.5” strip and glue to the front of the box. Cut one 3.5” x 3.75” piece and glue to the back of the box.
Cut two 5” x 9.5” pieces of green paper and glue to the box with Mod Podge. Cut two 5” x 3.5” pieces of green paper and glue to the front and back of the box. Allow the glue to dry before trimming excess paper.
Assemble the bottom of the holder. Cut 4” down on the seam where the front and side connect. Cut a 3” diagonal slit from the corner of the sides. Fold the bottom half of the cut section in. Fold the front section down and hot glue in place.
Fold the top part of the cut slit in and hot glue the front in place to create the front of the truck.
Cut a 5” x 8” piece of cardboard for the top of the truck. Fold a 1” flap on the long side. Hot glue the folded flap to the inside of the top of the box.
Cut a 5.5” x 10.5” piece of turquoise felt. Cut a scallop along the long sides of the felt. Hot glue the felt to the top of the box, leaving a 1" overhang on the front and sides.
Paint four of the wood circles with Black. When the paint is dry, paint 2” circles in the center of the black circles with White. Paint small hearts with Bright Red. Paint the 1.5” wood circles in White and add smaller Yellow circles.
Cut two 2” x 3” pieces of blue cardstock. Cut the pieces at a diagonal and trim a 0.5” off the top. Line the windows with a black permanent marker.
Cut a 3.25” x 2.5” piece of blue cardstock. Outline the windshield and windshield wipers with the black permanent marker.
Cut a 4” x 2” piece of blue cardstock for the large side window. Decorate it and personalize it with the black permanent marker.
Cut a 2.75” x 2.25” piece of blue cardstock for the back window. Glue all the windows to the truck with Mod Podge.
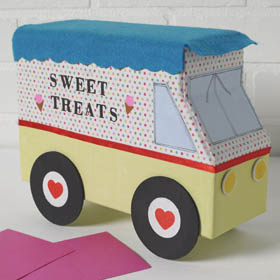
Stencil the words "Sweet Treats" to the side with Black. Add ice cream cones with Pink Parfait and Chestnut.
Hot glue the red ribbon around the truck as shown. Hot glue the wheels and the headlights to the truck.