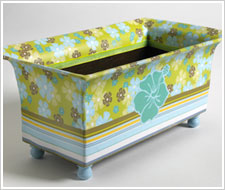
Design a Decoupaged Decorative Planter that is just as beautiful as the flowers inside with this project. Redesign seasonally for a fresh look each spring.

FolkArt ® Outdoor™ Acrylic Colors - Burnt Umber, 2 oz. - 1618
FolkArt
2 oz
+ 31 colors
Special Price $2.09 Regular Price $2.99
FolkArt ® Outdoor™ Acrylic Colors - Light Blue, 2 oz. - 1633
FolkArt
2 oz
+ 31 colors
Special Price $2.09 Regular Price $2.99

Instructions
- Basecoat inside and bottom of planter Burnt Umber and feet Light Blue. Let dry completely.
- Using tracing paper, make a pattern piece for front/back and sides of the top ¾ of the planter (we suggest making these slightly larger).
- Following pattern pieces, cut a front, back and two sides from flower paper. Using a clean foam brush, apply Mod Podge to back of paper piece then position on planter surface, working slowly to remove air bubbles and wrinkles. Repeat to cover front, back and both sides, trimming paper pieces to meet at edges or slightly overlap. Refer to photo for flower paper placement.
- Cut strips of striped paper to fit around bottom ¼ of planter. Repeat technique in step 3 to apply paper to planter.
- Cut one large blue flower motif from paper; glue to center of planter as shown.
- Apply one coat of Mod Podge over all of paper covered areas.Let dry.
- Apply two additional coats of Mod Podge, completely drying between each application.
- Thoroughly wet sandpaper under running water then squeeze out slightly. Using light pressure, sand entire decoupaged area of planter. Brush off dust then apply one final coat of Mod Podge. Let dry completely.

