
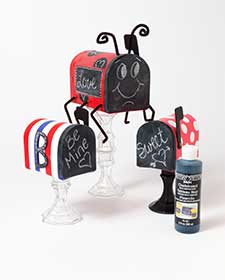
Your child's classmates will love dropping Valentine cards in these adorable mailboxes.


Instructions
Pink with White Dots Mailbox
- Remove the flag from mailbox. Basecoat the mailbox with Pretty in pink and allow to dry.
- Paint the front door and the flag of the mailbox with Black Chalkboard Paint. Allow to dry.
- Add white dots with the 5/8” Spouncer. Allow to dry.
- Glue the candlestick to the bottom of the mailbox.
- Condition the chalkboard by rubbing the chalk onto the chalkboard and rubbing off.
Valentine’s Day Red Ladybug Mailbox
- Remove the flag from mailbox. Basecoat the mailbox with Cardinal Crimson. Allow to dry.
- Paint the front and the flag with Black Chalkboard . Allow to dry.
- Tape off a rectangle on the side and paint with chalkboard. Allow to dry.
- Draw large circles onto the mailbox and paint with chalkboard paint.
- Make the White stitching around the rectangle box. Allow to dry.
- Make three holes with the craft knife on both sides of the box at the bottom and insert the chenille stems in one hole on one side go through the mailbox and outside the same hole on the other side. Bend legs as shown in photo.
- Make two hole on the top of the mailbox and insert one chenille stem into one hole and then go out the other. Curl the ends.
- Condition the chalkboard with the chalk and rub off.
- Glue the candlestick to the bottom of the mailbox.
Valentine’s Day Striped Mailbox
- Remove the flag from the mailbox. Basecoat the mailbox white. Allow to dry.
- Paint the front, letter and the flag with Black Chalkboard Paint.
- Tape off stripes and paint every other Cardinal and Concord Grape. Remove tape and allow to dry.
- Glue the letter on the side of the mailbox.
- Glue the candlestick to the bottom of the mailbox.
- Add flag back to the mailbox
- Condition the chalkboard by rubbing the chalk onto surface and wiping off.


