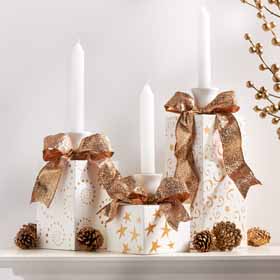
Embrace a more modern and elegant holiday decor with these tastefully painted candle holders.


Instructions
Preparation Instructions
- Apply an even coat of All Purpose Sealer to all wood surfaces. Allow to dry.
- Sand with fine grit (150-200) sandpaper.
Painting Instructions
- Using a large flat brush, basecoat all pieces, (candle cups and wood blocks) White. Allow to dry.
- Using the same brush, paint the interior and rims of the candle cups Bronze. Allow to dry.
Stenciling
TIP: When stenciling this type of project where you are only using portions of the stencil rather than the entire stencil design, it is easier to use painters or stencil tape to mask the open areas of the stencil that you don't want paint to go through.
- Small Candleholder – Uses the Fun Shapes stencil featuring the cluster of small stars.Begin by taping all around the grouping of funky star shapes to mask the edges and other unused stencil designs. Apply Stencil Adhesive by lightly dabbing it onto the back of the stencil and allow to dry lightly until tacky. Press the stencil firmly in place on the small wood block where desired. Stencil small funky star design using a cosmetic wedge sponge. Load Metallic Bronze onto the large flat surface of the cosmetic wedge by dabbing into the paint using the narrow tip as the handle. Dab straight up and down over the star stencil to transfer the design. TIP: A stencil brush can be used if a cosmetic wedge is unavailable. Lift the stencil and reposition to repeat the pattern where desired. (Refer to photo for design inspiration.) Remove painters or stencil tape from stencil when complete.
- Medium Candleholder – Using the same technique as described above, tape or mask around the large swirl dot pattern on the Fun Shapes stencil. Repeat stenciling technique using the same color, Metallic Bronze.
- Large Candleholder – Repeat the same process on the largest wood block stenciling the overall design featured on the Stars & Swirls stencil. Continuestenciling the entire block with Metallic Bronze.
Finishing Instructions
- Glue a candle cup to the top of each package using either fast drying white craft glue or hot glue.
- When the glue is dry and the candle cup is set, apply a couple coats of Satin Varnish using a large flat brush. Be sure to allow each varnish application time to thoroughly dry before applying the next.
- Add ribbon bow embellishments.

