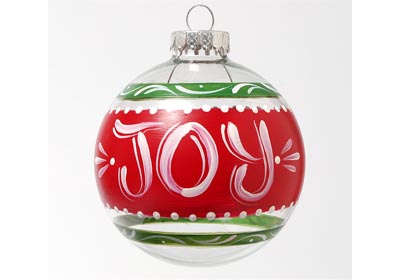
These ornaments will add a touch of cheer to your holidays!
FolkArt ® Multi-Surface Satin Acrylic Paints - Wicker White, 2 oz. - 2894
FolkArt
2 oz
+ 73 colors
Special Price $1.39 Regular Price $1.99
FolkArt ® Multi-Surface Satin Acrylic Paints - Cardinal Red, 2 oz. - 2900
FolkArt
2 oz
+ 73 colors
Special Price $1.39 Regular Price $1.99
FolkArt ® Multi-Surface Satin Acrylic Paints - Classic Green, 2 oz. - 2917
FolkArt
2 oz
+ 73 colors
Special Price $1.39 Regular Price $1.99
Instructions
- Begin by wiping the exterior of your glass ornament with a paper towel moistened with rubbing alcohol. This will clean the glass of any impurities such as grease, dirt or hand lotion.
- Load your large flat brush with Cardinal Red and paint a wide stripe around the belly of the glass ornament. Allow the paint to dry and repeat a couple more applications until you have /tmp/tmpC0iYJN opaque coverage. Be sure to allow each application to thoroughly dry before adding the next.
- Load the No. 4 flat brush with Classic Green and paint a narrow band just above and below the wide Cardinal Red band. I positioned this band slightly above yet allowed some glass space between. Again repeat until you have opaque coverage.
- Still working with the No. 4 flat brush, paint Wicker White “Joy” and “Noel” across the center of the red band. Highlight each letter with a thin stripe using your liner brush. If desired, add a couple strokes and a dot of Wicker White on each side of the word as a painted embellishment.
- Using the handle end of the liner brush, paint Wicker White dots around the top and bottom border of the red band.
- Load your liner brush with thinned Wicker White and paint a few brush strokes around the green bands. Allow to dry.
- If desired, add a ribbon bow at the top when dry and hang on your tree to enjoy!
Tip: I did not add a ribbon bow at the ornament top; however, I usually do on most hand created ornaments. To me, it just adds a finishing touch! Use a special holiday plaid ribbon of red and green or perhaps a sheer organza ribbon to dress up your ornament.


