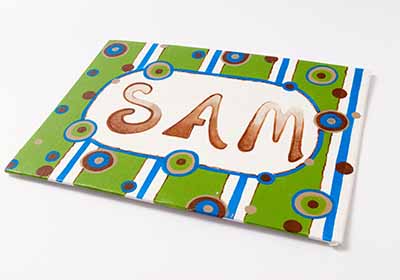
Every child enjoys being able to identify their “space!” What better way to do this than to create a fun striped and polka dotted personalized sign!


Instructions
- Begin by basecoating the 9” x 12” canvas panel White. Allow to dry.
- Create a name template. Lay a sheet of tracing paper onto the work surface. Position alphabet stencil, one letter at a time, over tracing paper. Using a pencil, trace within the cut area of each letter stencil. TIP: Be creative; names can be designed in many ways: in a straight line, slightly overlapped, alternate raised and lowered letters, and even in an arc.
- Fold the paper name template created in step 2 in half, then fold in half again. Draw an arch; then cut along the arc creating an oval shape when unfolded.
- Pencil the oval shape in the center of the canvas panel. Apply vertical tape lines across the canvas in desired pattern. TIP: Vertical stripes can be exact and measured or created more randomly allowing some to be wider than others. I created a pattern of alternating 1” and 2” widths using a ruler to measure.
- The 2” stripes are painted Leaf Green. Allow to dry and reapply Leaf Green for opaque coverage. When dry, remove tape.
- Create a ¼” vertical stripe in the center of the 1” White vertical stripe. Paint the ¼” stripe Cobalt Hue. Allow to dry and reapply for opaque coverage. Remove tape when dry.
- Paint a Cobalt Hue border around the oval. Allow to dry and reapply.
- Personalize within the White oval. TIP: Use tracing paper template to assist in spacing each stencil one at a time. Load a Spouncer with Khaki and lightly pounce up and down over the stencil to fill in the letter shape. While still wet, add a touch of White to the top of the letter and shade the lower half of the letter with Melted Chocolate. Lift to remove the stencil.
- Create a variety of various sized polka dots over the vertical stripes and around the personalized oval. Polka dots are painted, Khaki, Melted Chocolate, Cobalt Hue, and Leaf Green. TIP: Create interest - layer smaller polka dots over larger ones easily by using a variety of Spouncer sizes.
- Thin Melted Chocolate with a small amount of water. Load No. 1 Liner brush with thinned Melted Chocolate and paint a care-free wiggle line along the 1” vertical stripes as well as around the white of the oval shape.
- Still using the liner brush loaded with thinned Melted Chocolate, outline each letter.
- When completely dry, lightly spray seal FolkArt Clearcote Matte Sealer to seal and protect your project surface.
Project Tip: Switch up the color palette for boys or girls when personalizing a sign for your special little one!

