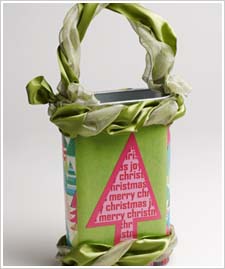
Fast to craft and fabulous, a recycled cereal box Christmas tree gift tote!

Instructions
- Clean the interior and exterior of the cereal box.
- Lightly buff any burrs and imperfections from the upper lip of the cereal box with the foam core nail file.
- Touch-up any unpainted area on the lip of the cereal box opening with the silver metallic leafing pen. Allow to dry completely.
- Paint the exterior bottom of the cereal box with the silver metallic leafing pen. Allow to dry completely.
- Cut the 11” x 17” sheet of white paper to wrap around the cereal box with a slight overlap. Adhere the white paper to the cereal box using Mod Podge. Make sure the seam is centered on the back of the cereal box. Allow to dry. (Tip: This layer of paper will ensure the design on the cereal box will not show through the decorative scrapbook paper layer and will strengthen the sides of the box/tote so it may be reused in the future.)
- Cut one sheet of the craft paper to fit around the cereal box. There will be a gap due to the size of the paper. Adhere the paper to the cereal box with the gap centered on the front. Measure the gap and cut the second sheet of paper to fit into the gap. Adhere to the cereal box and allow to dry.
- Cut craft paper 5”wide and to fit the front of the box. Center and adhere with Mod Podge to the front of the box.
- Cut two 1 ½” wide strips to create the bottom border. Match the pattern and glue together using Mod Podge to create one long strip. Adhere to the cereal box along the bottom using Mod Podge as shown in the picture. Center the seams on the sides of the box.
- Using the tree template provided, cut out the small tree from paper and the background tree. Adhere the small tree to the background tree using Mod Podge. Allow to dry.
- Make holes on the sided of the cereal box for the ribbon handle using a bead reamer or ice pick. Enlarge the hole with the end of the paint brush.
- Apply one coat of Mod Podge to the entire cereal box and allow to dry. Add a second coat of Mod Podge and allow to dry. (Don’t forget the bottom.)
- Using the two different green ribbons, twist the ribbons together to create the handle. Insert the end of both ribbons into the holes from the outside of the box into the box. Bring each ribbon end forward toward the handle and tie into a knot around the handle. (See the picture for detail.) Apply ribbon fray check to the ends of all four ribbons.
- Using the same technique for the top and bottom ribbons, twist the two ribbons together and hot glue one end to the center of the back of the cereal box. Fit the twisted ribbon around the box and hot glue the other end so they meet in the back.

