Instructions
Pattern:- Print out the pattern elements, enlarge the elements until they fit the area you are working on. Print as many as needed to lay out in a pleasing arrangement (such as our project) or make up your own design.
- Tape the elements to a large sheet of paper, such as freezer paper. Make one quarter of the pattern as shown, then duplicate it by tracing the other three areas. Fold the paper in half, trace the elements, then refold and trace until you have a complete pattern.
*You can tape the pattern you have just made to the outside of your window and by using Redi Lead and the Modular Method you can complete your project as directed. Follow the directions at the beginning of the article to complete the painting for this project.
Specific painting instructions for this project: Etching Medium is applied with a small stencil brush. The etching medium is the only paint that should be shaken and mixed well. Squirt a small amount (quarter size) into a foam plate. Dip the bristles of the round brush into the paint and on a clean area of the plate make little round circle with the brush to help distribute the paint on the bristles. In areas where the pattern notes Etching Medium(044) use the pre-loaded brush to make an up and down pouncing motion. While going in random circles completely fill in the areas that require the medium. Where the pattern notes (001B) this means use a flat brush set to apply the paint in a random "x" and "o" overlapping technique.
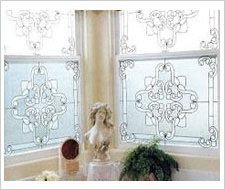
**Note: We purchased a sheet of Plexiglass cut 1/32” smaller than the size of the glass area of our garden tub windows. Our pattern was placed and taped to the underside of the Plexiglass. The project was laid on a table and then leaded, painted and cured while horizontal. After allowing to cure 24 to 72 hours (depending on your area,) the project was placed into position. There are several ways to secure the Plexiglass to your windows, and it depends on the construction of your home. For wood frame windows use tiny glazier points to slide into the wood and hold the Plexiglass into place just as you would do in replacing a piece of regular glass. You can also use double stick tape around the edges of the Plexiglass or double stick foam tape. Make sure to secure the Plexiglass well to your window opening to prevent pieces from falling.

