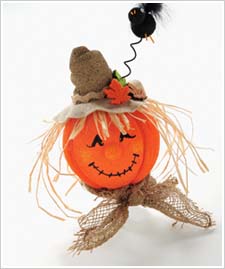
This friendly scarecrow keeps the duldrums away.
Instructions
- On the 6" Styrofoam ball, use the pencil to create the lines that make the pumpkin shape. Fold your sandpaper in half and follow the lines, rubbing gently until the shape forms. Paint the pumpkin shape and one ½” ball Pumpkin Orange. Let dry and hot glue the nose into place on the face.
- Paint the eyes and mouth Black with the liner brush. Dry brush the nose and cheeks with Apricot. Use a toothpick to apply the highlights in the pumpkin’s eyes.
- Cut and shape the Styrofoam cone with the sandpaper in the shape of his hat. Paint the hat Sandstone and Country Tan.
- Paint the 1” Styrofoam ball and one ½” Styrofoam ball Black. Paint two toothpicks Apricot. When dry, assemble crow as shown in photo.
- Arrange raffia pieces on head and hot glue into place. Cut a 6” circle out of the craft felt and hot glue it on top of the hair. Hot glue the hat on top of the felt and glue the rickrack and felt embellishments into place.
- Curl a piece of thick craft wire (painted black) around a paintbrush handle and cut to fit. Attach crow to hat with the wire as shown in photo.
- Tie the natural woven fabric into a knot and hot glue under the scarecrow’s chin.


