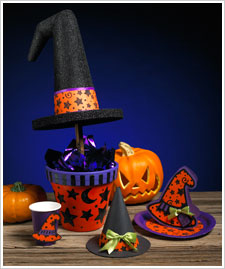
This bewitching Witch's Hat Party Set is a spirited set you can create on a limited funds. Give your Halloween party a pop of bold color with this spooky party set design.


Instructions
Witch's Hat Topiary
- Cut Styrofoam cone in two places at an angle. To form the bend in the hat, turn each piece in the same spot that it was cut and hot glue into place. Paint the cone and the round styrofoam disk Black. Allow to dry and then hot glue the cone to the center of disk.
- Basecoat the bottom of the clay pot Pumpkin Orange and the rim Concord Grape. Allow to dry and paint over the Pumpkin Orange with the Glow-in-the-Dark Orange. The more coats of the Glow-in-the-Dark paint the more it will glow. Allow the paint to dry and then stencil the stars and the moon with Black. Add the stripes on the rim in Black using a flat brush. After the stars, moon, and stripes have dried, brush on black glitter glue.
- Using the pattern provided, cut out the trim along the bottom of witch's hat from the orange paper. Stencil the stars in Black onto the trim. Wrap the trim around the bottom and glue the two pieces together at the sides using hot glue. Cut two pieces of 1/4" purple ribbon to fit around the top and bottom of orange trim and hot glue in place. Tie a green bow and hot glue in place.
- Insert 4"x4" Styrofoam block into the clay pot pushing it in as far as it will go. Insert stick into the center of block. Hot glue around the stick. Make a hole in the center of the bottom of the hat slightly smaller than the stick. This will make it easier to slide hat on. Once the hat in on the stick, hot glue to hold in place. Add the metallic purple tissue paper to clay pot.
- Using the patterns provided, cut out all the parts for hat from black posterboard using a craft knife. Before forming the cone for hat, make 1/2" slits at the bottom as shown on pattern and fold outward. Make the slit in the side of cone as indicated on pattern and insert the flap. The flap ends must be folded first to fit inside of slit. Once the flap is in unfold the flap ends. Take the circle that has the largest hole in the center and place over the top of the cone. Hot glue to the bottom of cone onto folded pieces. Set aside. On the other circle with the smaller hole in center, cut out a circle for the clear purple plastic which is slightly larger than center hole and tape it to the wrong side of center. Fill the hat with goodies and then hot glue the bottom piece to hat. Make sure the taped side is glued to the bottom of hat.
- Use the pattern provided to make the orange trim at bottom of hat. Stencil stars in Black and then wrap round hat, hot glue at ends. Add green bow.
- Using patterns provided, cut out card parts. Actual card and tag are cut from purple paper. Witch's hat is cut from orange. Stencil the stars onto the orange hat with black. Attach orange hat to black paper using glue stick. Cut out the hat leaving a small black border around orange hat. Attach to purple card using glue stick. Cut out trim for bottom of hat from black paper. Cut out small strips from the purple paper and glue onto black trim. Refer to photo for placement. Glue purple tag to black paper and cut out leaving a black border around the purple write words with black marker. Hot glue tag into place and add green bow.
- Cut out orange circle to fit into the center of black paper plate. Stencil black stars onto circle. Glue in place with glue stick. Add a clear plastic or glass plate on top before using for food. Do not eat directly from plate.
- For paper cups, use the pattern for the small witch's hat. Stencil stars onto orange paper in black and then cut out hat. Glue the hat to Black paper and then cut out leaving a small Black border. Hot glue to the side of cup.


