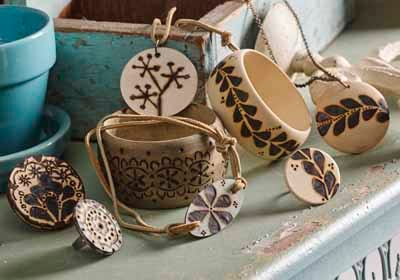
Instructions
Trailing Leaves Ring, Necklace, and Bracelet
- Before you begin with wood burning tool, lightly draw the leaf pattern onto the wood surface using chalk. You don’t need to draw all the details, but just a basic guide for placement; for example, we drew a line on the bracelet to follow for the center of leaves.
- The leaves are created with the Shading Point included in Wood Burning Tool Kit.
- Place the leaf pattern as shown and hold tip onto wood, ‘roll’ a bit to get a solid leaf.
- Repeat as shown to create leaf vine pattern.
- After allowing the tool to cool, use the Cone Tip to add random dots as shown to leaf vine.
- Glue wood round to ring base, and create necklace with wood pendant.
Daisy Bracelet
- Before you begin with wood burning tool, lightly draw the flower pattern onto the wood surface using chalk.
- Tip: You don’t need to draw all the details, but just a basic guide for placement.
- The petals are created with the Shading Point included in Wood Burning Tool Kit.
- Place the petal pattern as shown and hold tip onto wood, "roll" a bit to get a solid petal.
- Repeat as shown to create flower pattern.
- After allowing the tool to cool, use the Cone Tip to add random dots as shown to leaf vine.
- Using soft cloth, rub wood tint onto wood piece and let dry.
- Thread wood piece with leather and knot to create wrap bracelet.
Large Bangle with Lace Pattern
- Place Border stencil design onto bracelet. Lightly draw through the stencil with a pencil to create a pattern. Repeat tracing stencil as needed to go around bracelet.
- Using the Universal Tip or Chisel Point Tip in the Wood Burning Kit.
- Draw with Tip following pattern you created with Stencil.
- Using soft cloth and FolkArt Stain, rub Walnut Stain onto entire bracelet and let dry.
Dandelion Necklace
- Before you begin with wood burning tool, I lightly drew the flower pattern onto the wood surface using chalk.
- Tip: You don’t need to draw all the details, but just a basic guide for placement.
- Using the Cone Tip, burn the design onto wood pendant as shown.
- Add gold hoop and hang on leather cord.
Large Paisley Pattern Ring
- Before you begin with wood burning tool, lightly draw the pattern onto the wood surface using chalk.
- Tip: You don’t need to draw all the details, but just a basic guide for placement.
- Start with Shading Tip to create large leaf and petal designs.
- Using Shading Tip, drag tip around edges of both rings to create heavy-burned edge.
- After letting the tool cool, use the Universal/Chisel Tip to add detail with random dots and patterns.
Small Bohemian Ring
- Using Cone Tip start in the center of ring and burn design that is shown.
- After letting tool cool, use the Shading Tip add the large patterns around the edge of circle as shown.
- Glue wood rounds to ring bases using jewelry glue. Let dry.


