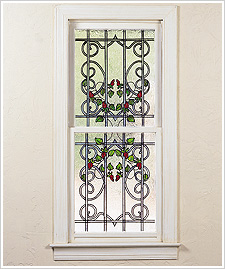
Transform any window into a stained glass window in a weekend! It is fun and easy to do with Gallery Glass®! Simply transfer the pattern, lead the design, and color. When it is time to redecorate, remove the design and replace with another!

Instructions
- Enlarge pattern to desired size. Pattern given is the lower left quadrant for one window. The pattern will need to be repeated for the entire window. For the lower right quadrant of the window, repeat the pattern as a mirror image. For the top left quadrant of the window, repeat the pattern as an upside down mirror image, leaving off the vines and using only the wrought iron. For the top right quadrant, use the top left quadrant as a mirror image.
- If you have access to the outside of the window, you may want to tape the pattern to the back of the glass. If access is not convenient transfer the pattern onto the glass with transfer paper. To do this, place the darkest side of the transfer paper against the inside glass and place the pattern on top of it. Trace the lines of the pattern firmly with a pencil.
- To obtain a mirror image of the pattern, put against a bright window and trace the design on the back of the paper, following the shadow of the ink on the original side. Use this side as your template when the reverse of the image is needed to complete the design.
- Peel up Redi-Lead strips from backing.
- Press the strip onto glass on top of pattern or transferred line of design.
- (Note: Although strips may be curved to it lines, do not stretch the strips. Do not handle the strips more than necessary, or they may not adhere properly)
- Continue adding leading to pattern lines. If a pattern is longer than your strip piece strips together end to end. Intersecting lines should be trimmed so that they meet; do not overlap leading strips.
- Touch up all joints with Liquid Leading Let joints dry thoroughly before applying Window Color paint. Use sparingly. Remove excess with paper towel.
- You are now ready to add Window Color. Do not shake Window Color bottles. Small bubbles in the paint are normal. Numbers on the pattern correspond to the last two digits of the colors stock number on the bottle. (E.G. Kelly Green's stock number is 16008 and is indicated on the color key as 08.)
- Start at the top left corner of the window and apply color to one section at a time by squeezing it from the bottle on to the glass. Run a thin line of paint across the top of the section, wiggling the tip back & forth as you move left to right. Repeat moving side to side, and downwards to the end of the section. Apply paint thickly enough to prevent light from showing through.
- After you have applied paint to a section, hold the pointed end of the nut pick to the glass and comb or stroke back and forth quickly in straight lines through the paint. All colors except Crystal Clear should be combed. Crystal Clear should remain bumpy.
- Repeat the process until you have finished the complete pattern.
- Window Color projects usually dry in 8 hours and cure in 3-7 days. Allow projects to cure at least one week before cleaning.
- To clean, spray a very light mist of water on a soft cloth and wipe the surface gently. Do not use abrasive or solvent based cleaning product or too much water to clean your project.


