Create an ornate monogrammed canvas using the Plaid Wood Burning tool.

Instructions
- If desired, sand the wood plaque smooth.
- Tip: When creating a wood burned project, select a wood surface that has a smooth, close grain without bumps, ridges or large pores.
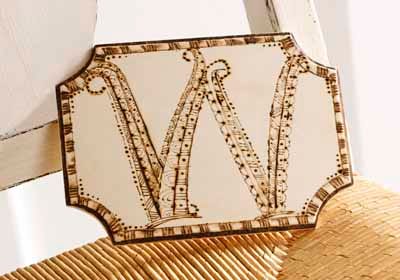
- Prepare your zentangle letter design. Using a sheet of tracing paper cut to the size of the wood plaque, pencil your zentangle letter. Basically begin by drawing the letter then add to the basic lines - with additional lines, scallops, cross-hatching, scrolls, dots, chevrons and checkerboard patterns. If the letter “W” is your letter, you can use the sample pattern provided.
- Next, transfer your pattern onto the smooth wood surface by sliding a sheet of transfer paper between the wood surface and the pattern. If desired, hold the pattern in place using a piece of stencil tape. Trace over the pattern lines using a pencil, dead ballpoint pen, or an artist’s stylus.
- Insert the desired tip into the 2-n-1 Craft Tool and screw into place until it no longer moves. There are four different wood burning tips Universal Point (angled chisel edge tip), Flow Point (looks like a rounded metal dowel tip), Shading Point (appears like a leaf shape) and the Cone Point (which looks like a rounded tip cone similar to a ballpoint pen) as well as two super fine point tips which are perfect for cutting stencils: a Straight Tip and a Curved Tip. Each tip or point will provide you a completely different wood burn look. Try each tip on a piece of scrap wood or on the back of your project to “test” the tips and determine the look that can be achieved with each tip. We used the “cone” tip for most of the project. Once inserted and screwed down in place, rest your tool on the metal easel/stand that comes in the package. Lastly, plug your 2-n-1 Craft Tool into a wall socket and flip the switch to turn it on. Allow a couple minutes for the tool to heat up.
- Tip: To lock your easel/stand in place so that the hot wood burning tool does not shift or move, place a length of stencil tape over the legs of the easel/stand and tape it to your work surface.
- When the tool is hot, begin touching the surface with light pressure and move to direct the heated tip to follow the pencil lines of your pattern. You may find it easier to pull towards you rather than away from you. Continue burning one section of the pattern at a time until the entire design has been wood burned.
- Tip: Use the cone point tip to create dots. Hold the tool straight up vertically and then touch the surface. The longer you hold the tool in one place or the more pressure you apply, the larger and deeper the wood burned dot
- To wood burn the checkerboard design around the edges of the plaque as well as to darken the routed edge, switch the tip to the Universal Point (the angle chisel edge tip).
- Tip: To change tips, either turn the unit off and unplug it from the wall to allow it to completely cool down before handling, OR keep a pair of flat nose jewelry pliers handy to grasp onto the hot tip when removing it from the tool. Be careful where you set the removed hot tip as it may burn your surface. I usually immerse it in a little water to cool it down.
- Tip: Exposed pencil lines can be removed with an eraser after the entire design has been completed.

