
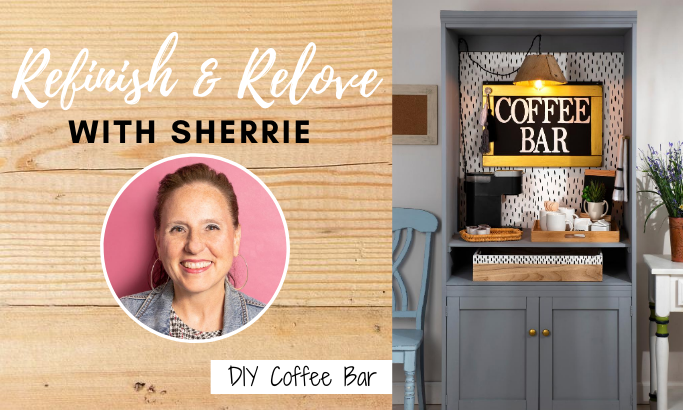
Today, we continue our Refinish & Relove with Sherrie series with a beautiful coffee bar. See how Sherrie transformed an old armoire into a one-of-a-kind coffee bar. You are going to love how she gives this old piece of furniture new life in just a few steps. Keep reading to learn how! 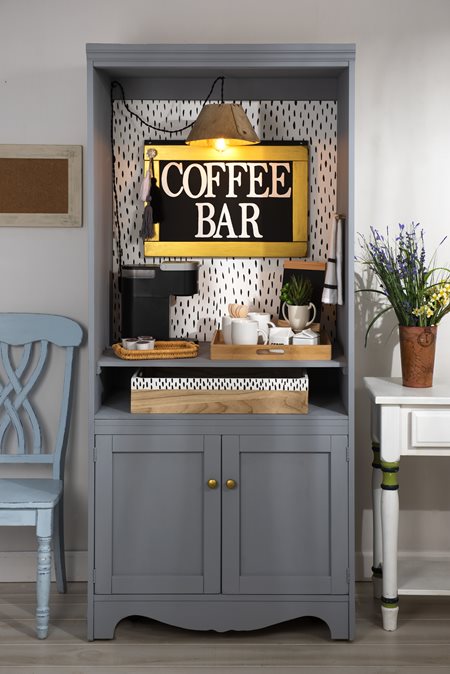
Supply List:
Watch how Sherrie put this amazing piece together!
Instructions:
As an added touch, take a plain tea towel and add some extra flair to your creation. For the tea towel, using the Black Fabric Creations, stencil "Coffee before Talkee" 3 1/2" from the bottom of the towel. Tape off a 1/2" border above and below the words and paint Black as well.
AND to fill that coffee bar you'll need some new coffee mugs. Try painting your old mugs for a complete and total refresh to your morning routine! Check out some of our favorite coffee mug makeover ideas!


Happy Crafting!!
Supply List:
- FolkArt ® Home Decor™ Chalk - Castle, 16 oz. - 34873
- FolkArt ® Home Decor™ Chalk - White Adirondack, 8 oz. - 34150
- FolkArt ® Home Decor™ Chalk - Black, 8 oz. - 34169
- FolkArt ® Home Decor™ Wax - Clear, 8 oz. - 34170
- FolkArt ® Treasure Gold™ - Gold, 2 oz. - 3081
- FolkArt ® Home Decor™ Brushes - Chalk Paintbrush - 34907
- FolkArt ® Alphabet & Monogram Paper Stencils - Serif Font, 5" - 50319
- Folkart ® Brushes - Stencil, Premium, 1" - 5077
- FolkArt ® Painting Tools - Stencil Tape, 3/4" x 25 yds. - 50380
- Folkart ® Brush Sets - Artist Variety Set, 10 pc. - 50536
- Fabric Creations™ Soft Fabric Inks - Black, 2 oz. - 25999
- Fabric Creations™ Adhesive Stencils - Mini - Coffee, 3" x 3" - 26392
- Old armoire with electric outlets
- Large drawer pull for hanging the tea towel
- Drill
- Hammer
- 1" paddle bit to make large holes
- Screwdriver
- Jigsaw or circular saw
- Wood glue
- Wooden bowl
- Hanging light pendant
- 2 cut hooks
- Large tray
- White tea towel
- 2'x4' 1/4" birch plywood
- 2'x4' 1/2" birch plywood
- Measuring tape
- Wood filler
- Wood glue
- Sandpaper
- Clean soft cloth
- 1" drywall screws
- 1/2" finishing nails
Watch how Sherrie put this amazing piece together!
{^media|(width)600|(height)500|(ext).mp4|(url)~/Plaid/media/BlogImages/Sherrie-Coffee-Bar.mp4^}
Instructions:
- Remove doors and any inside component that doesn't make sense. Make sure to hold on to the electrical outlets that were located on the inside. Place them to the side.
- Fill any holes left by screws with wood filler. Once wood filler is dry, sand it down until flush with surface.
- Measure the inside dimensions to determine the size of the shelf. Cut shelf from the 1/2" plywood. Sand rough edges.
- Cut a set of 2" wide strips from the 1/2" birch plywood. Then cut these pieces to the depth of the inside of the armoire. These will be the two braces that hold the shelf up.
- Determine where the shelf will sit on the inside and screw the two strips, one on each side, in place.
- Measure between the top of the shelf to the bottom of the top on the inside of cabinet. Measure the width. Cut the 1/4" plywood to these dimensions. Sand any rough edges.
- The doors from this armoire are easy to cut in half to make a sign. Not all doors will be made this way. If that is the case then buy an unfinished wooden sign and paint it in the same way.
- Begin to basecoat the cabinet with Castle. Paint the shelf as well. Sand in between coats.
- Paint the 1/4" backing with White Adirondack. Allow the white to dry and then add the black marks with one of the round brushes from the pack of brushes listed in the supply list. Glue the backing to the back of the armoire. Add some finishing nails to hold it in place. Apply a coat of clear wax to the cabinet and the shelf. Allow to dry and then use the soft cloth to buff. Drill a 1" hole with the paddle bit at the bottom where the electrical cord will be running. Screw the electrical outlet onto the back of the cabinet where the coffee pot is going to sit.
- Put the shelf in place.
- Paint the frame of the sign with Treasure Gold and the back of sign with Black. Once dry. Stencil "COFFEE BAR" in White Adirondack.
- Tape off a 2" border at the top edge of the large tray located under the shelf of the Coffee Bar. Paint above the tape with White Adirondack. Once dry add the Black marks to the painted border.
- For the light fixture, make a hole in the bottom of the wooden bowl large enough for the plug from the hanging pendant to fit through. This can be done with the jigsaw or by using the large paddle bit in the drill. Pull the cord from the bottom, through the hole and out the top, which is actually the bottom of the bowl.
- Find the center of the underside of the top. Screw in a cup hook.
- Screw another cup hook in to back upper corner.
- Drape the light fixture as seen in the video. Plug the light into the electrical outlet attached to the inside of cabinet.
As an added touch, take a plain tea towel and add some extra flair to your creation. For the tea towel, using the Black Fabric Creations, stencil "Coffee before Talkee" 3 1/2" from the bottom of the towel. Tape off a 1/2" border above and below the words and paint Black as well.
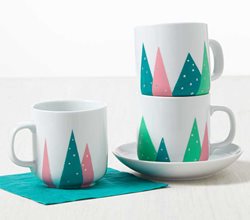
AND to fill that coffee bar you'll need some new coffee mugs. Try painting your old mugs for a complete and total refresh to your morning routine! Check out some of our favorite coffee mug makeover ideas!
Happy Crafting!!
