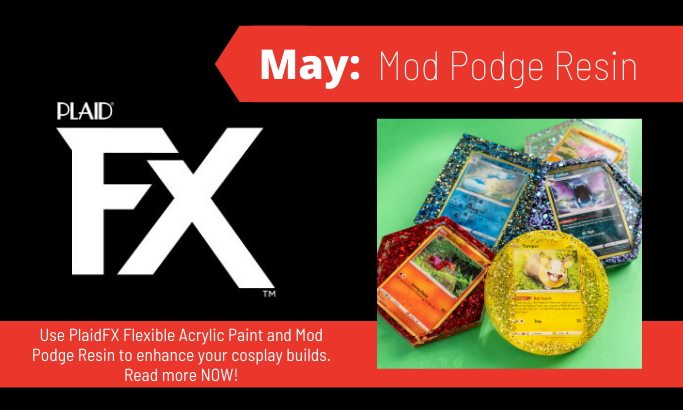
In the summer of 2021, we are going big! We are going to spend this summer building an extraordinary cosplay build and YOU get a front-row seat to see it all take shape. In the months of June, July, and August we are going to be continually updating this blog post with the progress of our build. Then at the end of the summer, we will debut the entire build to the cosplay community. So stay tuned and get hyped for a summer full of tips, tricks, and creativity! This is the summer of nature elements. Make sure to tune in each month as we dive deep into a specific cosplay technique that is sure to be a help to you when you are building. All summer long we will be going live on Facebook, providing project tutorials, and bringing in new areas of fandom to the PlaidFX community.
In June, July, and August we are diving into everything nature. Our cosplay build for summer 2021 is a wood nymph. We are excited to teach you how to create realistic wood grain texture, moss, vines, flowers, and so much more! This summer you will also learn the fundamentals of color theory to give your build a realistic touch.
Are you excited about our summer build? We are! And we are so excited for you to take this journey with us as we create. And if you decide to create along with us, make sure to share your creations with us using #PlaidFX. You could be featured on our social media channels.
Check out this awesome introduction to PlaidFX Flexible Acrylic Paint and how you can use it in your builds!
Our Craft Break in June will cover the basics of color theory. Jessie will be discussing the color wheel, types of colors, basic color theory terms, and how to mix paint to adjust hues and temperatures. All of these painting basics will be used for creating realistic wood, moss, and vines for our build.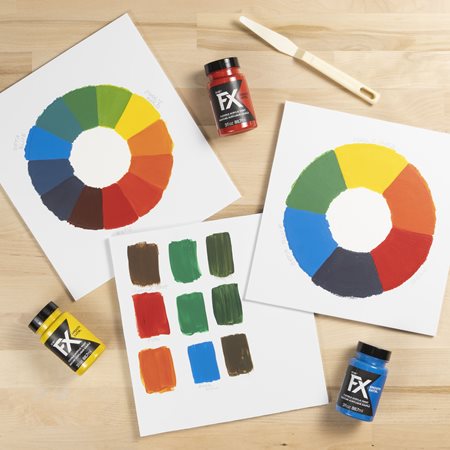
All Craft Breaks will be featured in this blog for your reference after the Craft Break livestream is over.
Check back to this blog in the month of June, July, and August to see what other great tips and tricks we will be discussing in our Craft Breaks.
We have some awesome tips and tricks to share with you on everything from shading to highlighting to create every element of our build this summer. You will want to follow PlaidFX on TikTok to stay up to date with each part of the build. Then at the end of the summer stay tuned to see how all these tutorials come together to create a unique and fun cosplay build you'll be proud to wear around any con.
Click on each project photo below for full instructions and step-by-step videos.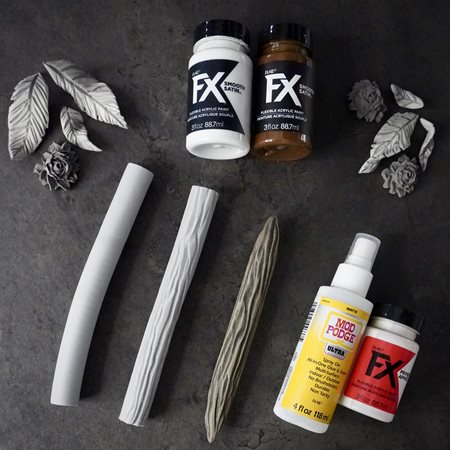 Stay tuned to TikTok later in the month for the full video instructions to see how we make all this realistic components of the wood nymph build.
In reference to the project above, here are some things to remember:
We will be showing you how to create a realistic wood grain texture. Emily will be discussing tips and tricks for dry brushing, how to use Foam Clay, and so much more. If you are new to adding texture to your cosplay builds, this a great tutorial for learning the basics. Make sure to check out the PlaidFX TikTok to see full video instructions later this month. We are also super excited to elaborate on this wood grain technique and embellish it with moss details. With these easy-to-follow instructions you can turn faux moss into realistic forest greenery.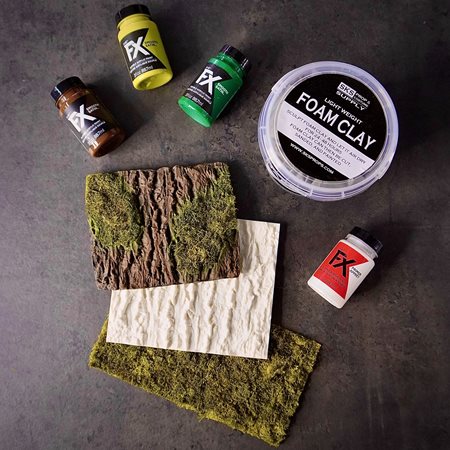
In reference to the project above, here are some things to remember when creating a wood grain texture.
Tips & tricks for creating faux moss:
Don't forget we will be adding to this blog all summer long with a variety of tips, tricks, and how-tos to show the progress of our wood nymph build. Are you as excited as we are? Share your love creations and love for PlaidFX by using the #PlaidFX! You could be featured on our social media channels.
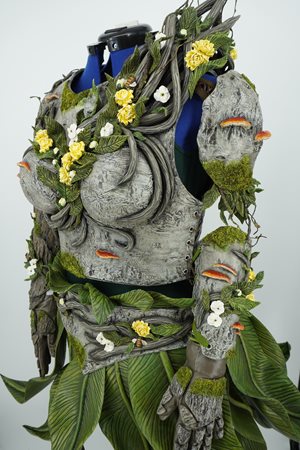
In June, July, and August we are diving into everything nature. Our cosplay build for summer 2021 is a wood nymph. We are excited to teach you how to create realistic wood grain texture, moss, vines, flowers, and so much more! This summer you will also learn the fundamentals of color theory to give your build a realistic touch.
Are you excited about our summer build? We are! And we are so excited for you to take this journey with us as we create. And if you decide to create along with us, make sure to share your creations with us using #PlaidFX. You could be featured on our social media channels.
JUNE
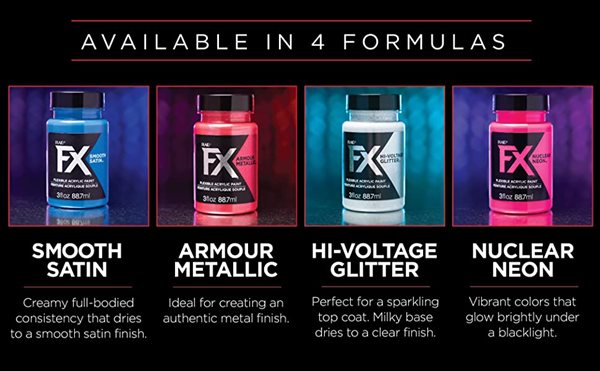
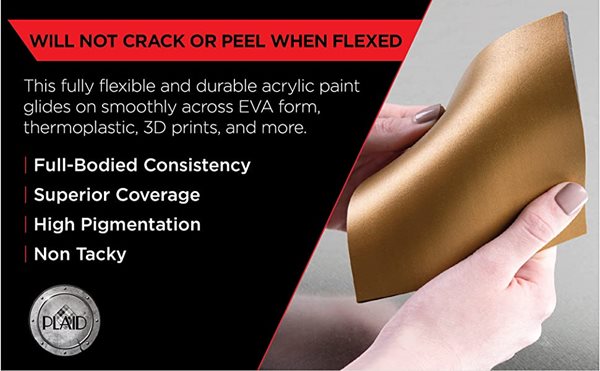
To begin, you are going to need some durable paints as a solid base for your builds. PlaidFX is a paint line specially designed for cosplay and costuming. The Smooth Satin colors will glide on effortlessly for a high-quality finish each time you paint. This fully flexible and durable acrylic paint for cosplay is ideal for EVA foam, thermoplastic, 3D prints and more. Enjoy the creamy, full-bodied consistency of this fandom-inspired color palette. With every stroke, there is superior coverage and high pigmentation. When dry, this innovative paint is not tacky and will not crack or peel.Check out this awesome introduction to PlaidFX Flexible Acrylic Paint and how you can use it in your builds!
CRAFT BREAK LIVESTREAMS
Over the course of the summer, we will be doing several Craft Breaks to show you the progression of this cosplay build. Make sure you are following PlaidFX on Facebook so you will be notified when we go live.Our Craft Break in June will cover the basics of color theory. Jessie will be discussing the color wheel, types of colors, basic color theory terms, and how to mix paint to adjust hues and temperatures. All of these painting basics will be used for creating realistic wood, moss, and vines for our build.
All Craft Breaks will be featured in this blog for your reference after the Craft Break livestream is over.
Check back to this blog in the month of June, July, and August to see what other great tips and tricks we will be discussing in our Craft Breaks.
FUN TIPS, TRICKS, AND HOW-TOS
Throughout the summer we will be providing you with several awesome tutorials and informative techniques involving nature using PlaidFX Flexible Acrylic Paint.We have some awesome tips and tricks to share with you on everything from shading to highlighting to create every element of our build this summer. You will want to follow PlaidFX on TikTok to stay up to date with each part of the build. Then at the end of the summer stay tuned to see how all these tutorials come together to create a unique and fun cosplay build you'll be proud to wear around any con.
Click on each project photo below for full instructions and step-by-step videos.
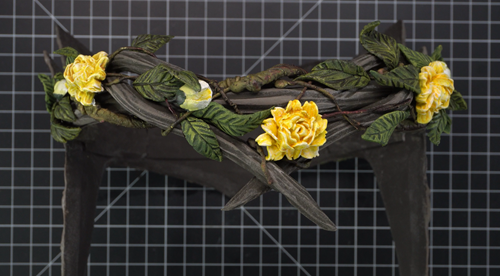
Realistic Vines
In reference to the project above, here are some things to remember:
- When creating texture using a rotary tool, remember to wear appropriate safety equipment including goggles and a dust mask.
- Make sure to have a shop vac or home vacuum close by for easy clean up of the EVA foam dust.
- When using a rotary tool, glide the bit away from you if you are right-handed and toward you if you are left-handed.
- Start slow and gradually increase speed once you are comfortable with the tool.
- Holding the rotary tool at an angle will help create varying grooves in your foam.
- Heat seal the EVA foam dowels after shaping to close the foams pores and reduce fuzz. Heat sealing your foam helps prep the material for paint.
- Using PlaidFX Clear Primer will smooth out the EVA foam texture to create a more organic surface.
- Start by applying a dark base color.
- Dry brush a mid-tone color around the high peaks created with the rotary tool.
- Add lighter colors in some areas for highlights.
- To attach vines to your cosplay or prop we recommend using super glue on the back.
- These vines are perfect to embellish with leaves and flowers.
We will be showing you how to create a realistic wood grain texture. Emily will be discussing tips and tricks for dry brushing, how to use Foam Clay, and so much more. If you are new to adding texture to your cosplay builds, this a great tutorial for learning the basics. Make sure to check out the PlaidFX TikTok to see full video instructions later this month. We are also super excited to elaborate on this wood grain technique and embellish it with moss details. With these easy-to-follow instructions you can turn faux moss into realistic forest greenery.
Wood Grain
In reference to the project above, here are some things to remember when creating a wood grain texture.
- When working with silicone molds it is important to apply a releasing agent to prevent Foam Clay from adhering.
- We recommend applying two thin layers of the releasing agent and allowing 15 minutes drying time in between.
- Always remember to wear proper safety gear when working with these materials and spray in a well-ventilated area.
- Once releasing agent has cured apply a thin layer of Foam Clay pressing in firmly.
- Try to keep Foam Clay level at the top of the mold to allow easy application later.
- Place mold in freezer for 30 minutes to allow to harden.
- After 30 minutes the Foam Clay can be released from the mold easily.
- You can directly place Foam Clay onto EVA foam using water or wait 48 hours for the Foam Clay to cure and adhere with contact cement.
- Once cured the Foam Clay is ready to be primed and painted.
- After curing, Foam Clay can become brittle and is not flexible.
- For durability, we recommend adding Super Glue around the edges to prevent Foam Clay from cracking.
- We also recommend adding 3-4 layers of PlaidFX Clear Primer to give some flex back to the Foam Clay and prep the surface for paint.
- For this demo we show how to add a dark base and dry brush on lighter shades to create depth.
- The Foam Clay's texture helps add depth to this paint job and is super easy to achieve.
- Adding Mod Podge Ultra in Matte will transform the Smooth Satin finish to appear more realistic.
Tips & tricks for creating faux moss:
- Peel n’ stick moss is a great base to work with for this technique.
- This type of moss embellishment can be easy to apply on top of wood grain details.
- Though it has a sticky back, some moss still falls off when taken out of the packaging. To help prevent this from occurring, we recommend applying multiple thin layers of Mod Podge Ultra.
- To add realism to the moss, we recommend adding multiple shades of PlaidFX Smooth Satin.
- Using a texture brush is perfect for this application.
- Start with darker tones and gradually add lighter shades to create depth.
- This helps achieve shading and highlights.
- Repeat steps as desired to customize your project.
- Cut out moss using scissors and peel off back adhesive to attach on to your project.
- To help hide the harsh line of the moss, dab on paint around edges to blend.
- Apply Mod Podge Ultra in Matte to add a realistic finish and seal your project.
Don't forget we will be adding to this blog all summer long with a variety of tips, tricks, and how-tos to show the progress of our wood nymph build. Are you as excited as we are? Share your love creations and love for PlaidFX by using the #PlaidFX! You could be featured on our social media channels.
July
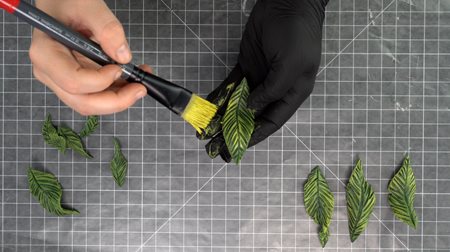
In the month of July, we continue working on our wood nymph build by creating a variety of accents and texture pieces to really make the build pop! Check out the details of each of piece below.Leaf details:
@plaidfx ##create ##leaf ##details out of ##EVAFoam using a ##woodburner from ##plaidcrafts in this ##stepbysteptutorial for ##cosplay
⬠Summer Breeze - Tobu & Jordan Kelvin James
@plaidfx ##Paint ##leaf ##details for ##cosplay using ##plaidfx and ##modpodge in this ##stepbystep ##tutorialseries
⬠original sound - PlaidFX
- This technique is perfect for creating a dynamic leaf skirt or smaller leaf details attached to vines embellished with flowers.
- It is advised to wear protective gloves/glasses, a respirator, and working over a shop vac for various steps of this technique.
- When drafting your leaf patterns, vary the shape and sizes slightly to create visual interest on your main build.
- For the smaller leaves, use 4mm EVA Foam and for the larger leaves use 6mm EVA Foam.
- To help hold the small leaves you can use a pair of pliers where appropriate.
- Painting the leaves is best to do before assembling onto your main project. This is because you have more control over the small pieces and can get to all the edges.
- When attaching small leaves to vines you can use super glue or hot glue; an accelerator for super glue is a great benefit when placing leaves onto your your project.
- When attaching large leaves to create a skirt use 2 layers of Contact Cement on both sides being adhered together. This will create a strong bond.
- If needed, before applying contact cement, score the areas where you want to attach with a utility knife or lightly sand with 200 grit sandpaper. This will help the two sides grip together and create a stronger bond.
- To create more realism, it is advised to desaturate the paint colors used. This is achieved by mixing in a small amount of the color opposite on the color wheel. For example, in this project we added a small amount of orange to the green hues to dull the color.
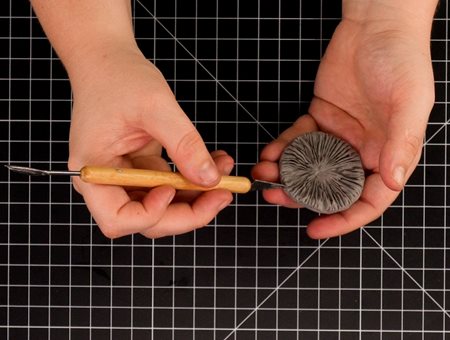
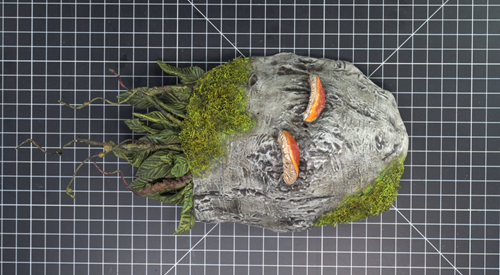
Mushroom Details:
@plaidfx ##create ##mushroom ##details out of ##foamclay for ##cosplay in this ##stepbysteptutorial by ##plaidfx
⬠original sound - PlaidFX
- Depending on how thick you want your mushroom caps to be, you can add more or less Foam Clay into the silicone mold.
- Once cured, Foam Clay can become brittle, so do not make the mushroom caps too thin.
- You can coat the mushroom caps in epoxy or multiple layers of PlaidFX Clear Primer to add a protective coating which can help to prevent any breakage.
- When blending the seams on the mushroom caps, be mindful not to press down too hard on the Foam Clay. If you press down too hard, detail could be lost on the other side.
- When working with yellow and orange hues, it’s important to apply a white basecoat. This will help those bright bold colors pop. This will reduce the number of layers needed or opaqueness.
- When applying a wash to the underside of the mushroom caps, if you work in layers, you do not need to wipe away the excess paint. Rather, allow the watered down paint to rest into the recesses and settle. Repeat as necessary to intensify the effect.
- You can also repeat these steps to create stems for the mushroom caps.
- Stems can be attached to the mushroom caps using Super Glue or Contact Cement once cured.
- As these details can be fragile, try not to add them to areas on your main build that will be under a lot of stress or could be knocked/hit.
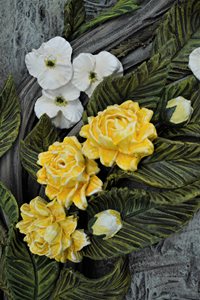
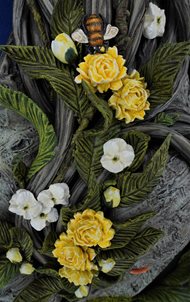
Flower Details:
@plaidfx ##Learn ##Howto ##paint ##flowers using ##PlaidFX for ##cosplay in this ##stepbystep ##tutorialseries
⬠original sound - PlaidFX
- Using an airbrush to apply the white basecoat will help reduce brush strokes which could take away from the delicate details on the flower.
- Create subtle contrast to the flowers by building up varying yellow hues gradually.
- Wearing gloves will help keep paint off of your fingers on these small details.
- Change dirty gloves often when paint drys on them so they do not transfer paint onto the flowers.
- To make multiple flowers, work in small batches to help quicken your productivity and time management.
- This technique can be repeated with a variety of silicone molds to add visual interest to your overall main build.
- Attach flowers in clusters to appear as though they are growing naturally on vines.
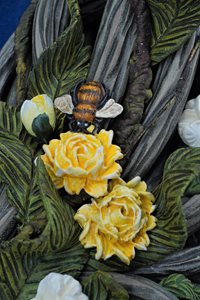
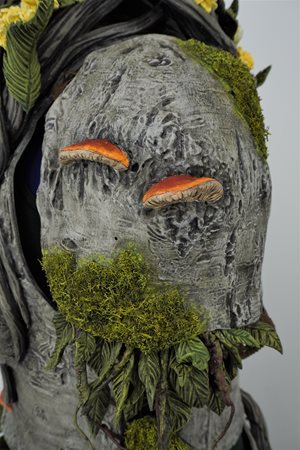
Natural Texture:
@plaidfx ##Learn ##howto ##paint ##naturaltexture using ##PlaidFX in this ##stepbystep ##tutorialseries
⬠original sound - PlaidFX
- Heat forming EVA Foam before gluing seams together will help prevent the EVA Foam from resisting any complex curves.
- Having something to shape the EVA Foam is really beneficial. For this shoulder piece, we used a dress form arm attachment.
- When applying Contact Cement to an inner seam, add two thin layers onto both sides allowing to cure in-between coats. You want the thickness to be similar to how you would apply nail polish. Too much Contact Cement can actually cause the seam to rip, which we do not want.
- Adding a 2mm strip of EVA Foam to the backside of the shoulder’s base will help the pattern keep it’s shape. This is important because when Foam Clay is added on top it will make the EVA Foam want to expand and loose it’s shape. Once the Foam Clay has cured, addressing this issue is not easy to fix.
- When using Foam Clay to create a textured skin onto EVA Foam armor for large areas, it helpful to have multiple silicone molds of the same texture to increase productivity and time. This however is not necessary. When you have multiple molds, you can cast them at the same time. When you pull the Foam Clay out of the silicone mold it starts to cure, leaving a limited amount of time to blend the seams together.
- Adding a lot of water on the Foam Clay can make the material sticky, so try not to overwork the material when blending the seams together.
- Using water to adhere Foam Clay onto EVA Foam before it is cured is a great non-toxic application. This however can result in some areas having air pockets. Use Super Glue or Contact Cement to reattach any loose areas.
- Applying the Foam Clay onto armor pieces before it cures allows it to take the shape of the piece you want to attach it to. If the Foam Clay cures before you do this, it will not be flexible and could potentially crack.
- Be mindful that Foam Clay shrinks slightly when it dries. You can over compensate this by leaving a little extra material around the edges and seams.
- Using wax or parchment paper on your working surface will help prevent the Foam Clay from sticking to your table when working with it.
- Foam Clay can be pretty forgiving when spreading out over your base armor. You can stretch it slightly and it will still maintain it’s details.
- It is important to note that once Foam Clay cures, it can become brittle. It is recommended to add multiple thin layers of PlaidFX Clear Primer to help add durability to the material prior to paint.
- If there are any stubborn areas around high flex points on your build, you can also coat the Foam Clay with epoxy or Super Glue to add reinforcement.
- Another benefit of using PlaidFX Clear Primer to coat the Foam Clay is that this formula self-levels and will not distract from the sculpted details from the silicone mold. For this project, 4-5 layers of PlaidFX Clear Primer was used and the details still remain.
- PlaidFX has a satin finish which isn’t ideal for this project. This however is a simple fix by applying a few layers of Mod Podge Ultra in Matte. Mod Podge Ultra is easy to apply and transforms the armor to have a simple matte finish. This product also adds protective coating and seals the paint job.
- Painting natural textures like this can be really fun because you learn how to layer multiple different hues, shades, and tints. This project showcases how easy it is to paint on a textured surface to create realistic cosplay details perfect for any nature themed project.
AUGUST
Hard to believe we have been working on this build all summer long. We continue working on our wood nymph build by creating a variety of accents, accessories, and texture pieces to really make the build pop! Check out the details of each of piece below. We will debuting the the full build very very soon and we cannot wait for you to see it. 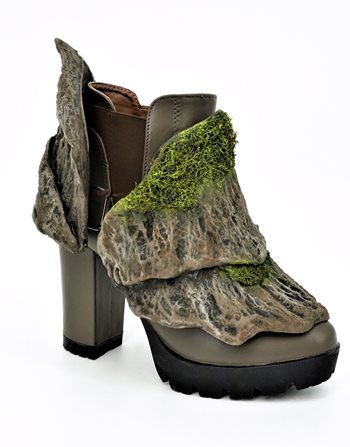

Painting on Shoes:
@plaidfx ##Create ##Nature ##themed ##shoes in this fun ##cosplaytutorial using ##PlaidFX
⬠original sound - PlaidFX
- A great way to clean shoes is to use a wet wipe to remove any dust or small fibers off of the shoes surface.
- PlaidFX Clear Primer is perfect for prepping the shoes for paint. We recommend applying 2-3 layers and allow to dry completely between each coat.
- When applying any PlaidFX formulas onto shoes, we recommend applying multiple thin layers to achieve a smooth surface on the shoes you are customizing.
- To seal the paint, you can use the PlaidFX Clear Primer as a top layer or use Mod Podge Ultra to change the finish to look matte or glossy.
- These shoes are great on their own or to accent your build!
- Touch up any areas as needed after initial wear.
- It is not recommended to use PlaidFX formulas on rubber, as the product will not stick properly to this surface.
Dyeing Elastic:
@plaidfx ##Dye ##elastic with ##PlaidFX for ##cosplay ##armor in this ##attachment ##cosplaytutorial ##howto
