

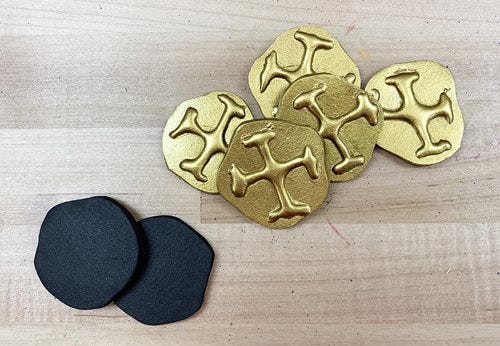
Gold Doubloons (coins)
Plaid Products: Mod Podge Matte, Mod Podge Ultra in Gloss, FolkArt Treasure Gold 3091E Gold, FolkArt 479 Pure Black, FolkArt Artist Variety Set, 10 pc. 50536. All products can be found in our Cosplay Finishing Kit.
Other Materials: 2-6mm EVA Foam, Hot Glue, Scissors
- https://www.walmart.com/ip/Plain-EVA-Foam-Sheets-10-Piece-12-X-18-2MM-Coal/406361628
- https://www.joann.com/cosplay-by-yaya-han-eva-foam-sheet---24in-x-40in-x-5mm/16793606.html
- https://www.walmart.com/ip/AdTech-Hi-Temp-Mini-Glue-Gun-with-10-Glue-Sticks-Combo-Pack-1-Each/104562800
- https://www.walmart.com/ip/Universal-Stainless-Steel-Straight-7-Scissors-Black/19311621
Instructions:
- Start by cutting out EVA foam circles.
- Using hot glue, draw out the letter X on all the coins. Experiment with making skulls or other letters on your coins depending on your preference.
- Place in the freezer to help glue cool.
- Prime both sides of your coins using 2 layers of Mod Podge Matte.
- Once cured, basecoat your coins in black by using FolkArt Pure Black and a Flat #8 paint brush.
- Apply a few layers of FolkArt Treasure Gold in Gold to your coins on both sides. Seal everything with Mod Podge Ultra in Gloss.
Eye Patch

Plaid Products: FolkArt Multi-Surface 4645 Titanium White, 2948 Engine Red, 2392 Podge Yellow, Mod Podge Matte, Mod Podge Ultra in Gloss, FolkArt Artist Variety Set, 10 pc. 50536. All products can be found in our Cosplay Finishing Kit.
Other Materials: 2-6mm EVA Foam, Hole Punch, Scissors, Elastic String or Ribbon
- https://www.walmart.com/ip/Plain-EVA-Foam-Sheets-10-Piece-12-X-18-2MM-Coal/406361628
- https://www.joann.com/cosplay-by-yaya-han-eva-foam-sheet---24in-x-40in-x-5mm/16793606.html
- https://www.walmart.com/ip/School-Smart-039423-1-Hole-Paper-Punch-44-0-25-In-10-Sheets-44-Nickel-Plated/194544550
- https://www.walmart.com/ip/Universal-Stainless-Steel-Straight-7-Scissors-Black/19311621
- https://www.walmart.com/ip/Dritz-Round-Cord-Elastic-5yd-Black/42639620
Instructions:
- Start by cutting out the shape of your eye patch onto EVA Foam.
- Punch two holes for the string using a hole punch.
- Prime one side with Mod Podge Matte using a Flat # 8 paint brush. Let dry.
- Basecoat using Folk Art Multi-Surface Titanium White. Once dry, paint the entire eye patch yellow using FolkArt Podge Yellow.
- Use FolkArt Engine Red to add vertical lines with a Flat #2 paint brush.
- Seal your paint job using Mod Podge Ultra in Gloss.
- Cut a piece of elastic string or ribbon that fits around your head. Tread through the two holes in the eye patch and tie at the ends.
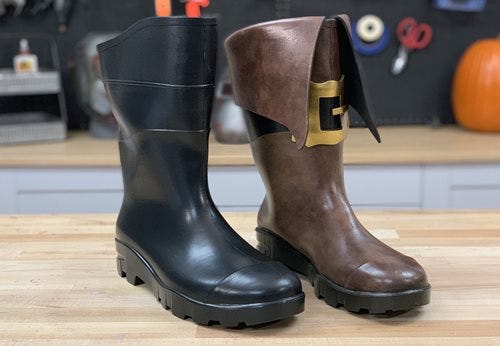
Boots
Plaid Products: Fabric Creations Fabric Painting Tools Sponge Cube Set, 4 Piece 26517, FolkArt Treasure Gold 3081E, FolkArt 479 Pure Black, 417 Teddy Bear Brown, 231 Real Brown, Mod Podge Matte, Mod Podge Ultra in Gloss, FolkArt Artist Variety Set, 10 pc. 50536. All products can be found in our Cosplay Finishing Kit. Other Materials: Rain Boots (we purchased ours from Walmart: https://www.walmart.com/ip/Unisex-Rubber-Rain-Boots/22026492), Rubbing Alcohol, Paper Towels, 2-6mm EVA Foam, Super Glue, Scissors, Craft Knife
- https://www.walmart.com/ip/Unisex-Rubber-Rain-Boots/22026492
- https://www.walmart.com/ip/Equate-91-Isopropyl-Alcohol-Antiseptic-32-fl-oz/276040459
- https://www.walmart.com/ip/Loctite-Loctite-Super-Glue-Longneck-Bottle/26524615
- https://www.walmart.com/ip/Plain-EVA-Foam-Sheets-10-Piece-12-X-18-2MM-Coal/406361628
- https://www.joann.com/cosplay-by-yaya-han-eva-foam-sheet---24in-x-40in-x-5mm/16793606.html
- https://www.walmart.com/ip/Sparkle-Paper-Towels-2-Double-Rolls-White-Pick-A-Size/271323750
- https://www.walmart.com/ip/Universal-Stainless-Steel-Straight-7-Scissors-Black/19311621
- https://www.walmart.com/ip/X-Acto-Blister-Carded-Knife-with-Safety-Cap-1-Each/19868650
Instructions:
Note: The rain boots that we are using have a slightly rough texture. This helps the paint stick to the rubber finish.
- Cleaning your boots with rubbing alcohol.
- Once dry apply 2 primer layers of Mod Podge Matte over the entire boot using a Flat 3/4" paint brush.
- On the third layer, mix a 1:1 ratio of Mod Podge Matte and FolkArt Real Brown paint. Use the FolkArt Real Brown paint for two more layers without using Mod Podge. Allow to dry. Alternate between FolkArt Real Brown and Teddy Bear Brown paint while using a sponge to create a texture over the entire boot. Repeat this step an additional time. Once dry, apply a wash all over the boot by using FolkArt Pure Black paint mixed one to one with water. Start in small sections painting with a Scruffy 3/4" paint brush. Wipe away excess paint with a paper towel, allowing the black wash to be darker around the edges. Paint using the same black paint and a Flat 3/4" paint brush. Seal the paint job using Mod Podge Matte.
- Cut out boot collar and buckle out of EVA Foam. Paint the boot collars with the same technique as used on boots. Once dry use super glue to attach your collars around the inner lining of the boots. The foam should fold over seamlessly once connected. For the belt buckle, prime with 2 layers of Mod Podge Matte. Once cured, basecoat in FolkArt Pure Black paint and a Flat #6 paint brush. Apply a few layers of FolkArt Treasure Gold in Gold. Seal with Mod Podge Ultra in Gloss. To finish, attach the belt buckle with super glue.
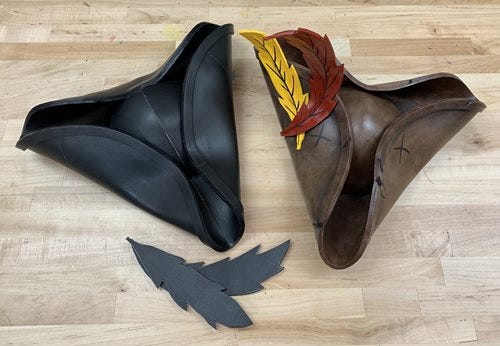
Hat
Plaid Products: Fabric Creations Fabric Painting Tools Sponge Cube Set, 4 Piece 26517, FolkArt Multi-Surface 4645 Titanium White,2948 Engine Red, 2392 Podge Yellow, FolkArt 479 Pure Black, 417 Teddy Bear Brown, 231 Real Brown, Mod Podge Matte, Mod Podge Ultra in Gloss, FolkArt Artist Variety Set, 10 pc. 50536. All products can be found in our Cosplay Finishing Kit.
Other Materials: EvilTed 8in Dome Pattern (LINK: https://eviltedsmith.com/shop/basic-dome-patterns/), 4-6mm EVA Foam, Contact Cement, Super Glue, Scissors, Craft Knife, Heat Gun (or blow dryer)
- https://www.joann.com/cosplay-by-yaya-han-eva-foam-sheet---24in-x-40in-x-5mm/16793606.html
- https://www.walmart.com/ip/DAP-Contact-Cement-3oz/20370938
- https://www.walmart.com/ip/Loctite-Loctite-Super-Glue-Longneck-Bottle/26524615
- https://www.walmart.com/ip/Universal-Stainless-Steel-Straight-7-Scissors-Black/19311621
- https://www.walmart.com/ip/X-Acto-Blister-Carded-Knife-with-Safety-Cap-1-Each/19868650
- https://www.walmart.com/ip/Wagner-Furno-300-Heat-Tool/154134135
- https://www.walmart.com/ip/Revlon-1875W-Compact-Travel-Hair-Dryer-Black/14551419
For extra help in creating your pirate hat, check out these helpful links:
Pattern Download: https://eviltedsmith.com/shop/basic-dome-patterns/
Tutorial Video: How to Make a Foam Dome and other pattern making techniques
Instructions:
- For this project we will be using EvilTeds 8 inch Dome Pattern to create the base for our pirate's hat. Once downloaded, print out and transfer pattern onto EVA Foam.
- Cut out patterns. It's always best to remember to keep your cuts as close to a 90 degree angle as possible.
- To heat seal, and shape your EVA Foam use a heat gun or blow dryer on the hottest setting. Remember to continuously move the tool over the surface of the EVA Foam. To round out your pieces, roll them while heated. You can exaggerate this curve because once the foam cools it will release a little. To connect your pieces, use two thin layers of contact cement around the edges. The first layer seeps into the foam because it is porous. The second layer is what creates the adhesive properties. It should feel like the sticky part of a posted note. Work slowly and try to reduce seam lines by having all of your sections line up.
- For the large rim around the pirate’s hat all, cut out a large foam circle. Make sure to only cut the hole in the middle to the size of your dome base.
- Once assembled, glue the dome base to the brim.
- To create pinches in the pirate’s hat, glue three flaps down using contact cement.
- Apply 2-3 layers of Mod Podge Matte all over the surface of your hat using a Flat 3/4" paint brush. Follow the same painting instructions described in the boot finishing section.
- Transfer the pattern of a feather onto EVA Foam. Cut out 2 feathers and prime with 2-3 layers of Mod Podge Matte. Let dry.
- Basecoat the front and back of your feathers with Folk Art Multi-Surface Titanium White paint using a Flat #10 paint brush. Paint one feather using FolkArt Multi-Surface Engine Red, and one feather using FolkArt Multi-Surface Podge Yellow paint.
- To add the barbs, paint a black line down the center of each feather and a few lines sticking out on either side using FolkArt Pure Black paint and a Liner 1 paint brush.
- To seal your feathers apply one layer of Mod Podge Ultra Gloss. Find out where you would like your feathers and attach with super glue.
Scarf
Other Materials: Fabric, ScissorsSHASON TEXTILE (3 Yards cut) CRAFT PROJECTS QUILTING POLY COTTON FABRIC, RED, Available In Multiple Colors - Walmart.com
Instructions:
- Cut out a large piece of fabric in the shape of a square.
- Fold fabric in half to create a triangle shape.
- Place center fold onto forehead while holding a point of the triangle in each hand. The triangle’s 3rd point should be resting on the back of your neck.
- Tie a knot with the two ends behind your head.
See below link for an image that we found helpful.
Pin by Derek Marquez on pirate wench | Pirate hair, Head scarf styles, Gypsy costume
Happy Crafting!
