Email Signup

Subscribe to the Plaid Crafts Newsletter for craft project ideas, product news, our live events, and more!

Upcycle Your Glassware! Save 25%

Save 25% on orders $60+ and get free U.S. ground shipping! Explore the NEW! FolkArt Murano Glass Paint! This promotion cannot be combined with other promos. See shipping details.

Use Code

Sale Ends 3/23/24

Bunnies Cloche

Bring your Easter projects to life by creating a 3-D effect with Photo Transfer.

At a Glance:

#6300 Skill Level: Intermediate Time:
  • Clock active
  • Clock active
  • Clock active
  • Clock inactive

This project features these great brands:

  • Mod Podge Logo
supplies

Mod Podge Professional Decoupage Tool Set - 2295

Number Needed: 1 $9.99
Item not for sale on Plaid Online.

Mod Podge ® Photo Transfer Medium, 8 oz. - CS15067

Number Needed: 1 $9.99
Item not for sale on Plaid Online.
instructions

Other Supplies

Color copies of bunnies, Wax paper, Foam brush, Muslin fabric, Ivory fleece fabric, Sponge, Bowl of water, Needle & thread, Scissors, Polyfil, Wooden tree slice, One thin dowel, Bag of dried moss, Glass cloche or smooth vase

Instructions

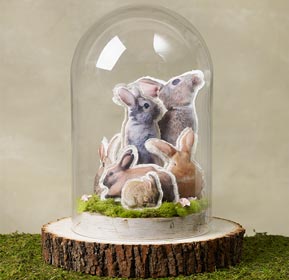
  1. Cut out and arrange a selection of bunny image poses and sizes. Use the size of your cloche as a guide for sizing height and width.
  2. One at a time, lay a bunny image on top of a sheet of wax paper print side up. Generously paint a smooth layer of Mod Podge Photo Transfer Medium over the image. You should barely be able to see the bunny.
  3. Bend the wax paper away to release the prepared image and carefully lay the image on a clean piece of wax paper. Gently lay a piece of fabric over the image. Press softly. Flip the fabric over and carefully squeegee the image to the fabric. Press along the edge with your finger to ensure good contact. Let dry 24 hours.
  4. Repeat steps 2-3 for each bunny.
  5. To reveal image, press a damp sponge over the image and let sit for 2 minutes. Gently begin rubbing the paper off in circular motions. This will take 2-4 times letting the image dry in between rubbings.
  6. To create a 3D bunny, pin the prepared image fabric to a piece of fleece. Do not trim the fabric yet. Sew a simple running stitch around the bunny close to the image. Leave the bottom of the bunny open to insert the stuffing. Stitch closed.
  7. Trim the fabric around your bunny. Repeat step 6-7 for each image.
  8. Place your largest bunny first on the wood slice and place a mark that is the center of the bottom of the bunny. Drill a small hole and insert the dowel. Cut a small hole in the bottom of the bunny. Slide the bunny onto the dowel. This will help the bunnies stay upright. Trim the dowel as necessary for the height of your selected bunny.
  9. Cover the wood slice with moss. Arrange and prop you bunnies together. Cover with the glass cloche.

Disclaimer: The information found in each project is presented in good faith, but no warranty is given, nor results guaranteed, nor is freedom from any patent to be inferred. Since we have no control over physical conditions surrounding the application of information herein contained, Plaid Enterprises, Inc. disclaims any liability for untoward results.

Important: Please be sure to thoroughly read the instructions for all products, paying particular attention to all cautions and warnings shown to ensure the proper and safe use of the product.

Copyright: All Rights Reserved. No part of this Project may be reproduced in any form without permission in writing, except for your personal use, except by reviewer, who may in reviewing this project, quote brief passages in a magazine or newspaper.

Nested Easter Eggs
New!
Nested Easter Eggs
Bunny Box
New!
Bunny Box
Stacked Books with Egg Tag
New!
Stacked Books with Egg Tag
Wooden Easter Bunnies
New!
Wooden Easter Bunnies