Email Signup

Subscribe to the Plaid Crafts Newsletter for craft project ideas, product news, our live events, and more!

Upcycle Your Glassware! Save 25%

Save 25% on orders $60+ and get free U.S. ground shipping! Explore the NEW! FolkArt Murano Glass Paint! This promotion cannot be combined with other promos. See shipping details.

Use Code

Sale Ends 3/23/24

Christmas Gift Box with Pet Key Chains

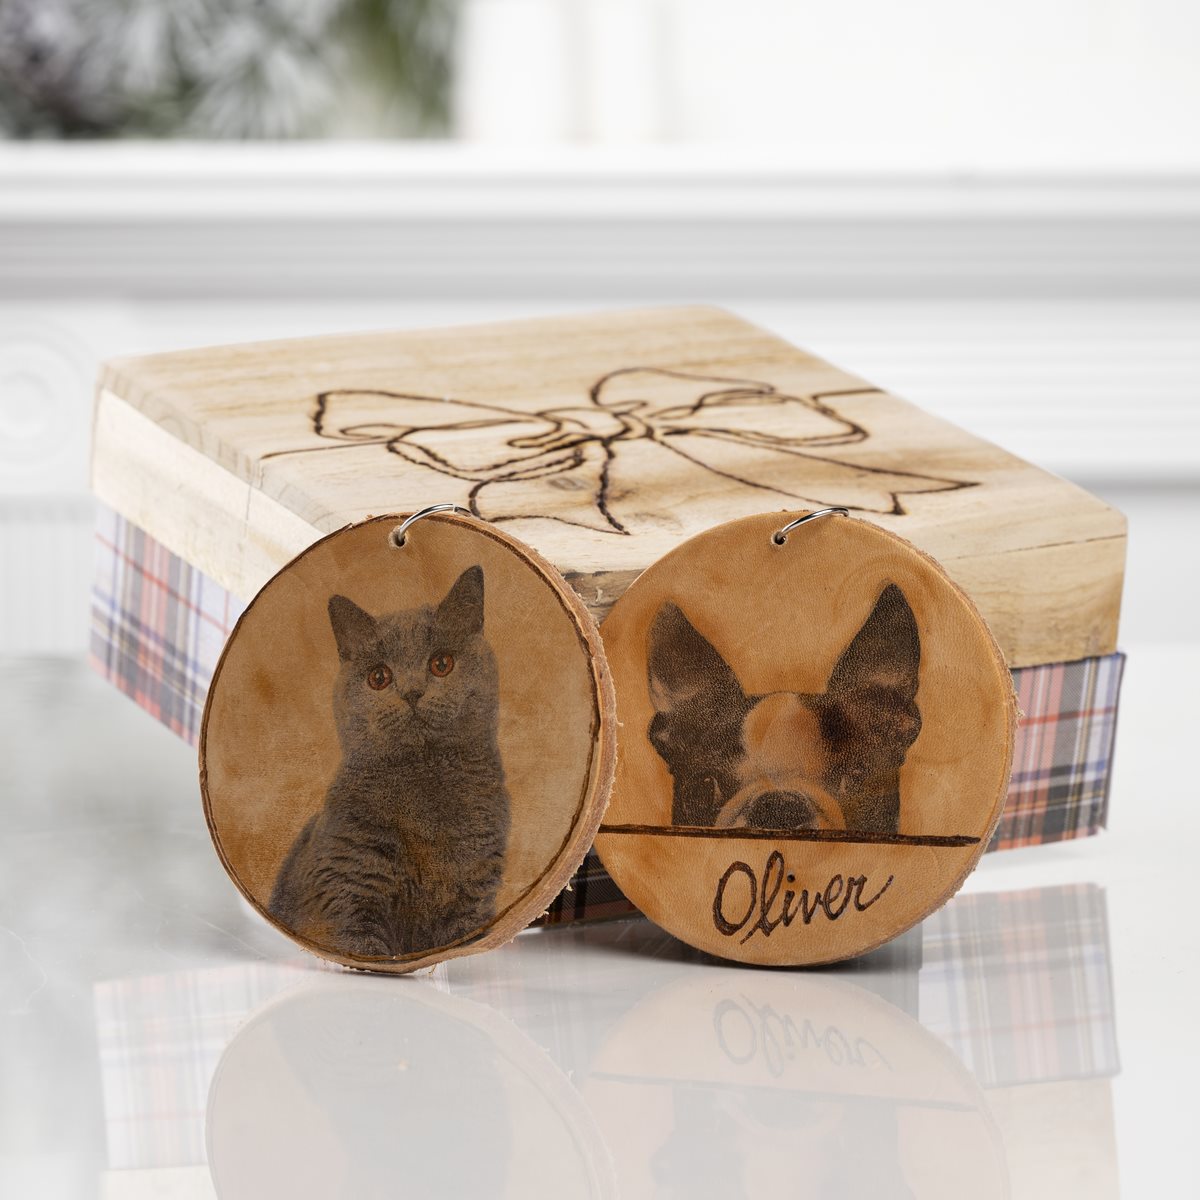
Give a personalized gift this holiday with this elegant, wood burned box and pet key chains!

This project features these great brands:

  • Mod Podge Decoupage Finishes and Formulas Logo

At a Glance:

Project #16269 Skill Level: Intermediate
supplies

Plaid Supplies

Plaid ® Brush Sets - Wood Brush Set, Flats - 44219

Number Needed: 1 $3.99
Item not for sale on Plaid Online.

Plaid ® Wood Burning Set with Variable Temperature Control - 17391E

Number Needed: 1 $26.99
Item not for sale on Plaid Online.

Mod Podge ® Gloss, 4 oz. - CS11205

Number Needed: 1 $4.49
Item not for sale on Plaid Online.

Other Supplies

  • Wood box with lid
  • Scrapbook paper
  • 2 round leather tags
  • Key chain parts
  • Laser jet printer copies of pets
  • Transfer paper and pencil

instructions

  1. Transfer pattern onto box lid as shown, with transfer paper and pencil.
  2. Following basic instructions on wood burning tool, create design as shown.
  3. Cut scrapbook paper to fit bottom of box and apply to box with Mod Podge. Let dry.
  4. Following basic instructions on Woodburning Tool- use photo heat transfer tip. Tape photo, image down to leather tag. Heat by rubbing large flat tip over back of paper, keep moving tip-do not be still and press.
  5. Change tips when cool and accent with lines and personalize with name.
  6. Attach keychain parts.


resources

Related Videos

Mod Podge Tips and Tricks for No Wrinkles

Learn how to get perfect Mod Podge projects everytime!

Watch this Video

Learn how to get perfect Mod Podge projects everytime!

How Mod Podge is Made

Get a behind-the-scenes look at how Mod Podge is made, bottled and shipped to you!

Watch this Video

Get a behind-the-scenes look at how Mod Podge is made, bottled and shipped to you!

Applying Paper to Wood Using Mod Podge

Learn basic steps of applying paper to wood using Mod Podge.

Watch this Video

Learn basic steps of applying paper to wood using Mod Podge.

Related Resources

Free Lesson Plans featuring Mod Podge

Free Lesson Plans featuring Mod Podge

Use these free lesson plans to craft an unforgettable experience in the classroom with one of these

View PDF
Mod Podge Clear Image Transfer FAQs

Mod Podge Clear Image Transfer FAQs

Learn more about Mod Podge Clear Image Transfer Medium by reading the FAQ. 

View PDF
Mod Podge Ultra Frequently Asked Questions

Mod Podge Ultra Frequently Asked Questions

Learn more about Mod Podge Ultra by reading the frequently asked questions. 

View PDF

Related FAQs

Decorated candles using Mod Podge ® or Royal Coat ® Decoupage Finish are meant for decorative purposes and not for illumination. Many of the decorations would catch fire and be hazardous if the candle were burned. However, if you are using a wide pillar candle and the decorations do not go to the top of the candle, it can be burned down slightly to create a well, then a votive candle inserted into the well. A new votive candle can be inserted when the old one is finished. Use extreme caution and good judgment when burning candles that have been decorated.
First check to see if the napkin is 2 ply. If so, separate and lay aside. Brush Mod Podge directly on the your surface. Carefully place the printed napkin on the surface and lightly blot down with a dampened sponge. Start blotting in the center and work to the edge. Once it is in place, let dry. After about 30 minutes lightly apply a top coat of Mod Podge.
  1. Apply a coat of Mod Podge® to the inside of the form and allow to dry slightly. Place the Napkin design where desired and gently rub it flat with your thumb.
  2. Cover the image with a second very thin coat of Mod Podge®, beginning in the center and brushing out. Allow to dry thoroughly.
  3. Add special sponging or spouncing effects, as desired, around the design and let dry.
  4. Paint the whole inside with a light color of FolkArt® Acrylic Colors. If you want to use a darker color inside, first paint around the Napkin design with a light color, let dry and then add the darker color.
Personalized Christmas Stocking
New!
Personalized Christmas Stocking
Holiday Lincoln Log House
New!
Holiday Lincoln Log House
Santa Frame Ornaments
New!
Santa Frame Ornaments
Seasons Greeting Holiday Plaque
New!
Seasons Greeting Holiday Plaque

Disclaimer: The information found in each project is presented in good faith, but no warranty is given, nor results guaranteed, nor is freedom from any patent to be inferred. Since we have no control over physical conditions surrounding the application of information herein contained, Plaid Enterprises, Inc. disclaims any liability for untoward results.

Important: Please be sure to thoroughly read the instructions for all products, paying particular attention to all cautions and warnings shown to ensure the proper and safe use of the product.

Copyright: All Rights Reserved. No part of this Project may be reproduced in any form without permission in writing, except for your personal use, except by reviewer, who may in reviewing this project, quote brief passages in a magazine or newspaper.