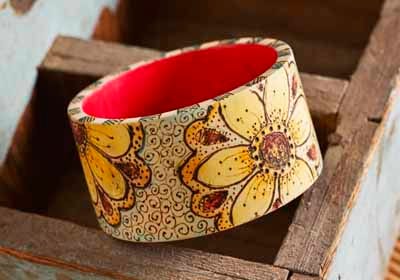
Create your own wood burned bangle bracelet with funky daisy flowers.
FolkArt ® Multi-Surface Satin Acrylic Paints - Apple Red, 2 oz. - 2901
FolkArt
2 oz
+ 73 colors
$1.99

FolkArt ® Multi-Surface Satin Acrylic Paints - Vivid Orange, 2 oz. - 2904
FolkArt
2 oz
+ 73 colors
$1.99
FolkArt ® Multi-Surface Satin Acrylic Paints - Daffodil Yellow, 2 oz. - 2912
FolkArt
2 oz
+ 73 colors
$1.99


Instructions
- If desired, sand the wood bangle bracelet smooth.
- When creating a wood burned project, select a wood surface that has a smooth, close grain without bumps, ridges or large pores.
- Using the pattern provided, trace and transfer the pattern onto the bangle bracelet, or create your own pattern.
- Insert the desired tip into the 2-n-1 Craft Tool and screw into place until it no longer moves. The “universal” and “flow” points were used for all the line work and dots on this project. Once inserted and screwed down in place, rest your tool on the included metal stand. Lastly, plug in and turn on your 2-n-1 Craft Tool. Allow a couple minutes for the tool to heat up.
- To lock your easel/stand in place so that the hot wood burning tool does not shift or move, place a length of stencil tape over the legs of the easel/stand and tape it to your work surface.
- When the tool is hot, using light pressure begin touching the surface with the point of the universal point and move towards you directing the heated tip to follow the pencil lines of your pattern.
- If desired, you can switch the tip to another point to experiment!
- To change tips, either turn the unit off and unplug it from the wall to allow it to completely cool down before handling, OR keep a pair of flat nose jewelry pliers handy to grasp onto the hot tip when removing it from the tool. This will allow you to burn the outline of the leaves rather than the full leaf.
- To intensify the burn or darken an area to shade, simply go over the burned area a second time.
- To create the dots that are scattered throughout the design, switch the tip to the cone point. To create even dots, hold the tool straight up vertically when touching the surface.
- The longer you hold the tool in one place of the more pressure you apply, the larger and deeper the wood burned dot.
- Erase any exposed pencil lines after all wood burning is completed.
- Exposed pencil lines can be removed with an eraser after the entire design has been completed.
- If desired, embellish the wood burned pattern with a light wash of color using FolkArt Multi-Surface Paints. I thinned each color with a small amount of water, then lightly brushed the thinned paint onto the area to be colored.
- Daisy Petals - Daffodil Yellow with a touch of Vivid Orange at the base of each petal
- Daisy Centers – Daffodil Yellow with a touch of Apple Red on outside edge
- Small Teardrop Petals – Apple Red
- Outer Daisy Petals – Vivid Orange
- Blush of Color around the Daisy – Patina
- Inside Bangle – Apple Red

