Email Signup

Subscribe to the Plaid Crafts Newsletter for craft project ideas, product news, our live events, and more!

Upcycle Your Glassware! Save 25%

Save 25% on orders $60+ and get free U.S. ground shipping! Explore the NEW! FolkArt Murano Glass Paint! This promotion cannot be combined with other promos. See shipping details.

Use Code

Sale Ends 3/23/24

DIY Mod Podge Photo Transfer Pet Pillows

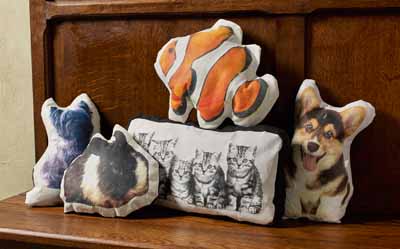
Show the love for your four-legged friends by creating a fun throw pillow using Mod Podge Photo Transfer!

This project features these great brands:

  • Mod Podge Decoupage Finishes and Formulas Logo
supplies

Mod Podge ® Photo Transfer Medium, 8 oz. - CS15067

Number Needed: 1 $9.99
Item not for sale on Plaid Online.
instructions

Other Supplies

3/4” Flat paint brush or squeegee, Enlarged photo copy, Wax paper, Sponge, White fabric, Black fabric, Pencil, Scissors, Sewing machine, Thread, Fiberfill

Instructions

  1. Take a good, clear photo of your pet.  Use a dry toner copy machine to enlarge photo to fit on standard size paper – 8.5” x 11” or 11” x 17” works best.  Never use an actual photo
  2. Cover work surface with wax paper.  Apply Mod Podge Photo Transfer Medium on to the face of the pet image using a ¾” flat brush or squeegee and should be applied to the image in a level, medium thickness.
  3. Carefully lift coated image off of the waxed paper.  Flip image over and place on white fabric.  Lightly smooth from center outwards to release any air bubbles.  Allow to dry 24 hours.
  4. Use a sponge to moisten the paper and then begin rubbing with light pressure over entire paper.  Paper will begin to roll up and peel away.
  5. While wet, it may feel as though all paper has been removed.  Allow surface to dry and repeat until no more white haze appears.  It is best to use light pressure with every repeat.
  6. Trace a line 1.5” away from pet image, following shape and contours of pet if desired and cut on this line.  Use just cut image as a pattern to cut same shape out of black fabric.
  7. Pin both pieces right sides together and sew 0.5 ” seam allowance, leaving an opening at the base.
  8. Cut slits along seam, being careful not to cut through sewing.  Turn right side out.
  9. Stuff with fiberfill and slip-stitch opening closed.

Disclaimer: The information found in each project is presented in good faith, but no warranty is given, nor results guaranteed, nor is freedom from any patent to be inferred. Since we have no control over physical conditions surrounding the application of information herein contained, Plaid Enterprises, Inc. disclaims any liability for untoward results.

Important: Please be sure to thoroughly read the instructions for all products, paying particular attention to all cautions and warnings shown to ensure the proper and safe use of the product.

Copyright: All Rights Reserved. No part of this Project may be reproduced in any form without permission in writing, except for your personal use, except by reviewer, who may in reviewing this project, quote brief passages in a magazine or newspaper.

Pastel Dog Leash Holder
New!
Pastel Dog Leash Holder
Holiday Christmas Cat House
New!
Holiday Christmas Cat House
DIY Mod Podge Photo Transfer Pet Pillows
New!
DIY Mod Podge Photo Transfer Pet Pillows
Pet Silhouette Gallery Wall
New!
Pet Silhouette Gallery Wall