Email Signup

Subscribe to the Plaid Crafts Newsletter for craft project ideas, product news, our live events, and more!

Upcycle Your Glassware! Save 25%

Save 25% on orders $60+ and get free U.S. ground shipping! Explore the NEW! FolkArt Murano Glass Paint! This promotion cannot be combined with other promos. See shipping details.

Use Code

Sale Ends 3/23/24

Fabric Covered and Stenciled Hat Boxes

Hat boxes are perfect for storing bulky items in your closet.

At a Glance:

#4558 Skill Level: Beginner Time:
  • Clock active
  • Clock active
  • Clock inactive
  • Clock inactive

This project features these great brands:

  • FolkArt Acrylic Paint Logo
  • Mod Podge Decoupage Finishes and Formulas Logo
supplies

FolkArt ® Enamels™ - Violet Pansy, 2 oz. - 4029

Number Needed: 1 $2.99
Item not for sale on Plaid Online.

Mod Podge ® Fabric, 8 oz. - CS11218

Number Needed: 1 $8.99
Item not for sale on Plaid Online.
instructions

Other Supplies

3 Hat boxes, Stencil, Low-tac tape, Stencil paintbrush, Gems, Tape measure, Scissors, Decorator weight fabric, Wax paper, Foam paintbrush, Hot Glue, Jewelry glue

Instructions

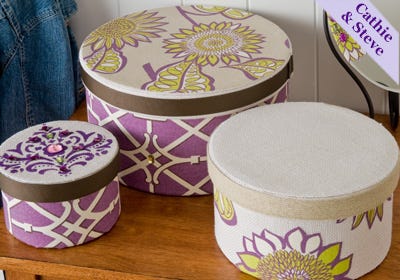
1. Stenciling on the lids: Tape the stencil to the top of the lid.  Pool Violet Pansy paint onto wax paper.  Dip the stencil brush into the paint and tap of the excess paint.  Working in an up and down fashion, paint the stencil motif onto the top of the lid.  Carefully remove the stencil and allow to dry.  Glue gems to the design.

2. Covering the lids with fabric: Trace around the lid onto the backside of a piece of fabric.  Working 1/4 “ on the inside of the drawn line, cut out the circle shape.  Apply fabric Mod Podge to the back of the fabric.  Position onto the top of the hatbox and allow to dry.

3. Covering the sides with fabric motifs: Cut designs from fabric, coat the backside with fabric Mod Podge and position on the sides of the boxes.  Smooth with your fingers and allow to dry.

4. Covering the sides with solid piece of fabric:  Measure around the hatbox.  Add 2 inches for overlap to the length.  Measure the height of the hatbox.  Add 5 inches to the measurement.  Apply fabric Mod Podge to the hatbox, center the fabric on the box and press down.  Continue adding Mod Podge and pressing the fabric.  When you reach the end, fold back the fabric and glue with Mod Podge to create a clean edge.  Hot glue to secure.  Allow to dry for 1 hour.  Hot glue the excess fabric to the bottom of the box and to the inside of the box.

5. Embellishments: Hot glue ribbons around the boxes.  Add gems or other embellishments.


Disclaimer: The information found in each project is presented in good faith, but no warranty is given, nor results guaranteed, nor is freedom from any patent to be inferred. Since we have no control over physical conditions surrounding the application of information herein contained, Plaid Enterprises, Inc. disclaims any liability for untoward results.

Important: Please be sure to thoroughly read the instructions for all products, paying particular attention to all cautions and warnings shown to ensure the proper and safe use of the product.

Copyright: All Rights Reserved. No part of this Project may be reproduced in any form without permission in writing, except for your personal use, except by reviewer, who may in reviewing this project, quote brief passages in a magazine or newspaper.

Round Butterfly Box
New!
Round Butterfly Box
FolkArt Home Decor Chalk Dresser
New!
FolkArt Home Decor Chalk Dresser
Waverly Mason Jars & Crate
New!
Waverly Mason Jars & Crate
Unexpected Color Pop Painted Basket
New!
Unexpected Color Pop Painted Basket