Email Signup

Subscribe to the Plaid Crafts Newsletter for craft project ideas, product news, our live events, and more!

Upcycle Your Glassware! Save 25%

Save 25% on orders $60+ and get free U.S. ground shipping! Explore the NEW! FolkArt Murano Glass Paint! This promotion cannot be combined with other promos. See shipping details.

Use Code

Sale Ends 3/23/24

Garden Gnome & Mushroom

Flip your terracotta upside down to create this outdoor Gnome and Mushroom!

This project features these great brands:

  • Mod Podge Decoupage Finishes and Formulas Logo

At a Glance:

Project #16691 Skill Level: Beginner
supplies

Plaid Supplies

Mod Podge ® Outdoor, 8 oz. - CS11220

Number Needed: 1 $8.99
Item not for sale on Plaid Online.

Apple Barrel ® Colors - Flamenco Red, 2 oz. - 21468

Number Needed: 1 $0.99
Item not for sale on Plaid Online.

Apple Barrel ® Colors - Laguna, 2 oz. - 20562

Number Needed: 1 $0.99
Item not for sale on Plaid Online.

Apple Barrel ® Colors - Antique Parchment, 2 oz. - 21463

Number Needed: 1 $0.99
Item not for sale on Plaid Online.

Apple Barrel ® Colors - Pavement, 2 oz. - 21490

Number Needed: 1 $0.99
Item not for sale on Plaid Online.

Apple Barrel ® Colors - Pink Parfait, 2 oz. - 20251

Number Needed: 1 $0.99
Item not for sale on Plaid Online.

Other Supplies

  • Gnome: 3 sizes of small terracotta pots
  • Mushroom: 1 small terracotta pot and one small/medium terracotta tray
  • 1 rounded wooden dome for nose
  • A variety of small & medium paint brushes

instructions

  1. Mushroom
    1. Using Antique Parchment basecoat the pot you have chosen as your mushroom base. Allow to dry and add a second coat.
    2. Basecoat the tray with Flamenco Red. Allow to dry and add a second coat. Allow to dry fully before moving on to the next step.
    3. Using Antique Parchment, create the random dots on the red tray (mushroom cap).
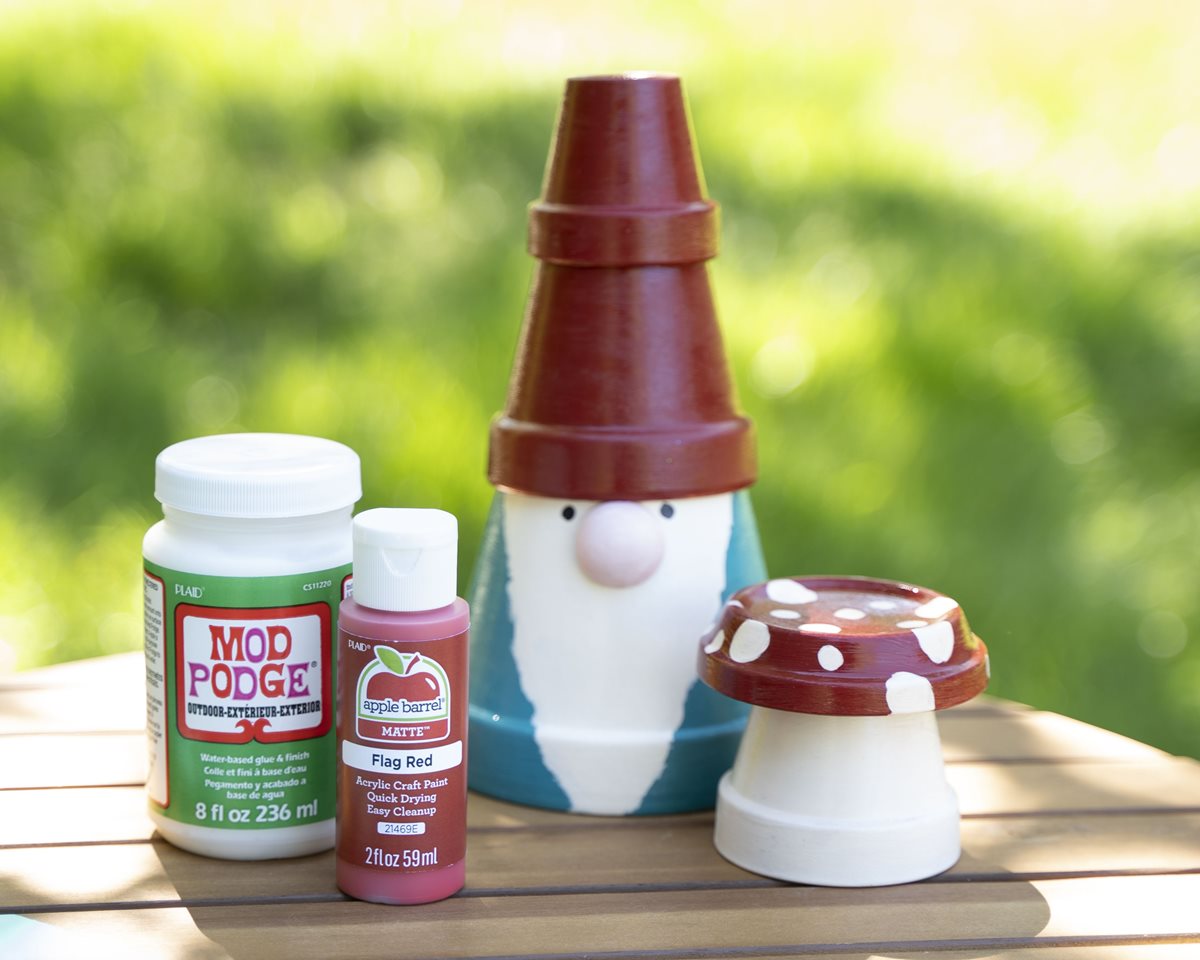
    4. Using Mod Podge ® Outdoor as a glue, connect your mushroom base and cap (See photo).
  2. Gnome
    1. Basecoat your two smaller pots that will make up the Gnomes hat with Flamenco Red. Allow to dry and add a second coat.
    2. Basecoat the largest pot in Antique Parchment. Allow to dry.
    3. Using a pencil, sketch directly onto your largest pot, creating the shape of the gnome's beard. Use this as a guide in the next step.
    4. Using Laguna, paint everywhere on your large pot except where the beard is.
    5. Using Antique Parchment, give the beard a second coat.
    6. Using Mod Podge ® Outdoor as a glue, connect the Gnome pot to the two pots that stack to create the hat.
    7. Mix Pink Parfait and Antique Parchment to create a pale pink. Paint your dome with this color for the nose. Once dry, attach the gnome using Mod Podge Outdoor as a glue.
    8. Using Pavement, create two small dots for the eyes.
  3. Once dry, top coat the entire gnome and mushroom with Mod Podge ® Outdoor. Allow to fully dry before placing outside.

resources

Related Videos

Mod Podge Tips and Tricks for No Wrinkles

Learn how to get perfect Mod Podge projects everytime!

Watch this Video

Learn how to get perfect Mod Podge projects everytime!

How Mod Podge is Made

Get a behind-the-scenes look at how Mod Podge is made, bottled and shipped to you!

Watch this Video

Get a behind-the-scenes look at how Mod Podge is made, bottled and shipped to you!

Applying Paper to Wood Using Mod Podge

Learn basic steps of applying paper to wood using Mod Podge.

Watch this Video

Learn basic steps of applying paper to wood using Mod Podge.

Related Resources

Free Lesson Plans featuring Mod Podge

Free Lesson Plans featuring Mod Podge

Use these free lesson plans to craft an unforgettable experience in the classroom with one of these

View PDF
Mod Podge Clear Image Transfer FAQs

Mod Podge Clear Image Transfer FAQs

Learn more about Mod Podge Clear Image Transfer Medium by reading the FAQ. 

View PDF
Mod Podge Ultra Frequently Asked Questions

Mod Podge Ultra Frequently Asked Questions

Learn more about Mod Podge Ultra by reading the frequently asked questions. 

View PDF

Related FAQs

Decorated candles using Mod Podge ® or Royal Coat ® Decoupage Finish are meant for decorative purposes and not for illumination. Many of the decorations would catch fire and be hazardous if the candle were burned. However, if you are using a wide pillar candle and the decorations do not go to the top of the candle, it can be burned down slightly to create a well, then a votive candle inserted into the well. A new votive candle can be inserted when the old one is finished. Use extreme caution and good judgment when burning candles that have been decorated.
First check to see if the napkin is 2 ply. If so, separate and lay aside. Brush Mod Podge directly on the your surface. Carefully place the printed napkin on the surface and lightly blot down with a dampened sponge. Start blotting in the center and work to the edge. Once it is in place, let dry. After about 30 minutes lightly apply a top coat of Mod Podge.
  1. Apply a coat of Mod Podge® to the inside of the form and allow to dry slightly. Place the Napkin design where desired and gently rub it flat with your thumb.
  2. Cover the image with a second very thin coat of Mod Podge®, beginning in the center and brushing out. Allow to dry thoroughly.
  3. Add special sponging or spouncing effects, as desired, around the design and let dry.
  4. Paint the whole inside with a light color of FolkArt® Acrylic Colors. If you want to use a darker color inside, first paint around the Napkin design with a light color, let dry and then add the darker color.
FolkArt Glitterific Fine Vases
New!
FolkArt Glitterific Fine Vases
Wood Burned Let It Snow Pallet Sign
New!
Wood Burned Let It Snow Pallet Sign
Sparkle Bat Costume Headband
New!
Sparkle Bat Costume Headband
Hand Painted Terra Cotta Vases
New!
Hand Painted Terra Cotta Vases

Disclaimer: The information found in each project is presented in good faith, but no warranty is given, nor results guaranteed, nor is freedom from any patent to be inferred. Since we have no control over physical conditions surrounding the application of information herein contained, Plaid Enterprises, Inc. disclaims any liability for untoward results.

Important: Please be sure to thoroughly read the instructions for all products, paying particular attention to all cautions and warnings shown to ensure the proper and safe use of the product.

Copyright: All Rights Reserved. No part of this Project may be reproduced in any form without permission in writing, except for your personal use, except by reviewer, who may in reviewing this project, quote brief passages in a magazine or newspaper.