Email Signup

Subscribe to the Plaid Crafts Newsletter for craft project ideas, product news, our live events, and more!

25% Bucilla Spring Sale

Save 25% on orders of $60 or more and get free U.S. shipping! Shop new arrivals from Bucilla - Seasonal Felt Stockings & Ornaments! This promotion cannot be combined with other promos. See shipping details. for inspirational ideas. Get free U.S. ground shipping on orders $60+! This promotion cannot be combined with other promos. See shipping details.

Use Code

Sale Ends 4/20/24

Halloween Paper Plate Mask: Frankenstein

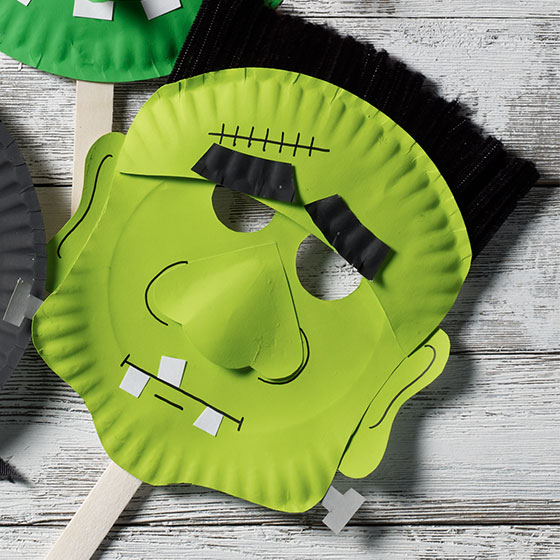
Frankenstein’s monster gets the craft treatment with paper plates and fun Apple Barrel colors. Perfect for keeping little hands busy, your kids will love this creepy, yet fun mask craft they can use on Halloween night.

Get the Pattern

At a Glance:

#6494 Skill Level: Beginner Time:
  • Clock active
  • Clock active
  • Clock active
  • Clock inactive

This project features these great brands:

  • Apple Barrel Logo
supplies

Apple Barrel ® Colors - Black, 2 oz. - 20504

Number Needed: 1 $0.99
Item not for sale on Plaid Online.

Apple Barrel ® Colors - Lime Tree, 2 oz. - 21476

Number Needed: 1 $0.99
Item not for sale on Plaid Online.
instructions

Other Supplies

Paper plates, Large popsicle sticks, Black chenille stems, Black permanent marker, ¾” Flat brush, Scissors, Pencils, Glue

Instructions

  1. Using the patterns provided, cut out all the parts of Frank's head.
  2. Basecoat all part except for the eye brows and teeth Lime Tree. Allow to dry.
  3. Cut the black chenille stems to 2 ½" each and glue them to the top of the head.
  4. Cut out eye holes.
  5. Glue the forehead to the head and sandwich the black chenille stems in between.
  6. Allow the glue to dry completely. Once dry, you can trim the hair across the top so that he has a flat top.
  7. Round the middle end of the nose and bend the outside nostrils up so that you can glue the nose onto the face. The middle end of the nose should be popped up.
  8. Paint the eyebrows Black. Allow to dry and then glue them into place.
  9. Make the stiches on his forehead, the detail in his ears, line for his mouth and chin and the marks around his nose with the permanent marker.
  10. Glue all the parts together as shown in photo.
  11. Glue sticks to the back for support. You will need more than one stick on the back to keep the mask from falling over.

Get the Pattern

Disclaimer: The information found in each project is presented in good faith, but no warranty is given, nor results guaranteed, nor is freedom from any patent to be inferred. Since we have no control over physical conditions surrounding the application of information herein contained, Plaid Enterprises, Inc. disclaims any liability for untoward results.

Important: Please be sure to thoroughly read the instructions for all products, paying particular attention to all cautions and warnings shown to ensure the proper and safe use of the product.

Copyright: All Rights Reserved. No part of this Project may be reproduced in any form without permission in writing, except for your personal use, except by reviewer, who may in reviewing this project, quote brief passages in a magazine or newspaper.

Treasure Gold Pumpkins
New!
Treasure Gold Pumpkins
Mod Podge Resin Leaf Coasters
New!
Mod Podge Resin Leaf Coasters
X-Ray Pillows Halloween Decoration Idea
New!
X-Ray Pillows Halloween Decoration Idea
Halloween Garland
New!
Halloween Garland