Email Signup

Subscribe to the Plaid Crafts Newsletter for craft project ideas, product news, our live events, and more!

25% Bucilla Spring Sale

Save 25% on orders of $60 or more and get free U.S. shipping! Shop new arrivals from Bucilla - Seasonal Felt Stockings & Ornaments! This promotion cannot be combined with other promos. See shipping details. for inspirational ideas. Get free U.S. ground shipping on orders $60+! This promotion cannot be combined with other promos. See shipping details.

Use Code

Sale Ends 4/20/24

Mod Podge Crackle Trinkets

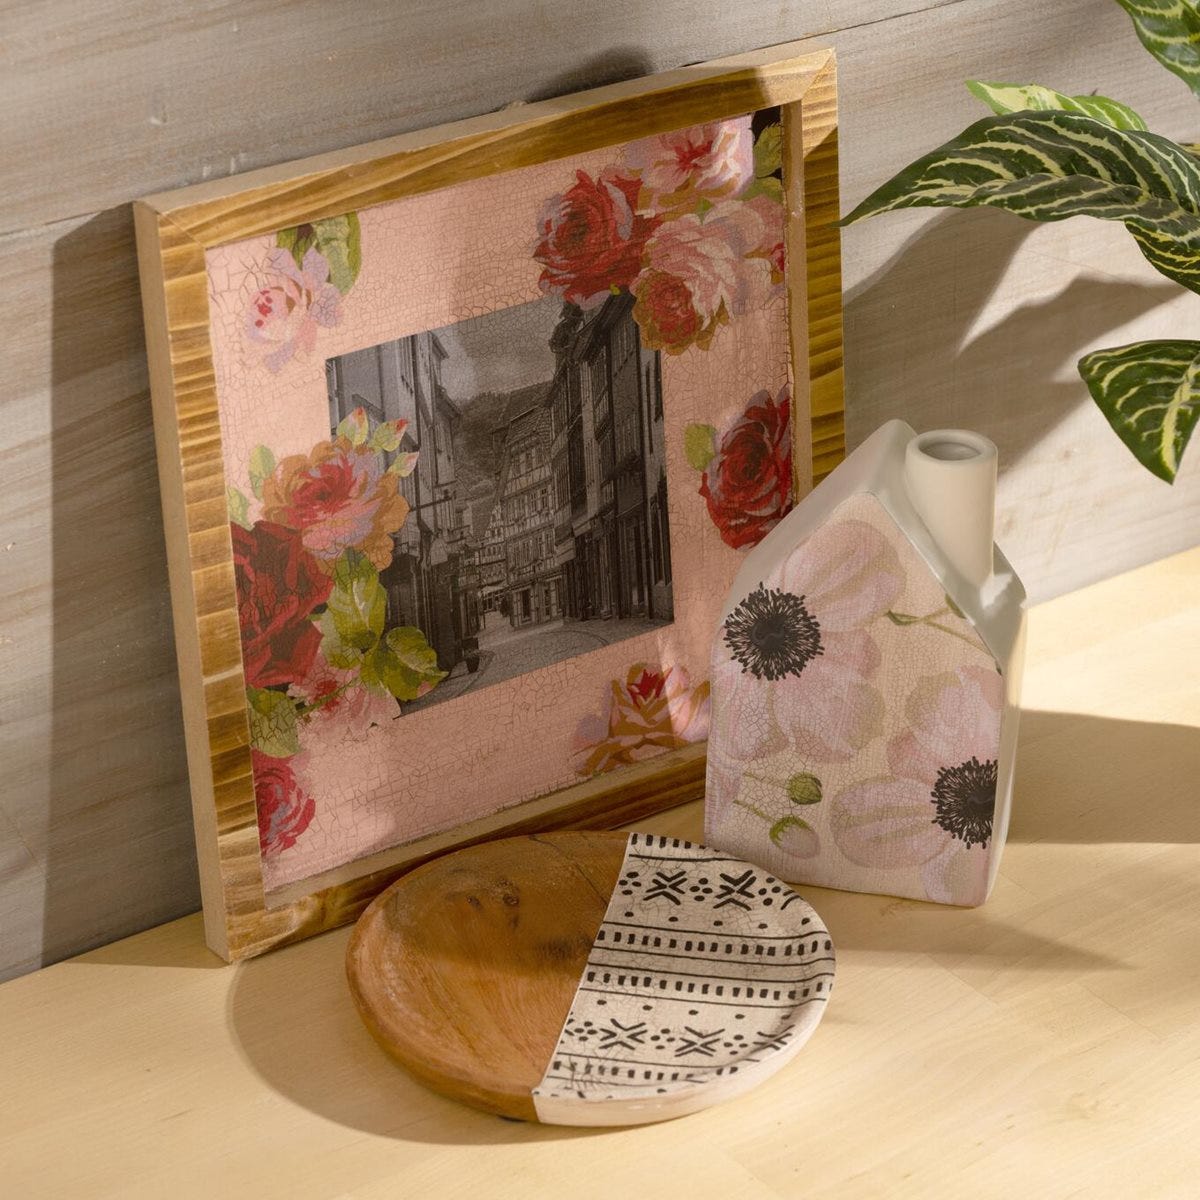
Create unique home decor projects with Mod Podge Crackle! The specialy formula gives your projects a realistic weathered and worn appearance.

This project features these great brands:

  • Mod Podge Decoupage Finishes and Formulas Logo

At a Glance:

Project #16949 Skill Level: Beginner
supplies

Plaid Supplies

Folkart ® Brush Sets - Artist Variety Set, 10 pc. - 50536

Number Needed: 1 $8.99
Item not for sale on Plaid Online.

Mod Podge ® Matte, 8 oz. - CS11301

Number Needed: 1 $7.49
Item not for sale on Plaid Online.

Mod Podge ® One-Step Crackle Medium, 8 oz. - CS25384

Number Needed: 1 $9.99
Item not for sale on Plaid Online.

FolkArt ® Acrylic Colors - Vintage Tea Rose, 2 oz. - 6451

Number Needed: 1 $1.69
Item not for sale on Plaid Online.

FolkArt ® Acrylic Colors - Coffee Bean, 2 oz. - 940

Number Needed: 1 $1.69
Item not for sale on Plaid Online.

FolkArt ® Acrylic Colors - Wicker White, 2 oz. - 901

Number Needed: 1 $1.69
Item not for sale on Plaid Online.

Other Supplies

-10x10 Wood Panel
-Wood Tray
-Decorative Ceramic House
-Floral Scrapbook Paper
-Decorative Napkin
-Printed Photo
-Painters Tape
-Scissors
-Water

instructions

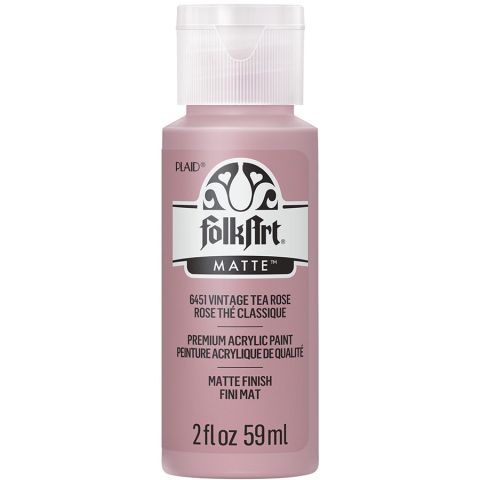
1. Paint the inside of your wood panel with Vintage Tea Rose and let dry. Use your Mod Podge Matte to adhere your printed photo to the inside center of the wood panel. Cut out big flowers from your floral scrapbook paper. Decoupage them around your printed photo. Let the Mod Podge dry. Seal your entire wood panel with Mod Podge Matte. Let dry.

2. Brush on a layer of Mod Podge Crackle Medium onto your sealed wood panel. Be careful not to overwork/over brush the medium. Let it dry and watch your panel start to crack.

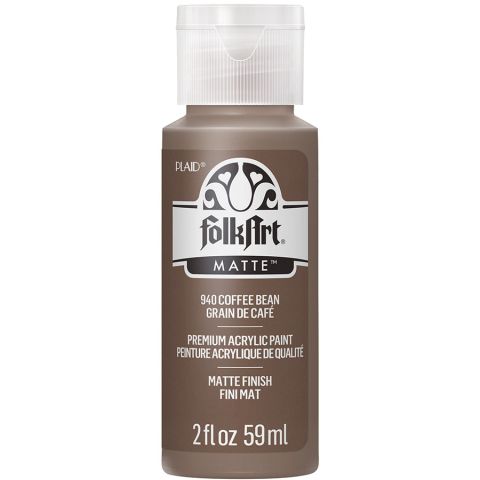
3. Mix a 1:3 ratio of FolkArt Coffee Bean and water in a cup. Once your crackle project is completely cracked and dried, brush your “stain” over the cracks.

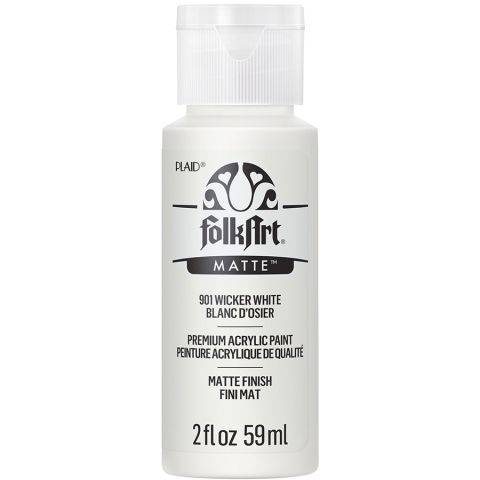
4. Tape off your wood tray. Paint one half of the tray with Wicker White and let dry. Adhere a decorative napkin to the White area of your tray with Mod Podge Matte. Once dry, apply a sealing coat of Mod Podge Matte onto the napkin side of the tray. Once dried and sealed, brush on a layer of Mod Podge Crackle Medium to your tray.

5. Cut a piece of scrapbook paper the size of your ceramic house. Decoupage your paper onto the house. Once dry, seal with Mod Podge Matte. When the sealing layer is dry, brush on a layer of Mod Podge Crackle Medium.
 

resources

Related Videos

Mod Podge Tips and Tricks for No Wrinkles

Learn how to get perfect Mod Podge projects everytime!

Watch this Video

Learn how to get perfect Mod Podge projects everytime!

How Mod Podge is Made

Get a behind-the-scenes look at how Mod Podge is made, bottled and shipped to you!

Watch this Video

Get a behind-the-scenes look at how Mod Podge is made, bottled and shipped to you!

Applying Paper to Wood Using Mod Podge

Learn basic steps of applying paper to wood using Mod Podge.

Watch this Video

Learn basic steps of applying paper to wood using Mod Podge.

Related Resources

Free Lesson Plans featuring Mod Podge

Free Lesson Plans featuring Mod Podge

Use these free lesson plans to craft an unforgettable experience in the classroom with one of these

View PDF
Mod Podge Clear Image Transfer FAQs

Mod Podge Clear Image Transfer FAQs

Learn more about Mod Podge Clear Image Transfer Medium by reading the FAQ. 

View PDF
Mod Podge Ultra Frequently Asked Questions

Mod Podge Ultra Frequently Asked Questions

Learn more about Mod Podge Ultra by reading the frequently asked questions. 

View PDF

Related FAQs

Decorated candles using Mod Podge ® or Royal Coat ® Decoupage Finish are meant for decorative purposes and not for illumination. Many of the decorations would catch fire and be hazardous if the candle were burned. However, if you are using a wide pillar candle and the decorations do not go to the top of the candle, it can be burned down slightly to create a well, then a votive candle inserted into the well. A new votive candle can be inserted when the old one is finished. Use extreme caution and good judgment when burning candles that have been decorated.
First check to see if the napkin is 2 ply. If so, separate and lay aside. Brush Mod Podge directly on the your surface. Carefully place the printed napkin on the surface and lightly blot down with a dampened sponge. Start blotting in the center and work to the edge. Once it is in place, let dry. After about 30 minutes lightly apply a top coat of Mod Podge.
  1. Apply a coat of Mod Podge® to the inside of the form and allow to dry slightly. Place the Napkin design where desired and gently rub it flat with your thumb.
  2. Cover the image with a second very thin coat of Mod Podge®, beginning in the center and brushing out. Allow to dry thoroughly.
  3. Add special sponging or spouncing effects, as desired, around the design and let dry.
  4. Paint the whole inside with a light color of FolkArt® Acrylic Colors. If you want to use a darker color inside, first paint around the Napkin design with a light color, let dry and then add the darker color.
FolkArt One Decor Candlesticks & Trinket Boxes
New!
FolkArt One Decor Candlesticks & Trinket Boxes
Mod Podge Multi Frame
New!
Mod Podge Multi Frame
Window Box Floral
New!
Window Box Floral
Summerscape Color Palette
New!
Summerscape Color Palette

Disclaimer: The information found in each project is presented in good faith, but no warranty is given, nor results guaranteed, nor is freedom from any patent to be inferred. Since we have no control over physical conditions surrounding the application of information herein contained, Plaid Enterprises, Inc. disclaims any liability for untoward results.

Important: Please be sure to thoroughly read the instructions for all products, paying particular attention to all cautions and warnings shown to ensure the proper and safe use of the product.

Copyright: All Rights Reserved. No part of this Project may be reproduced in any form without permission in writing, except for your personal use, except by reviewer, who may in reviewing this project, quote brief passages in a magazine or newspaper.