Email Signup

Subscribe to the Plaid Crafts Newsletter for craft project ideas, product news, our live events, and more!

25% Bucilla Spring Sale

Save 25% on orders of $60 or more and get free U.S. shipping! Shop new arrivals from Bucilla - Seasonal Felt Stockings & Ornaments! This promotion cannot be combined with other promos. See shipping details. for inspirational ideas. Get free U.S. ground shipping on orders $60+! This promotion cannot be combined with other promos. See shipping details.

Use Code

Sale Ends 4/20/24

Mod Podge Stained Glass House

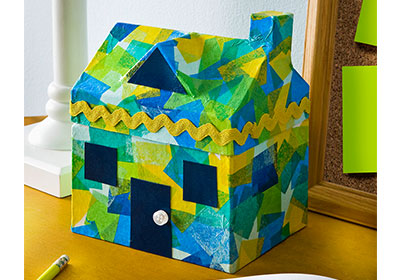
Here's a crafty decoupage project you can do with the kids.

At a Glance:

#5030 Skill Level: Intermediate Time:
  • Clock active
  • Clock active
  • Clock active
  • Clock active

This project features these great brands:

  • Apple Barrel Logo
  • Mod Podge Decoupage Finishes and Formulas Logo
supplies

Apple Barrel ® Colors - White, 2 oz. - 20503

Number Needed: 1 $0.99
Item not for sale on Plaid Online.

Mod Podge ® Gloss, 8 oz. - CS11201

Number Needed: 1 $7.49
Item not for sale on Plaid Online.
instructions

Other Supplies

Paper mache house with removable roof, Tissue paper in your choice of colors, Cardstock in coordinating colors, Scissors, Craft glue, 1 small white button, Ric rac trim in your choice of color

Instructions

  1. Paint your paper mache house in the color of your choice. I recommend going with White or a very light color so the tissue paper stands out better. Paint several coats and let dry.
  2. Cut tissue paper into squares—enough to cover the house.
  3. Use Mod Podge to adhere all the squares to the house in a random pattern. Keep Mod Podging the house and adding tissue paper until the house is completely covered. Let dry.
  4. Trim any tissue paper that overlaps the edges using the scissors.
  5. Cut the cardstock to make a door and two windows, as well as any other pieces of the house you like (transom, chimney, etc.).
  6. Mod Podge these cardstock pieces to the house and let dry.
  7. Glue a button to the front door as a knob.
  8. Glue ric rac trim around the edge of the roof – trim and let dry.
  9. Let dry 24 hours before using.

Disclaimer: The information found in each project is presented in good faith, but no warranty is given, nor results guaranteed, nor is freedom from any patent to be inferred. Since we have no control over physical conditions surrounding the application of information herein contained, Plaid Enterprises, Inc. disclaims any liability for untoward results.

Important: Please be sure to thoroughly read the instructions for all products, paying particular attention to all cautions and warnings shown to ensure the proper and safe use of the product.

Copyright: All Rights Reserved. No part of this Project may be reproduced in any form without permission in writing, except for your personal use, except by reviewer, who may in reviewing this project, quote brief passages in a magazine or newspaper.

Day of the Dead Flag Banner
New!
Day of the Dead Flag Banner
Mother’s Day Chalkboard
New!
Mother’s Day Chalkboard
Valentines Day Heart Boxes
New!
Valentines Day Heart Boxes
'Think Green' Clay Pot
New!
'Think Green' Clay Pot