Email Signup

Subscribe to the Plaid Crafts Newsletter for craft project ideas, product news, our live events, and more!

25% Bucilla Spring Sale

Save 25% on orders of $60 or more and get free U.S. shipping! Shop new arrivals from Bucilla - Seasonal Felt Stockings & Ornaments! This promotion cannot be combined with other promos. See shipping details. for inspirational ideas. Get free U.S. ground shipping on orders $60+! This promotion cannot be combined with other promos. See shipping details.

Use Code

Sale Ends 4/20/24

Photo Transfer and Stitching Wall Art

By: Julie Lewis

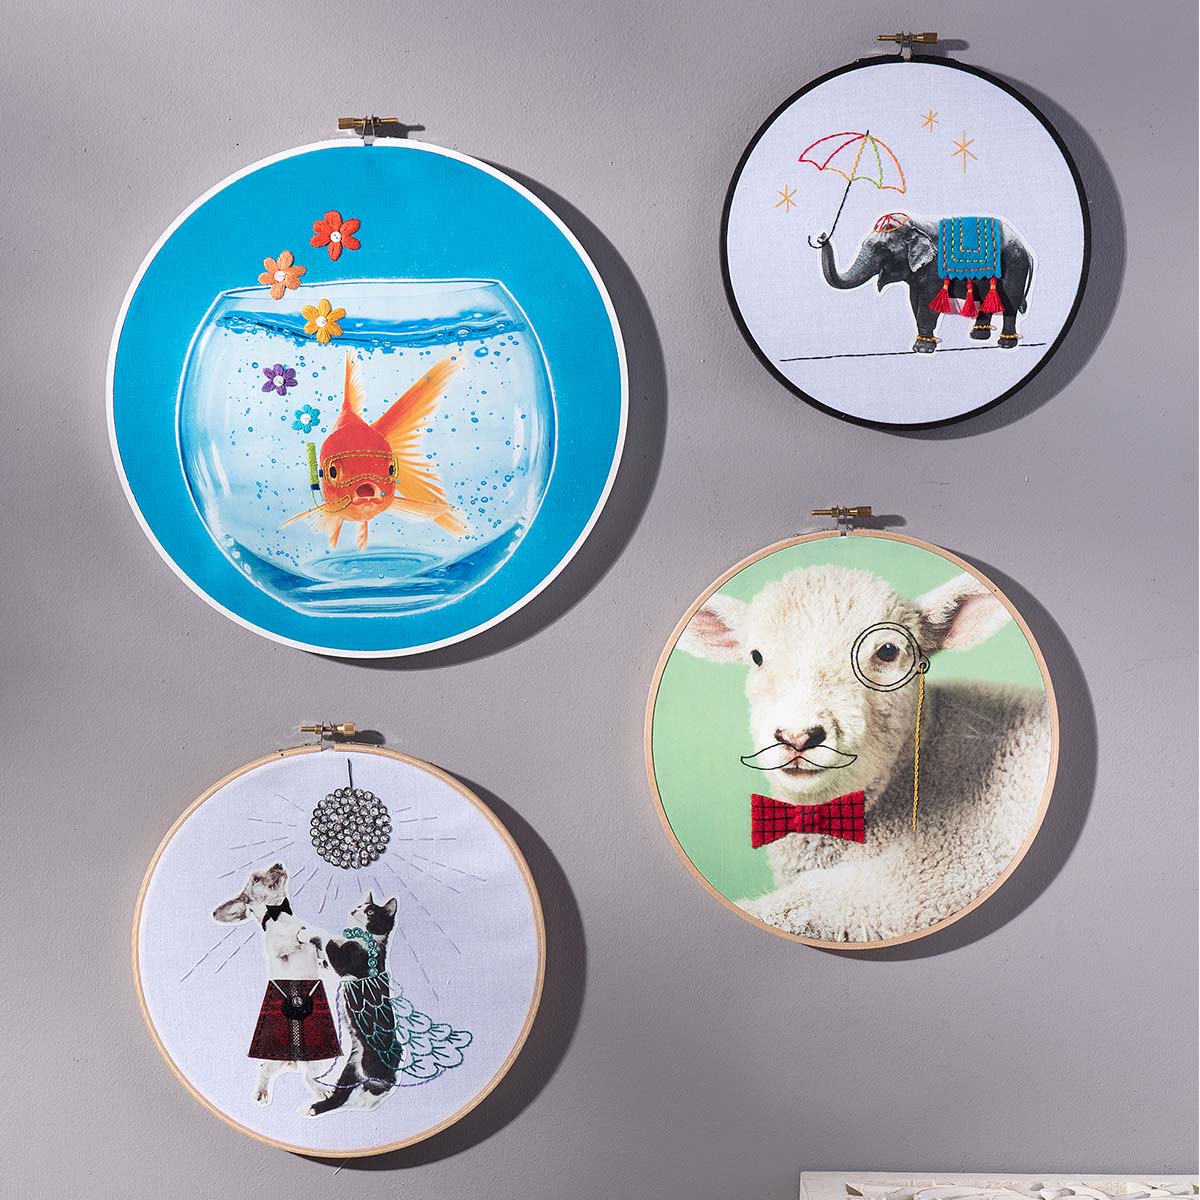
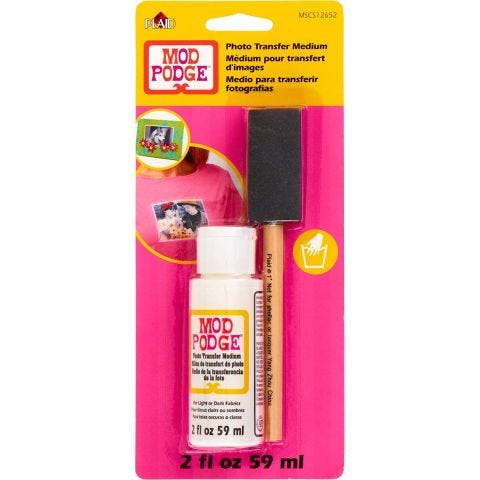
Use Mod Podge Photo Transfer and embroidery floss to create a dimensional wall-hanging!

At a Glance:

Project #14835 Skill Level: Intermediate Time:
  • Clock active
  • Clock active
  • Clock active
  • Clock active

This project features these great brands:

  • Mod Podge Decoupage Finishes and Formulas Logo
supplies

MOD PODGE PHOTO TRANSFER MEDIUM 2 OZ. CARDED

Number Needed: 1 $7.49
Item not for sale on Plaid Online.
instructions

Other Supplies

  • White or colored fabric (depending on your image)
  • Embroidery hoop (size dependent on your image)
  • Embroidery floss (to coordinate with your image)
  • Photocopy of your image (reversed if there is any text)
  • Sponge
  • Beading needle
  • Wax paper
  • Scissors
  • Paper plates
  • Paper towels
  • Water basin

Instructions

  1. If you are cutting your image out, cut along the outside of the shape leaving at least 1/8 of an inch. If not, leave your image intact.
  2. Make sure your fabric is free from wrinkles.
  3. Lay your image face up on wax paper. Apply an even coat of photo transfer medium over entire surface with foam brush.
  4. Carefully lift your image off the wax paper and place face down on your fabric. Smooth to even the image out and wipe away any excess from edges. Let cure at least 12 hours referring to bottle for curing time.
  5. When completely cured, dampen surface of paper and begin to lightly rub paper off in a circular motion. Let the image dry between dampening and rubbing paper off. Repeat until image is clear of any paper.
  6. Place fabric with transferred image between the embroidery hoops. Tighten the hoop while pulling on edges of fabric until hoop is tight and fabric is taut.
  7. Use the beading needle and one thread of floss to embellish image as desired. Stitch straight lines, loops for flowers and other stitches to embellish.
  8. To make a French knot, pull needle through fabric to the front. Wrap floss around needle two to three times, pull thread taut and bring needle back down through the fabric to create knot.
  9. Trim excess fabric from behind as close to the hoop as possible when completed.

Disclaimer: The information found in each project is presented in good faith, but no warranty is given, nor results guaranteed, nor is freedom from any patent to be inferred. Since we have no control over physical conditions surrounding the application of information herein contained, Plaid Enterprises, Inc. disclaims any liability for untoward results.

Important: Please be sure to thoroughly read the instructions for all products, paying particular attention to all cautions and warnings shown to ensure the proper and safe use of the product.

Copyright: All Rights Reserved. No part of this Project may be reproduced in any form without permission in writing, except for your personal use, except by reviewer, who may in reviewing this project, quote brief passages in a magazine or newspaper.

Hydrangeas in Turquoise Vase
New!
Hydrangeas in Turquoise Vase
Gingham Heart Plaque
New!
Gingham Heart Plaque
Watercolor Gelz Wedding Portrait
New!
Watercolor Gelz Wedding Portrait
Letter with Beaded Garland
New!
Letter with Beaded Garland