Email Signup

Subscribe to the Plaid Crafts Newsletter for craft project ideas, product news, our live events, and more!

20% Off Gifts for Mom!

Spend $60+ to save 20% site-wide for Mother's Day gifts and upcycled projects! Explore the NEW! FolkArt® Murano™ Glass Paint and Mod Podge Multi! Check out our Mother's Day Projects for inspirational ideas. Get free U.S. ground shipping on orders $60+! This promotion cannot be combined with other promos. See shipping details.

Use Code

Sale Ends 4/13/24

Pumpkin Spider

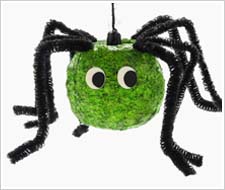
A spider who is not so scary.

At a Glance:

#3903 Skill Level: Intermediate Time:
  • Clock active
  • Clock active
  • Clock inactive
  • Clock inactive

This project features these great brands:

  • Mod Podge Logo
supplies

FolkArt ® Acrylic Colors - Wicker White, 2 oz. - 901

Number Needed: 1 $1.69
Item not for sale on Plaid Online.

FolkArt ® Acrylic Colors - Licorice, 2 oz. - 938

Number Needed: 1 $1.69
Item not for sale on Plaid Online.

Mod Podge ® Gloss, 8 oz. - CS11201

Number Needed: 1 $7.49
Item not for sale on Plaid Online.

Mod Podge ® Dimensional Magic, 2 oz. - CS11215

Number Needed: 1 $7.49
Item not for sale on Plaid Online.
instructions

Other Supplies

Small craft pumpkin, 8 curly chenille stems (18 mm x 12”), 4 sheets lime green tissue paper, 2 wood circles (1 ½”), 2 feet black yarn/string (to hang pumpkin), Awl, Hot glue gun

Instructions

  1. Paint each wood circle with Wicker White; allow to dry.
  2. Paint stem of pumpkin and eyes on circles as shown with Licorice. Let dry.
  3. Follow instructions on Demensional Magic and completely cover the front of each wood circle with Dimensional Magic. Set aside in an undisturbed place to dry.
  4. Cut sheets of tissue paper into 4" squares. “Scrunch up” each piece of tissue paper by laying on a flat surface and pushing each corner to the center.
  5. After papers are prepared, adhere papers to pumpkin with Mod Podge, Covering entire pumpkin except stem. Allow to dry.
  6. Use a dry brush to lightly paint tissue paper with Licorice (refer to photo). Allow to dry.
  7. Give the pumpkin a coat of Mod Podge. Allow to dry by setting the pumpkin upside down in a wide mouthed bottle.
  8. Use awl to punch holes for chenille stems (legs) making four holes on each side of the pumpkin, one inch apart and one inch down from the stem. Hot glue chenille stems in place then make two bends in each “leg” (refer to photo).
  9. Make a hole through the stem and tie on yarn/string to hang.

Disclaimer: The information found in each project is presented in good faith, but no warranty is given, nor results guaranteed, nor is freedom from any patent to be inferred. Since we have no control over physical conditions surrounding the application of information herein contained, Plaid Enterprises, Inc. disclaims any liability for untoward results.

Important: Please be sure to thoroughly read the instructions for all products, paying particular attention to all cautions and warnings shown to ensure the proper and safe use of the product.

Copyright: All Rights Reserved. No part of this Project may be reproduced in any form without permission in writing, except for your personal use, except by reviewer, who may in reviewing this project, quote brief passages in a magazine or newspaper.

FolkArt Terra Cotta Pumpkins
New!
FolkArt Terra Cotta Pumpkins
Mod Podge Tricks and Treats Halloween Necklace
New!
Mod Podge Tricks and Treats Halloween Necklace
Sparkly Geometric Pumpkin
New!
Sparkly Geometric Pumpkin
Gallery Glass Fall Leaf Ornaments
New!
Gallery Glass Fall Leaf Ornaments