Email Signup

Subscribe to the Plaid Crafts Newsletter for craft project ideas, product news, our live events, and more!

Upcycle Your Glassware! Save 25%

Save 25% on orders $60+ and get free U.S. ground shipping! Explore the NEW! FolkArt Murano Glass Paint! This promotion cannot be combined with other promos. See shipping details.

Use Code

Sale Ends 3/23/24

Resin Flower Bowl

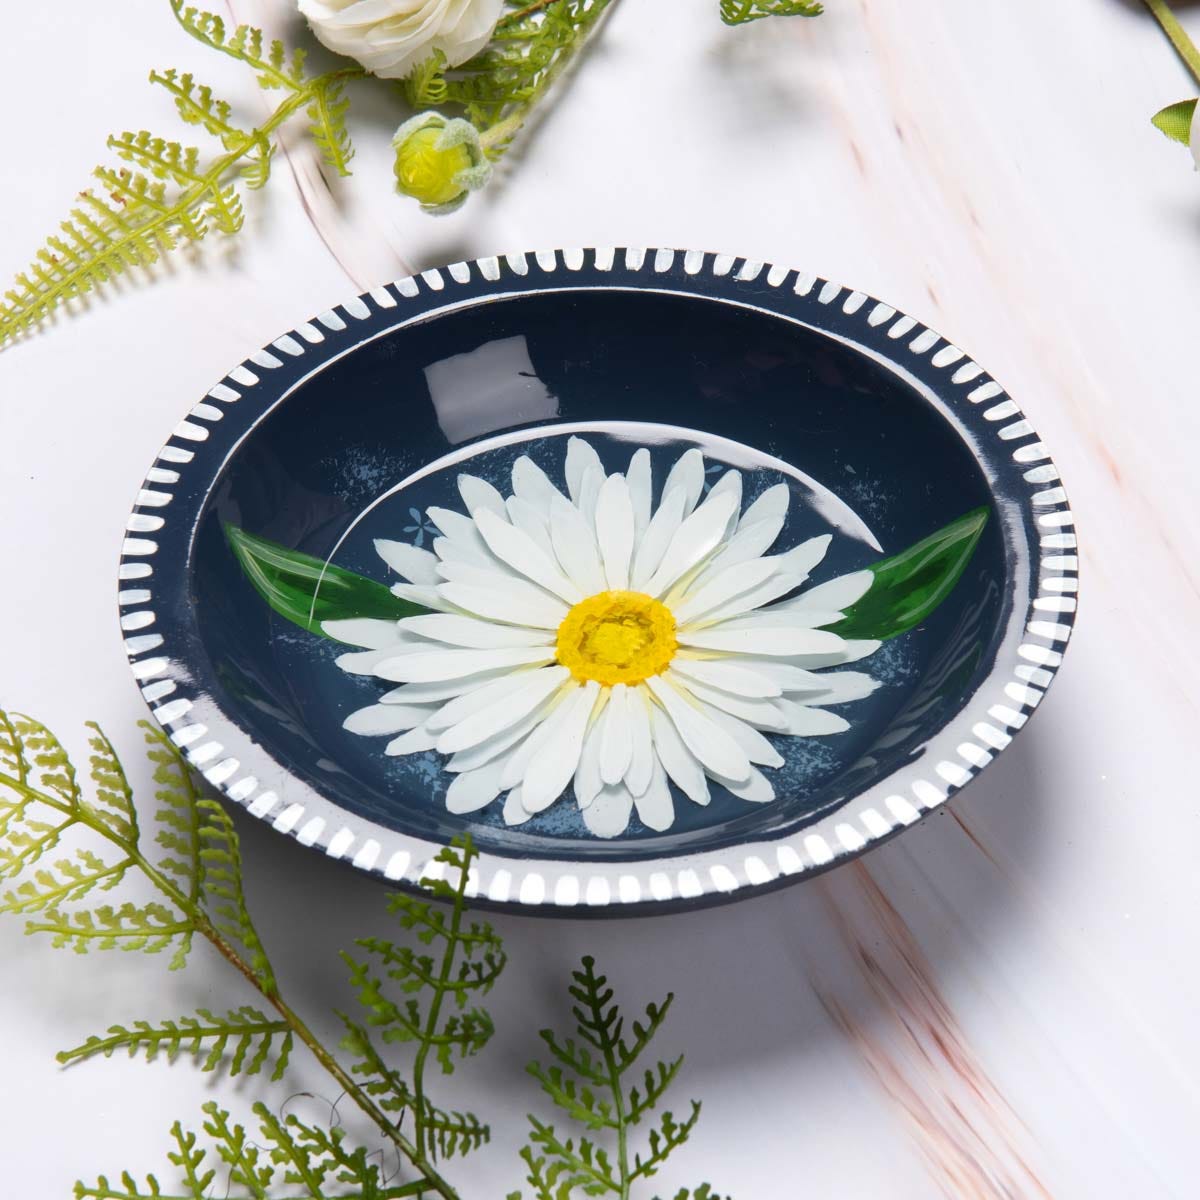
Give a wooden bowl new life with a beautiful floral design and preserved in Mod Podge Resin. Create stunning resin art that will add charm to your home decor with this fun DIY project.

This project features these great brands:

At a Glance:

Project #15839 Skill Level: Advanced
supplies

Plaid Supplies

Mod Podge ® Resin - 8 oz. - 25263

Number Needed: 1 $19.99
Item not for sale on Plaid Online.

FolkArt ® Acrylic Colors - Navy Blue, 2 oz. - 403

Number Needed: 1 $1.69
Item not for sale on Plaid Online.

FolkArt ® Acrylic Colors - Wicker White, 2 oz. - 901

Number Needed: 1 $1.69
Item not for sale on Plaid Online.

FolkArt ® Acrylic Colors - Daffodil Yellow, 2 oz. - 2550

Number Needed: 1 $1.69
Item not for sale on Plaid Online.

FolkArt ® Acrylic Colors - Classic Green, 2 oz. - 2554

Number Needed: 1 $1.69
Item not for sale on Plaid Online.

Folkart ® Brush Sets - Artist Variety Set, 10 pc. - 50536

Number Needed: 1 $8.99
Item not for sale on Plaid Online.

Other Supplies

  • Wooden Bowl
  • Respirator
  • Torch
  • Gloves
  • Disposable cups
  • Craft sticks

instructions

  1. Using a flat brush, base coat a wooden bowl with Navy Blue. Let dry.
  2. Paint a yellow circle in the middle of the bowl. Using Wicker White, paint 3-4 petals, spread out, coming from the yellow circle. Using Classic Green, paint 2 leaves toward the edges of the bowl. See project photo for placement. Let dry.
  3. Apply a thin coat of Mod Podge Resin to the bowl.
  4. When the resin is cured, paint more petals between the first few and let dry.
  5. Apply a thin coat of Mod Podge Resin to the bowl.
  6. Continue painting/layering petals and adding resin between layers until the flower is full.
  7. Before the last coat, add more details to the yellow center of the flower. Also, using a small round brush, paint little marks around the edges of the bowl using Wicker White.
  8. Apply the final coat of resin and allow it to cure completely.
 

Related FAQs

Can a Mod Podge Resin project be decorated with paint?
Can I apply Mod Podge Resin in layers, and how long should I wait between applying each layer?
Can I use a mold when working with Mod Podge Resin? And what types of molds work best?
How can I thin out the resin mixture?
How do I mix Mod Podge Resin?
resources

Related Videos

Getting Started with Mod Podge Resin

Watch this Video

How to Mix Resin

Watch this Video

Using Acrylic Paint with Resin

Watch this Video

Related Resources

Mod Podge Resin Info Sheet

Mod Podge Resin Info Sheet

Download this PDF document to learn more about Mod Podge Resin.

View PDF

Related FAQs

Once Mod Podge Resin has been completely cured, it can be decorated or embellished with paint, markers, ink, and more. Once decorated, it is recommended that the surface be protected by pouring a thin top coat of clear Mod Podge Resin over the decorated surface.
Yes, Mod Podge Resin can be applied to a surface in layers. The second layer can be applied once the first layer has set. This could be one to two hours, depending upon the humidity level and temperature in the room.
Mod Podge Resin works best with all types of molds. Some molds like a silicone mold will not require a mold release agent, while other types of molds made of plastic polypropylene or polyethylene sheet plastic will require a mold release agent

How much resin will you need?

* - Required Field

FolkArt Multi-Surface Jar of Jack-O-Lanterns
New!
FolkArt Multi-Surface Jar of Jack-O-Lanterns
Photo Transfer Pop Star Tote
New!
Photo Transfer Pop Star Tote
Ombre Beaded Easter Egg with Mod Podge
New!
Ombre Beaded Easter Egg with Mod Podge
Dipped Ceramic Birdhouse
New!
Dipped Ceramic Birdhouse

Disclaimer: The information found in each project is presented in good faith, but no warranty is given, nor results guaranteed, nor is freedom from any patent to be inferred. Since we have no control over physical conditions surrounding the application of information herein contained, Plaid Enterprises, Inc. disclaims any liability for untoward results.

Important: Please be sure to thoroughly read the instructions for all products, paying particular attention to all cautions and warnings shown to ensure the proper and safe use of the product.

Copyright: All Rights Reserved. No part of this Project may be reproduced in any form without permission in writing, except for your personal use, except by reviewer, who may in reviewing this project, quote brief passages in a magazine or newspaper.