Email Signup

Subscribe to the Plaid Crafts Newsletter for craft project ideas, product news, our live events, and more!

Make To Give Sale - 20% Off!

Spread the holiday cheer with personalized, hand-made gifts this Christmas! Save 20% during our Make To Give Sale on orders $60+ and get free U.S. ground shipping! This promotion cannot be combined with other promos. See shipping details.

Use Code

Sale Ends 12/9/23

Seize the Day Decorated Photo Box

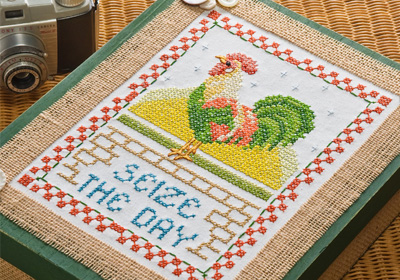
The perfect storage box for photos or recipes.

At a Glance:

#4854 Skill Level: Intermediate Time:
  • Clock active
  • Clock active
  • Clock active
  • Clock active

This project features these great brands:

  • Bucilla Stitchery Kits Logo
supplies

FolkArt ® Acrylic Colors - Sap Green, 2 oz. - 458

Number Needed: 1 $1.69
Item not for sale on Plaid Online.

Mod Podge ® Fabric, 8 oz. - CS11218

Number Needed: 1 $8.99
Item not for sale on Plaid Online.
instructions

Other Supplies

Unfinished wood photo storage box 9 ¾” x 12 ½” x 3 ¼”, ¼ yd Burlap, Sponge brush, Spray adhesive, Buttons, Hot glue gun and glue, Sandpaper

Instructions


  1. Follow kit instructions for cross stitch panel.

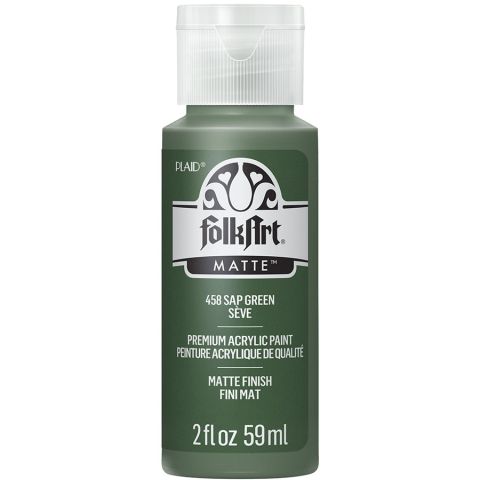
  2. Basecoat exterior of box with FolkArt Acrylic Paint.

  3. After paint dries, rough up edges and corners with sandpaper, giving a worn look.

  4. Trim sides of stitched panel to ¾” from stitching.

  5. Spread a thin coat of Mod Podge Fabric to the back of the stitched panel.  Allow to dry.

  6. Spread a second coat of Mod Podge Fabric to the back of the stitched panel and center piece onto the lid of the box.  Smooth with fingers.

  7. Cut two 1” x 9” strips from the burlap.  One at a time, spray one side of the burlap strip and place one at the top and bottom of the stitched piece to create a border.

  8. Cut two 1” x 10” strips from the burlap.  Again, spray one side of the burlap, one at a time, and place on each side of the stitched piece to finish the border.

  9. Cut 2” strips of burlap to the size of each side of the box and the box’s front.  Spray with adhesive and attach to the box one at a time. Hot glue buttons to the top as desired.


Disclaimer: The information found in each project is presented in good faith, but no warranty is given, nor results guaranteed, nor is freedom from any patent to be inferred. Since we have no control over physical conditions surrounding the application of information herein contained, Plaid Enterprises, Inc. disclaims any liability for untoward results.

Important: Please be sure to thoroughly read the instructions for all products, paying particular attention to all cautions and warnings shown to ensure the proper and safe use of the product.

Copyright: All Rights Reserved. No part of this Project may be reproduced in any form without permission in writing, except for your personal use, except by reviewer, who may in reviewing this project, quote brief passages in a magazine or newspaper.

FolkArt One Decor Gloss Small Side Table
New!
FolkArt One Decor Gloss Small Side Table
Rub-on Transfer Suitcases
New!
Rub-on Transfer Suitcases
Cock a Doodle Do Rooster
New!
Cock a Doodle Do Rooster
DIY Bottle Opener for Father's Day
New!
DIY Bottle Opener for Father's Day