Email Signup

Subscribe to the Plaid Crafts Newsletter for craft project ideas, product news, our live events, and more!

Upcycle Your Glassware! Save 25%

Save 25% on orders $60+ and get free U.S. ground shipping! Explore the NEW! FolkArt Murano Glass Paint! This promotion cannot be combined with other promos. See shipping details.

Use Code

Sale Ends 3/23/24

Snowflake Podgeable Pin

Make a holiday themed pin for yourself or as a gift.

At a Glance:

#4757 Skill Level: Beginner Time:
  • Clock active
  • Clock active
  • Clock inactive
  • Clock inactive

This project features these great brands:

  • Mod Podge Decoupage Finishes and Formulas Logo
supplies

Mod Podge ® Hard Coat, 8 oz. - CS11245

Number Needed: 1 $8.99
Item not for sale on Plaid Online.
instructions

Other Supplies

Mod Podge Podgeable Shapes, 12918
Mod Podge Holiday Papers or holiday themed scrapbook papers, Mod Podge Podgeable Snowflake or other snowflake shape embellishment, Pencil, Scissors, Foam Paintbrush, Beads, Headpins, Jump-rings, 2 Jewelry pliers, Gem glue, Pin backing

Instructions

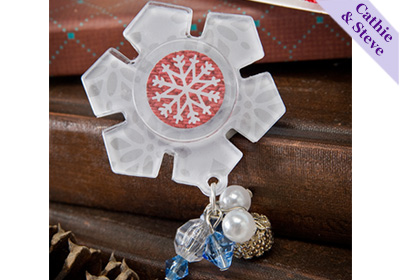
1. Create the Podgeable pin by placing the holiday shape on holiday themed papers, trace around the shape and cut out the design. (For this design we used one holiday shape and one small circle.)  Apply a coat of Mod Podge to the back of the Podgeable shape and to the top of the paper, sandwich the two together, press with your fingers and allow to dry.  Once dry, trim any excess paper from the edges.  Repeat with the circle shape. 

2.Once they are dry, glue together with the circle in the center.  The loop on the Podgeable shape will be the bottom of the pin.

3. Attach beaded dangles to the loop on the Podgeable shape.  First attach a jumpring to the loop on the Podgeable. Thread a bead onto a headpin, trim the length of the headpin if needed.  Form a loop at the end of the bead and attach to the jumpring.  Repeat with more beads.

4. Using gem glue, attach the pin back to the back of the Podgeable shape so the dangle is facing down.

PROJECT TIP: Mix up the colors by adding beads of different colors and sizes.

Disclaimer: The information found in each project is presented in good faith, but no warranty is given, nor results guaranteed, nor is freedom from any patent to be inferred. Since we have no control over physical conditions surrounding the application of information herein contained, Plaid Enterprises, Inc. disclaims any liability for untoward results.

Important: Please be sure to thoroughly read the instructions for all products, paying particular attention to all cautions and warnings shown to ensure the proper and safe use of the product.

Copyright: All Rights Reserved. No part of this Project may be reproduced in any form without permission in writing, except for your personal use, except by reviewer, who may in reviewing this project, quote brief passages in a magazine or newspaper.

DIY Dipped Glitter Ornaments
New!
DIY Dipped Glitter Ornaments
Festive Holiday Kid's Table
New!
Festive Holiday Kid's Table
Joy Glass Block
New!
Joy Glass Block
Metallic Teacup Ornaments
New!
Metallic Teacup Ornaments