Email Signup

Subscribe to the Plaid Crafts Newsletter for craft project ideas, product news, our live events, and more!

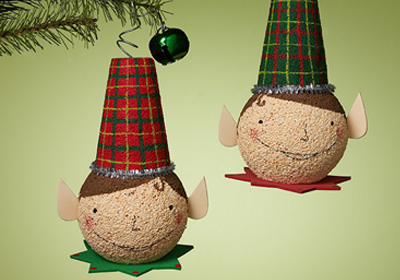
Twin Elf Ornaments

Whimsical elf twin ornaments will brighten up your tree with twice the fun.

Get the Pattern

At a Glance:

#4739 Skill Level: Intermediate Time:
  • Clock active
  • Clock active
  • Clock active
  • Clock active

This project features these great brands:

  • Apple Barrel Logo
supplies

Number Needed: 1 $-1.00
Item not for sale on Plaid Online.

Apple Barrel ® Colors - Limeade, 2 oz. - 20253

Number Needed: 1 $0.99
Item not for sale on Plaid Online.

Apple Barrel ® Colors - White, 2 oz. - 20503

Number Needed: 1 $0.99
Item not for sale on Plaid Online.

Apple Barrel ® Colors - Black, 2 oz. - 20504

Number Needed: 1 $0.99
Item not for sale on Plaid Online.

Apple Barrel ® Colors - Nutmeg Brown, 2 oz. - 20521

Number Needed: 1 $0.99
Item not for sale on Plaid Online.

Apple Barrel ® Colors - Christmas Green, 2 oz. - 20529

Number Needed: 1 $0.99
Item not for sale on Plaid Online.

Apple Barrel ® Colors - Cardinal Crimson, 2 oz. - 20590

Number Needed: 1 $0.99
Item not for sale on Plaid Online.
instructions

Other Supplies

2 Styrofoam cones – 2 7/8” x 5 7/8”, 2 Styrofoam balls – 3”, E6000 Glue, 2mm foam sheets – green, red and white, 2 silver tinsel chenille stems, Scissors, Craft knife, Butter knife, spoon, Ruler, Large jingle bells – one red and one green, 1/8” Flat brush, #1 Liner brush, 1/8” stencil brush

Instructions

1. Mix one part Mango to three parts Wicker White.

2. Cut two pairs of ears from foam. Paint ears and Styrofoam balls with Mango/Wicker White mixture. Let dry.

3. Cut a slit on either side of ball with craft knife. Glue and insert ears. (*remember project tip)

4. Paint hair. Add cheeks with dry stencil brush. Paint face details with liner brush and any dots using opposite end of paintbrush.

5. Measure 3” down from top of cones and cut with butter knife. Slightly scoop out cut end and press in with thumb to smooth out edges.

6. Paint one cone green and the other red. When dry, paint stripes horizontally and vertically as shown to create plaid.

7. Glue to tops of heads. Glue chenille stems around bases of hats.

8. Cut one red and one green foam collar. Add dots to tips and glue to bottoms of heads.

9. Twist wire around paintbrush handle. Secure jingle bell to one end and glue other end into top of hat

PROJECT TIP:
Insert a brush handle or dowel rod into Styrofoam ball to hold while painting. Make sure the hole is at the top of head when painting hair and gluing on hat.

Get the Pattern

Disclaimer: The information found in each project is presented in good faith, but no warranty is given, nor results guaranteed, nor is freedom from any patent to be inferred. Since we have no control over physical conditions surrounding the application of information herein contained, Plaid Enterprises, Inc. disclaims any liability for untoward results.

Important: Please be sure to thoroughly read the instructions for all products, paying particular attention to all cautions and warnings shown to ensure the proper and safe use of the product.

Copyright: All Rights Reserved. No part of this Project may be reproduced in any form without permission in writing, except for your personal use, except by reviewer, who may in reviewing this project, quote brief passages in a magazine or newspaper.

Icy Pastel Birdhouse Christmas Village
New!
Icy Pastel Birdhouse Christmas Village
Assorted Hand-painted Apple Barrel Ornaments
New!
Assorted Hand-painted Apple Barrel Ornaments
3 Ways to Stylize Candles
New!
3 Ways to Stylize Candles
Icy Pastel Nutcracker & Ceramic Glitter Trees
New!
Icy Pastel Nutcracker & Ceramic Glitter Trees