Email Signup

Subscribe to the Plaid Crafts Newsletter for craft project ideas, product news, our live events, and more!

25% Bucilla Spring Sale

Save 25% on orders of $60 or more and get free U.S. shipping! Shop new arrivals from Bucilla - Seasonal Felt Stockings & Ornaments! This promotion cannot be combined with other promos. See shipping details. for inspirational ideas. Get free U.S. ground shipping on orders $60+! This promotion cannot be combined with other promos. See shipping details.

Use Code

Sale Ends 4/20/24

Upcycled Pillow Cases

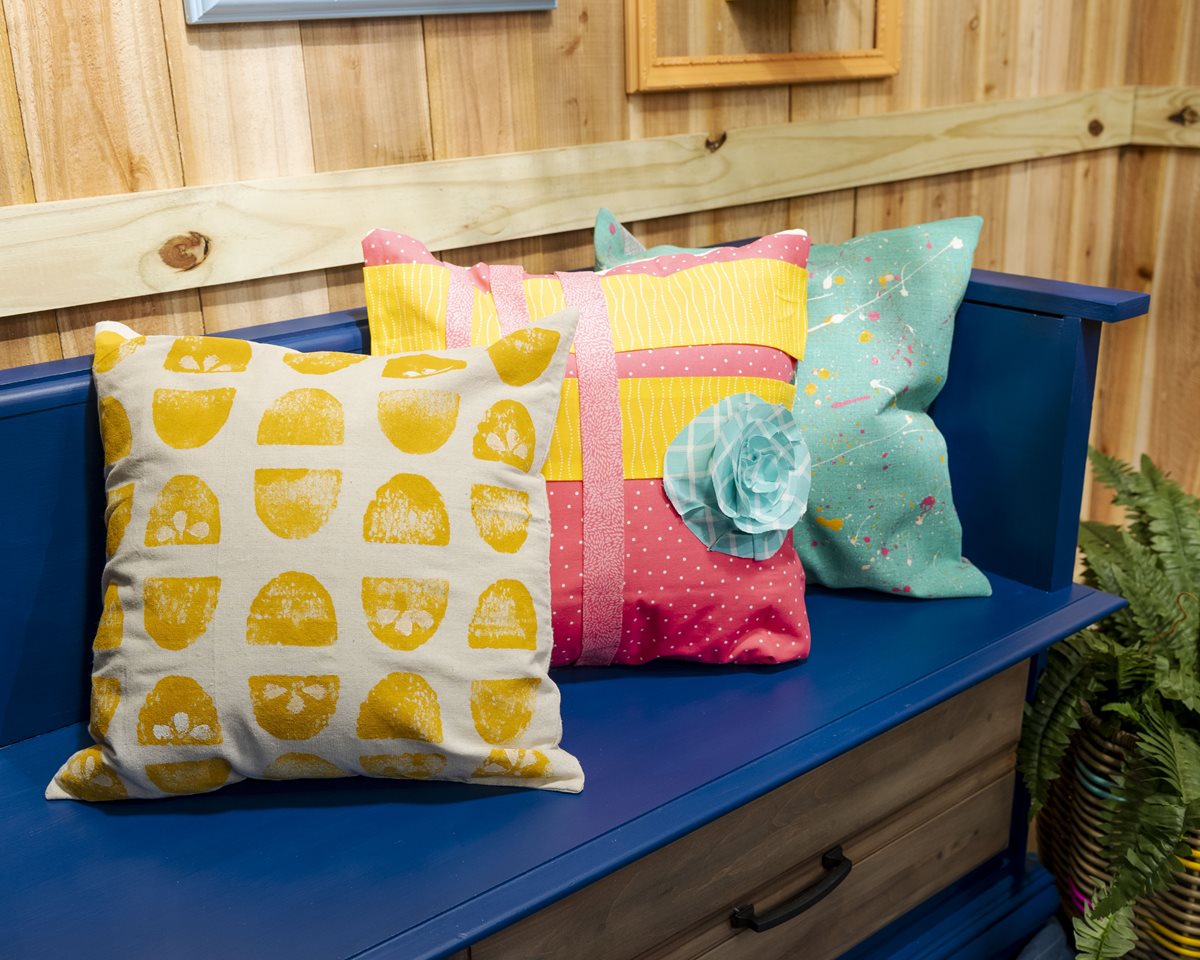
Give your throw pillows an upgrade with fun summer flair!

This project features these great brands:

  • Mod Podge Decoupage Finishes and Formulas Logo

At a Glance:

Project #16549 Skill Level: Intermediate
supplies

Plaid Supplies

Apple Barrel ® Multi-Surface Satin Acrylic Paints - Sunbeam, 2 oz. - 21965E

Number Needed: 1 $1.49
Item not for sale on Plaid Online.

Apple Barrel ® Multi-Surface Satin Acrylic Paints - Acapulco, 2 oz. - 21972E

Number Needed: 1 $1.49
Item not for sale on Plaid Online.

Apple Barrel ® Multi-Surface Satin Acrylic Paints - White, 2 oz. - 21954E

Number Needed: 1 $1.39
Item not for sale on Plaid Online.

Apple Barrel ® Multi-Surface Satin Acrylic Paints - Sunbeam, 2 oz. - 21965E

Number Needed: 1 $1.49
Item not for sale on Plaid Online.

Mod Podge ® Fabric, 8 oz. - CS11218

Number Needed: 1 $8.99
Item not for sale on Plaid Online.

Other Supplies

Sponge Stamp Throw Pillow

  • Throw pillow cover
  • Household sponge
  • Paper or cardboard to protect the pillow
  • Paper Plate


Splatter Throw Pillow
  • Throw pillow cover
  • Variety of paintbrushes & old toothbrushes
  • Paper or cardboard to protect the pillow

Mod Podge Fabric Throw Pillow
  • Throw pillow cover
  • Strips of fabric in coordinating colors/patterns

instructions

Sponge Stamp Throw Pillow

  1. Insert paper or cardboard inside your pillow so that the paint does not soak through both sides
  2. Cut your sponge into a half circle (lemon slice shape).
  3. Cut a single small raindrop shape out of the sponge scraps. This will be your lemon seed stamp.
  4. Pour out some Sunbeam onto your plate and dab it with your half circle sponge until the surface of the sponge is saturated.
  5. Press your sponge to the pillow to create the lemon shape. Continue loading and pressing to create the pattern (see image). Allow to dry.
  6. Using Toasted Marshmallow and your small seed stamp, create seeds on a few of the lemon slices and allow to dry.
  7. Repeat on the opposite side if desired.    

Splatter Throw Pillow
  1. Insert paper or cardboard inside your pillow so that the paint does not soak through both sides
  2. Basecoat one side of your pillow in Acapulco and allow to dry.
  3. Using your paintbrushes and toothbrushes, splatter your pillow with the remaining colors until the desired look is achieved. Allow to dry.
  4. Repeat on the opposite side if desired.

Mod Podge Fabric Throw Pillow
  1. Create strips of fabric by ripping on the grain or cutting to desired length and width.
  2. Lay your pillow cover on a flat surface and begin to lay out your design by placing your fabric strips until you get the desired look.
  3. Using a paint brush, apply Mod Podge ® Fabric to your pillowcase and press your fabric to the surface.
  4. To create extra texture, use your fingers to bunch fabric up.
  5. Once finished and dry to the touch, insert pillow into the case and reapply Mod Podge ® Fabric to any unstuck spots.

Watch a Video Tutorial

resources

Related Videos

Mod Podge Tips and Tricks for No Wrinkles

Learn how to get perfect Mod Podge projects everytime!

Watch this Video

Learn how to get perfect Mod Podge projects everytime!

How Mod Podge is Made

Get a behind-the-scenes look at how Mod Podge is made, bottled and shipped to you!

Watch this Video

Get a behind-the-scenes look at how Mod Podge is made, bottled and shipped to you!

Applying Paper to Wood Using Mod Podge

Learn basic steps of applying paper to wood using Mod Podge.

Watch this Video

Learn basic steps of applying paper to wood using Mod Podge.

Related Resources

Free Lesson Plans featuring Mod Podge

Free Lesson Plans featuring Mod Podge

Use these free lesson plans to craft an unforgettable experience in the classroom with one of these

View PDF
Mod Podge Clear Image Transfer FAQs

Mod Podge Clear Image Transfer FAQs

Learn more about Mod Podge Clear Image Transfer Medium by reading the FAQ. 

View PDF
Mod Podge Ultra Frequently Asked Questions

Mod Podge Ultra Frequently Asked Questions

Learn more about Mod Podge Ultra by reading the frequently asked questions. 

View PDF

Related FAQs

Decorated candles using Mod Podge ® or Royal Coat ® Decoupage Finish are meant for decorative purposes and not for illumination. Many of the decorations would catch fire and be hazardous if the candle were burned. However, if you are using a wide pillar candle and the decorations do not go to the top of the candle, it can be burned down slightly to create a well, then a votive candle inserted into the well. A new votive candle can be inserted when the old one is finished. Use extreme caution and good judgment when burning candles that have been decorated.
First check to see if the napkin is 2 ply. If so, separate and lay aside. Brush Mod Podge directly on the your surface. Carefully place the printed napkin on the surface and lightly blot down with a dampened sponge. Start blotting in the center and work to the edge. Once it is in place, let dry. After about 30 minutes lightly apply a top coat of Mod Podge.
  1. Apply a coat of Mod Podge® to the inside of the form and allow to dry slightly. Place the Napkin design where desired and gently rub it flat with your thumb.
  2. Cover the image with a second very thin coat of Mod Podge®, beginning in the center and brushing out. Allow to dry thoroughly.
  3. Add special sponging or spouncing effects, as desired, around the design and let dry.
  4. Paint the whole inside with a light color of FolkArt® Acrylic Colors. If you want to use a darker color inside, first paint around the Napkin design with a light color, let dry and then add the darker color.
Chalk Painted Ombre Mason Jars
New!
Chalk Painted Ombre Mason Jars
Mushroom Gnome Wall Hanging
New!
Mushroom Gnome Wall Hanging
Magazine Holder Cereal Box Craft
New!
Magazine Holder Cereal Box Craft
Boho Yarn Wrapped Letter
New!
Boho Yarn Wrapped Letter

Disclaimer: The information found in each project is presented in good faith, but no warranty is given, nor results guaranteed, nor is freedom from any patent to be inferred. Since we have no control over physical conditions surrounding the application of information herein contained, Plaid Enterprises, Inc. disclaims any liability for untoward results.

Important: Please be sure to thoroughly read the instructions for all products, paying particular attention to all cautions and warnings shown to ensure the proper and safe use of the product.

Copyright: All Rights Reserved. No part of this Project may be reproduced in any form without permission in writing, except for your personal use, except by reviewer, who may in reviewing this project, quote brief passages in a magazine or newspaper.