Email Signup

Subscribe to the Plaid Crafts Newsletter for craft project ideas, product news, our live events, and more!

25% Bucilla Spring Sale

Save 25% on orders of $60 or more and get free U.S. shipping! Shop new arrivals from Bucilla - Seasonal Felt Stockings & Ornaments! This promotion cannot be combined with other promos. See shipping details. for inspirational ideas. Get free U.S. ground shipping on orders $60+! This promotion cannot be combined with other promos. See shipping details.

Use Code

Sale Ends 4/20/24

Vintage Inspired Diorama Pumpkin

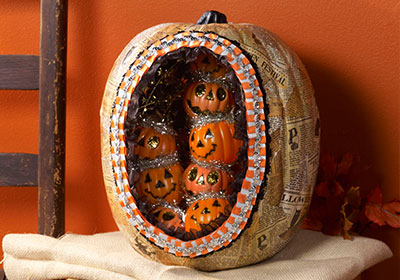
Podging the outside with vintage inspired Halloween papers, fill with your favorite

At a Glance:

#5116 Skill Level: Intermediate Time:
  • Clock active
  • Clock active
  • Clock active
  • Clock active

This project features these great brands:

  • FolkArt Acrylic Paint Logo
  • FolkArt Extreme Glitter Paint Logo
  • Mod Podge Decoupage Finishes and Formulas Logo
supplies

Mod Podge ® 3 Piece Silicone Finger Caps - 12958

Number Needed: 1 $5.99
Item not for sale on Plaid Online.

FolkArt ® Extreme Glitter™ - Black, 2 oz. - 2797

Number Needed: 1 $2.99
Item not for sale on Plaid Online.

FA EXTREME GLITTER - CHUNKY GOLD 2 OZ.

Number Needed: 1 $2.99
Item not for sale on Plaid Online.

FolkArt ® Acrylic Colors - Pure Black, 2 oz. - 479

Number Needed: 1 $1.69
Item not for sale on Plaid Online.

Mod Podge ® Gloss, 8 oz. - CS11201

Number Needed: 1 $7.49
Item not for sale on Plaid Online.
instructions

Other Supplies

Foam Pumpkin, Knife, Halloween Papers, Foam Paintbrush, Ribbons and Trims, Hot glue, Star packing garland, Detail paintbrush, 12 Mini Pumpkins, Tinsel

Instructions

  1. Carve a hole in the front of the pumpkin.
  2. Tear the Halloween papers into small pieces. Coat the back of the paper with Mod Podge, position the paper on the pumpkin, smooth with your fingers, top-coat the paper with more Mod Podge. Continue this until the pumpkin is totally covered. Overlap the papers as you apply more. Allow to dry.
  3. Paint the inside and stem of the pumpkin with Pure Black. Allow to dry.
  4. Hot glue ribbons and trims around the opening of the pumpkin. Hot glue star garland in the inside the pumpkin.
  5. Paint the facial features of the pumpkin with Extreme Glitter Black and Chunky Glitter Gold. Allow to dry. Hot glue the pumpkins is random crooked stacks. Hot glue tinsel in between the pumpkins to add pop.
Tip: Carving foam pumpkins is easy! All you need is a kitchen knife.

Disclaimer: The information found in each project is presented in good faith, but no warranty is given, nor results guaranteed, nor is freedom from any patent to be inferred. Since we have no control over physical conditions surrounding the application of information herein contained, Plaid Enterprises, Inc. disclaims any liability for untoward results.

Important: Please be sure to thoroughly read the instructions for all products, paying particular attention to all cautions and warnings shown to ensure the proper and safe use of the product.

Copyright: All Rights Reserved. No part of this Project may be reproduced in any form without permission in writing, except for your personal use, except by reviewer, who may in reviewing this project, quote brief passages in a magazine or newspaper.

Harvest Harlequin Plaque
New!
Harvest Harlequin Plaque
Gold Studded Pumpkin
New!
Gold Studded Pumpkin
'Boo' Plates
New!
'Boo' Plates
Bat Ornament
New!
Bat Ornament