Email Signup

Subscribe to the Plaid Crafts Newsletter for craft project ideas, product news, our live events, and more!

25% Bucilla Spring Sale

Save 25% on orders of $60 or more and get free U.S. shipping! Shop new arrivals from Bucilla - Seasonal Felt Stockings & Ornaments! This promotion cannot be combined with other promos. See shipping details. for inspirational ideas. Get free U.S. ground shipping on orders $60+! This promotion cannot be combined with other promos. See shipping details.

Use Code

Sale Ends 4/20/24

Witch Paper Plate Mask for Halloween

Get witchy with green Apple Barrel paint, a paper plate, and chenille stems this Halloween. Your kids will love creating and wearing this creepy green mask to scare their friends on Halloween. Easy and affordable craft you can do at home!

Get the Pattern

At a Glance:

#6477 Skill Level: Beginner Time:
  • Clock active
  • Clock active
  • Clock active
  • Clock inactive

This project features these great brands:

  • Apple Barrel Logo
supplies

Apple Barrel ® Colors - Black, 2 oz. - 20504

Number Needed: 1 $0.99
Item not for sale on Plaid Online.

Apple Barrel ® Colors - Misty White, 2 oz. - 20782

Number Needed: 1 $0.99
Item not for sale on Plaid Online.

Apple Barrel ® Colors - Crisp Green, 2 oz. - 21890

Number Needed: 1 $0.99
Item not for sale on Plaid Online.
instructions

Other Supplies

Paper plates, Posterboard, Orange chenille stems, Green pompom, Black permanent marker, ¾” Flat brush, Glue, Scissors, Pencil

Instructions

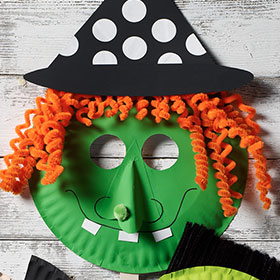
  1. Using the patterns provided, cut out all the parts of the witch from the paper plates except for the hat. Cut the hat and the brim from the poster board.
  2. Paint the face and nose with Crisp Green. Paint the hat and brim with Black. Allow to dry.
  3. Round the middle end of the nose and bend the outside nostrils up so that you can glue the nose onto the face. The middle end of the nose should be popped up.
  4. Using the brush handle, wrap the chenille stems around to make a spring/curly hair. Make several until you have enough hair. Glue the hair into place.
  5. Glue the nose, teeth and wart/pompom onto face. Glue the dots onto hat and then glue the brim onto the hat. Allow to dry.
  6. Cut out eye holes.
  7. Glue the hat onto the hair.
  8. Draw the mouth and the details around the nose with the black marker.
  9. Glue the sticks to the back of the paper plates. You will need to blue several to make sure the mask does not fall over.

Get the Pattern

Disclaimer: The information found in each project is presented in good faith, but no warranty is given, nor results guaranteed, nor is freedom from any patent to be inferred. Since we have no control over physical conditions surrounding the application of information herein contained, Plaid Enterprises, Inc. disclaims any liability for untoward results.

Important: Please be sure to thoroughly read the instructions for all products, paying particular attention to all cautions and warnings shown to ensure the proper and safe use of the product.

Copyright: All Rights Reserved. No part of this Project may be reproduced in any form without permission in writing, except for your personal use, except by reviewer, who may in reviewing this project, quote brief passages in a magazine or newspaper.

Harvest Harlequin Plaque
New!
Harvest Harlequin Plaque
Gold Studded Pumpkin
New!
Gold Studded Pumpkin
'Boo' Plates
New!
'Boo' Plates
Bat Ornament
New!
Bat Ornament